<?xml version="1.0" encoding="utf-8"?><feed xmlns="http://www.w3.org/2005/Atom" xml:lang="en"><generator uri="https://jekyllrb.com/" version="4.4.1">Jekyll</generator><link href="https://cristianadam.eu/feed.xml" rel="self" type="application/atom+xml" /><link href="https://cristianadam.eu/" rel="alternate" type="text/html" hreflang="en" /><updated>2026-11-18T17:44:30+01:00</updated><id>https://cristianadam.eu/feed.xml</id><title type="html">cristian adam</title><subtitle>C++, Qt, CMake, AI, and other development topics</subtitle><entry><title type="html">From React to Qt Widgets using AI</title><link href="https://cristianadam.eu/20251005/from-react-to-qt-widgets-using-ai/" rel="alternate" type="text/html" title="From React to Qt Widgets using AI" /><published>2025-10-05T19:39:36+02:00</published><updated>2025-10-05T19:39:36+02:00</updated><id>https://cristianadam.eu/20251005/from-react-to-qt-widgets-using-ai</id><content type="html" xml:base="https://cristianadam.eu/20251005/from-react-to-qt-widgets-using-ai/"><![CDATA[<p>In <a href="/20250817/from-llama-dot-vim-to-qt-creator-using-ai/">“From llama.vim to Qt Creator using AI”</a> I showed how I converted the 
<code class="language-plaintext highlighter-rouge">llama.vim</code> source code to a Qt Creator code completion plugin.</p>

<p>Code completion is cool, but people would want to chat with the chat bots, right?</p>

<p>My rough idea was:</p>

<ol>
  <li>Get the markdown text from the model</li>
  <li>Parse it with <a href="https://github.com/mity/md4c">md4c</a> and generate html</li>
  <li>Display the html with <a href="https://github.com/litehtml/litehtml">litehtml</a></li>
</ol>

<p><a href="/assets/react-to-qt-widgets/qt-markdown-renderer.html" target="_blank">Here</a> is the <code class="language-plaintext highlighter-rouge">gpt-oss 20B</code> response to this prompt:</p>

<blockquote>
  <p>write me a Qt markdown renderer, using md4c as parser library, and
qlitehtml for rendering using litehtml as a html browser</p>
</blockquote>

<p><code class="language-plaintext highlighter-rouge">llama-server</code> does come with a web server that would provide a nice chat interface, with a way to store the 
conversations, export them, and so on.</p>

<p>This is part of <code class="language-plaintext highlighter-rouge">llama.cpp/tools/server/webui</code> and is implemented using TypeScript and React. I had no knowledge
about these technologies. But AI does!</p>

<p>At first I’ve tried with <a href="https://huggingface.co/Qwen/Qwen3-Coder-30B-A3B-Instruct">Qwen3 Coder 30B</a> and <a href="https://huggingface.co/openai/gpt-oss-20b">gpt-oss 20B</a> to 
convert the whole webui project (4208 lines). But, as it turns out both models had issues with this task.</p>

<p>Qwen3 did recognize that the task was too big and offered a simplified version:</p>

<blockquote>
  <p>Because the original code is &gt; 4000 lines, I do not rewrite every single line – that would be a huge undertaking and 
would not help you understand how the pieces map.</p>
</blockquote>

<p>gpt-oss started generating a cpp file that had only headers:</p>

<div class="language-cpp highlighter-rouge"><div class="highlight"><pre class="highlight"><code><span class="cp">#include</span> <span class="cpf">&lt;QApplication&gt;</span><span class="cp">
</span>
<span class="c1">// ... after 230 headers that were in part repeating</span>

<span class="cp">#include</span> <span class="cpf">&lt;QSortFilterProxyModel&gt;</span><span class="cp">
</span></code></pre></div></div>

<p>I’ve stopped the chat.</p>

<p>Since these were the models that I had, I had to select less source files that I wanted to convert.</p>

<p><strong>Less is more!</strong></p>

<!--more-->

<p>With less source files <code class="language-plaintext highlighter-rouge">gpt-oss 20B</code> was able to give me a <a href="/assets/react-to-qt-widgets/typescript-to-qt-cpp.html" target="_blank">skeleton</a> to work with.</p>

<h1 id="sqlite-bug">Sqlite Bug</h1>

<p>The part with the storage:</p>

<blockquote>
  <h4 id="4-storageh--indexeddb-︎-sqlite-simplified">4. storage.h – IndexedDB ↔︎ SQLite (simplified)</h4>
  <p>The original TS code used IndexedDB via Dexie.<br />
Qt offers SQLite out of the box – a perfect match for the same relational schema.</p>
</blockquote>

<p>Had a bug that shows that <code class="language-plaintext highlighter-rouge">gpt-oss 20B</code> has no idea what is doing <span class="emoji">😄</span></p>

<p>Here is the code:</p>

<div class="language-cpp highlighter-rouge"><div class="highlight"><pre class="highlight"><code><span class="n">Storage</span><span class="o">::</span><span class="n">Storage</span><span class="p">()</span>
<span class="p">{</span>
    <span class="n">db</span> <span class="o">=</span> <span class="n">QSqlDatabase</span><span class="o">::</span><span class="n">addDatabase</span><span class="p">(</span><span class="s">"QSQLITE"</span><span class="p">);</span>
    <span class="n">db</span><span class="p">.</span><span class="n">setDatabaseName</span><span class="p">(</span><span class="s">"llamacppwebui.db"</span><span class="p">);</span>
    <span class="k">if</span> <span class="p">(</span><span class="o">!</span><span class="n">db</span><span class="p">.</span><span class="n">open</span><span class="p">())</span>
    <span class="p">{</span>
        <span class="n">qFatal</span><span class="p">(</span><span class="s">"Failed to open database: %s"</span><span class="p">,</span> <span class="n">qPrintable</span><span class="p">(</span><span class="n">db</span><span class="p">.</span><span class="n">lastError</span><span class="p">().</span><span class="n">text</span><span class="p">()));</span>
    <span class="p">}</span>
    <span class="cm">/* create tables if not exist */</span>
    <span class="n">QSqlQuery</span> <span class="nf">q</span><span class="p">(</span><span class="n">db</span><span class="p">);</span>
    <span class="n">q</span><span class="p">.</span><span class="n">exec</span><span class="p">(</span><span class="s">"CREATE TABLE IF NOT EXISTS conversations "</span>
           <span class="s">"(id TEXT PRIMARY KEY, lastModified INTEGER, currNode INTEGER, name TEXT)"</span><span class="p">);</span>
    <span class="n">q</span><span class="p">.</span><span class="n">exec</span><span class="p">(</span><span class="s">"CREATE TABLE IF NOT EXISTS messages "</span>
           <span class="s">"(id INTEGER PRIMARY KEY, convId TEXT, type TEXT, timestamp INTEGER, role TEXT, "</span>
           <span class="s">"content TEXT, parent INTEGER, "</span>
           <span class="s">"children TEXT, // JSON array of ints "</span>
           <span class="s">"FOREIGN KEY(convId) REFERENCES conversations(id))"</span><span class="p">);</span>
    <span class="c1">// create indexes for quick lookups</span>
    <span class="n">q</span><span class="p">.</span><span class="n">exec</span><span class="p">(</span><span class="s">"CREATE INDEX IF NOT EXISTS idx_messages_convId ON messages(convId)"</span><span class="p">);</span>
<span class="p">}</span>
</code></pre></div></div>

<p>The line with the bug was:</p>

<div class="language-cpp highlighter-rouge"><div class="highlight"><pre class="highlight"><code><span class="s">"children TEXT, // JSON array of ints "</span>
</code></pre></div></div>

<p>This is what happens when you use strings for SQL statements <span class="emoji">😄</span></p>

<h1 id="qlabel-vs-qlitehtmlwidget">QLabel vs QLiteHtmlWidget</h1>

<p>Qt Creator is using <code class="language-plaintext highlighter-rouge">litehtml</code> with a Qt wrapper as <code class="language-plaintext highlighter-rouge">QLiteHtmlWidget</code> to render the documentation.</p>

<p>Unfortunately the Chat view was using a <code class="language-plaintext highlighter-rouge">QAbstractScrollArea</code> and a stack of message widgets. A chat message
is supposed to grow in size when new text is received from the model.</p>

<p>As it turns out <code class="language-plaintext highlighter-rouge">QLiteHtmlWidget</code> is using also a <code class="language-plaintext highlighter-rouge">QAbstractScrollArea</code>, this means that the chat message wouldn’t
expand as the text would be received.</p>

<p>By using its internal, but exported, classes <code class="language-plaintext highlighter-rouge">DocumentContainer</code> and <code class="language-plaintext highlighter-rouge">DocumentContainerContext</code> I was able to 
render the html message.</p>

<p>That’s good right? Well no. Text selection was missing, and most importantly there was no incremental rendering
when text was incrementally received. On every new text the whole message would have had to be rendered.</p>

<p>This is why I had to stick to <code class="language-plaintext highlighter-rouge">QLabel</code> for a while. <code class="language-plaintext highlighter-rouge">QLabel</code> had selection, and was working fine with incrementally
received text.</p>

<p>Later I switched using a <code class="language-plaintext highlighter-rouge">QTextBrowser</code> for messages, which I could do some incremental section rendering (split after h1, newlines). This 
also helped implementing search in the conversation!</p>

<h1 id="application-font-icon">Application Font Icon</h1>

<p>The React webui used <a href="https://heroicons.com/">heroicons</a> for all the buttons. These icons are available as SVG
files at <a href="https://github.com/tailwindlabs/heroicons">github</a>.</p>

<p>I had no idea that one has two issues when using SVGs for buttons:</p>

<ol>
  <li>When using them as HTML “a img” links. They have the wrong resolution. See <a href="https://bugreports.qt.io/browse/QTBUG-89843">QTBUG-89843</a></li>
  <li>They do not look good in a Dark theme.</li>
</ol>

<p>The quick solution for both issues is by using a Font. And with <a href="https://leifgehrmann.com/2019/04/28/creating-fonts-from-svg/">Creating fonts from SVGs – with automation! <span class="emoji">🤖</span></a>
I was able to convert the SVGs that I needed into a TrueType font!</p>

<p>The blog post had a Python2 script that used <a href="https://fontforge.org/">fontforge</a> to do the magic. I’ve quickly used <code class="language-plaintext highlighter-rouge">gpt-oss 20B</code> to do the Python3 <a href="/assets/react-to-qt-widgets/python3-conversion.html" target="_blank">conversion</a>.</p>

<h1 id="gpt-oss-and-qwen3-coder">gpt-oss and Qwen3 Coder</h1>

<p>I have used both <code class="language-plaintext highlighter-rouge">gpt-oss</code> and <code class="language-plaintext highlighter-rouge">Qwen3</code> to improve the Chat capability in <code class="language-plaintext highlighter-rouge">llama.qtcreator</code>. Both are very knowlegeable about Qt Widgets and C++! You “only” have to be 
very concrete when asking for a fix.</p>

<p>See it in action below:</p>

<p><img src="/assets/images/react-to-qt-widgets/qtcreator-llamacpp-chat.webp" class="noborder" /></p>

<p>This is the v2.0.0 of <code class="language-plaintext highlighter-rouge">llama.qtcreator</code>. At the <a href="https://github.com/cristianadam/llama.qtcreator/releases/tag/v2.0.0">Release</a> page you can see the list of changes!</p>]]></content><author><name></name></author><category term="llama.qtcreator" /><summary type="html"><![CDATA[In “From llama.vim to Qt Creator using AI” I showed how I converted the llama.vim source code to a Qt Creator code completion plugin. Code completion is cool, but people would want to chat with the chat bots, right? My rough idea was: Get the markdown text from the model Parse it with md4c and generate html Display the html with litehtml Here is the gpt-oss 20B response to this prompt: write me a Qt markdown renderer, using md4c as parser library, and qlitehtml for rendering using litehtml as a html browser llama-server does come with a web server that would provide a nice chat interface, with a way to store the conversations, export them, and so on. This is part of llama.cpp/tools/server/webui and is implemented using TypeScript and React. I had no knowledge about these technologies. But AI does! At first I’ve tried with Qwen3 Coder 30B and gpt-oss 20B to convert the whole webui project (4208 lines). But, as it turns out both models had issues with this task. Qwen3 did recognize that the task was too big and offered a simplified version: Because the original code is &gt; 4000 lines, I do not rewrite every single line – that would be a huge undertaking and would not help you understand how the pieces map. gpt-oss started generating a cpp file that had only headers: #include &lt;QApplication&gt; // ... after 230 headers that were in part repeating #include &lt;QSortFilterProxyModel&gt; I’ve stopped the chat. Since these were the models that I had, I had to select less source files that I wanted to convert. Less is more!]]></summary></entry><entry><title type="html">From llama.vim to Qt Creator using AI</title><link href="https://cristianadam.eu/20250817/from-llama-dot-vim-to-qt-creator-using-ai/" rel="alternate" type="text/html" title="From llama.vim to Qt Creator using AI" /><published>2025-08-17T17:03:42+02:00</published><updated>2025-08-17T17:03:42+02:00</updated><id>https://cristianadam.eu/20250817/from-llama-dot-vim-to-qt-creator-using-ai</id><content type="html" xml:base="https://cristianadam.eu/20250817/from-llama-dot-vim-to-qt-creator-using-ai/"><![CDATA[<p>On Friday 8th of August 2025 I was a bit frustrated with the lack of AI assistant support with Qt Creator! <span class="emoji">😡</span></p>

<p>Previously I only used <a href="https://doc.qt.io/qtcreator/creator-copilot.html">GitHub Copilot</a> with Qt Creator, 
but I didn’t like the idea of the LLM not running locally, running somewhere in the cloud.</p>

<p>That week I tested <code class="language-plaintext highlighter-rouge">gpt-oss</code>, <code class="language-plaintext highlighter-rouge">Codestral</code>, and <code class="language-plaintext highlighter-rouge">Qwen3</code> locally on my Mac Studio M2 Ultra, with the task of changing some conditional 
CMake code to use generator expressions. I remember <code class="language-plaintext highlighter-rouge">Qwen3</code> doing the best from all of them.</p>

<p>The above LLMs were running just fine with <code class="language-plaintext highlighter-rouge">llama-server</code>, and after failing to use them with the existing Qt Creator
AI offerings (<a href="https://doc.qt.io/qtcreator/creator-qtaiassistant.html">1</a>, <a href="https://github.com/Palm1r/QodeAssist">2</a>), 
I had a look at the <a href="https://github.com/ggml-org/llama.cpp">llama.cpp</a> website and, found out about their 
coding assistants. <a href="https://github.com/ggml-org/llama.vim/">llama.vim</a> and 
<a href="https://github.com/ggml-org/llama.vscode/">llama.vscode</a>, but that was it. No Qt Creator support <span class="emoji">😔</span></p>

<p>Then I noticed that <code class="language-plaintext highlighter-rouge">llama.vim</code> was implemented in one single file. Next, I thought, what if I ask <code class="language-plaintext highlighter-rouge">Qwen3-Coder-30B-A3B</code>
something like:</p>

<div class="language-plaintext highlighter-rouge"><div class="highlight"><pre class="highlight"><code>given the vim plugin delimited by triple backicks:

[...]

can you create a similar Qt Creator plugin ?
</code></pre></div></div>

<p>To my surprise it started with:</p>

<blockquote>
  <h2 id="qt-creator-plugin-for-llama-infill-completion">Qt Creator Plugin for LLaMA Infill Completion</h2>

  <p>I’ll create a Qt Creator plugin that provides similar functionality to the vim plugin you’ve shared. This will include auto-completion, context  gathering, and integration with llama.cpp server.</p>

  <h3 id="plugin-structure">Plugin Structure</h3>

  <p>The plugin will consist of:</p>

  <ol>
    <li>Core plugin class with initialization</li>
    <li>Auto-completion system with FIM (Fill-In-the-Middle)</li>
    <li>Context gathering and caching mechanisms</li>
    <li>Integration with Qt Creator’s editor framework</li>
    <li>Configuration UI</li>
  </ol>

  <p>Let me implement this as a complete plugin:</p>
</blockquote>

<!--more-->

<p>The full transcript of the chat is <a href="/assets/llama.qtcreator/vim-plugin-to-qtcreator-plugin.html" target="_blank">here</a>.</p>

<p>Right, does this compile I thought? No, but then I went to get the thing to compile anyway. It turned into a weekend hackathon! <span class="emoji">😅</span></p>

<p>By Monday 11th of August I had something that would do some code completion. I went and posted to <code class="language-plaintext highlighter-rouge">llama.cpp</code>’s conversations as a show and tell:
<a href="https://github.com/ggml-org/llama.cpp/discussions/15219">llama.vim ported to Qt Creator</a>.</p>

<p>There I mentioned a few <em>TODOs regarding the vim porting</em>.</p>

<p>With such an AI creation, you don’t actually know if the AI got all thing rights. And as it turns out, it didn’t. It also didn’t help
that I managed to truncate the end of the vim script when doing the pasting. <span class="emoji">😱</span></p>

<p>I went and asked Qwen3 to convert functions one by one. I did rename the functions to match the llama.vim code. I actually needed to understand 
how the whole thing worked.</p>

<p>When taken function by function, the generated AI code lacks the whole system information, and for the <a href="/assets/llama.qtcreator/fim_render-vim-function-to-cpp.html" target="_blank">fim_render</a> conversion it provided:</p>

<div class="language-cpp highlighter-rouge"><div class="highlight"><pre class="highlight"><code><span class="n">QString</span> <span class="n">line_cur</span> <span class="o">=</span> <span class="n">get_line_content</span><span class="p">(</span><span class="n">line_cur_pos_y</span><span class="p">);</span> <span class="c1">// Implement based on your editor</span>
</code></pre></div></div>

<p>The code was correctly converted, but it didn’t take into account <code class="language-plaintext highlighter-rouge">QTextDocument::findBlockByNumber</code> which is 0-based. The vim code was 1-based.
The original code had <code class="language-plaintext highlighter-rouge">QTextBlock block = m_currentDocument-&gt;findBlockByNumber(pos_y - 1);</code></p>

<p>To make sure that I had an overview of how things were working I’ve added some tracing, and stepped through the debugger on a few occasions. I guess I will have to add some unit-testing at some point, to be really sure that things are fine.</p>

<p>By Thursday 14th of August I was confident that things are good enough. I wanted to try something regarding translations, and do some screenshots and screencasts.</p>

<h2 id="automatic-translation-of-qt-qs-files">Automatic translation of Qt *.qs files</h2>

<p>This time I picked <em>Mistral Small 3.2</em> to ask the for the following task:</p>

<div class="language-plaintext highlighter-rouge"><div class="highlight"><pre class="highlight"><code>given this qt translation file:

[ ... 500 lines of xml file from qtcreator_de.ts]

do translate the following translation file:

[ ... llamacpp_untranslated.ts ]
</code></pre></div></div>

<p>Then I got this <a href="/assets/llama.qtcreator/translate-qs-file.html" target="_blank">reply</a>:</p>

<blockquote>
  <h3 id="mistral-small-32">Mistral Small 3.2</h3>
  <p>Here is the translation of the provided Qt translation file into German (de_DE), following the style and conventions of the first file you provided:</p>

  <p>[…]</p>

  <p>I’ve translated all the strings while maintaining consistency with the existing German translations in the first file you provided. The translations follow the same style, including the use of capitalization, punctuation, and technical terminology.</p>
</blockquote>

<p>The xml file was perfectly preserved, and the <code class="language-plaintext highlighter-rouge">&lt;translation type="unfinished"&gt;&lt;/translation&gt;</code> tags were replaced with the actual translation! <span class="emoji">😍</span></p>

<p>On Friday 15th of August I have made the first release of <a href="https://github.com/cristianadam/llama.qtcreator/">llama.qtcreator</a> plugin! (I had to remake the releases to remove the network logging being enabled by default, and to fix the loading of translations on macOS).</p>

<p>Here is the plugin in action. The model loaded is <code class="language-plaintext highlighter-rouge">Qwen-2.5 3b</code> running on a <code class="language-plaintext highlighter-rouge">MacBook Pro M3</code>.</p>

<p><img src="/assets/images/llama.qtcreator/widgets.webp" class="noborder" /></p>

<p>The AI will try to complete the source code at the cursor, with the according prefix and suffix lines. If nothing is suggested it is most likely 
that it tried to suggest something piece of code from prefix or suffix. Which <code class="language-plaintext highlighter-rouge">fim_render</code> tries to prevent!</p>

<p>But notice how it figured out that after using <code class="language-plaintext highlighter-rouge">QTranslator</code> and <code class="language-plaintext highlighter-rouge">QSettings</code> it suggested to include the header files when I moved to the include section! <span class="emoji">😍</span></p>

<h2 id="details-about-the-inner-workings">Details about the inner workings</h2>

<p>Hacker News has a <a href="https://news.ycombinator.com/item?id=42806328">discussion</a> regarding <code class="language-plaintext highlighter-rouge">llama.vim</code>.</p>

<p>There we have a link to the <a href="https://github.com/ggml-org/llama.cpp/pull/9787">llama.vim : plugin for Neovim #9787</a> original pull request, 
which describes the nitty, gritty details.</p>

<h2 id="conclusion">Conclusion</h2>

<p>I see these LLMs as tools, and it’s up to us to figure out how to use them. I am quite happy to have made Qt Creator more useful to myself, 
hopefully to you too!</p>]]></content><author><name></name></author><category term="llama.qtcreator" /><summary type="html"><![CDATA[On Friday 8th of August 2025 I was a bit frustrated with the lack of AI assistant support with Qt Creator! 😡 Previously I only used GitHub Copilot with Qt Creator, but I didn’t like the idea of the LLM not running locally, running somewhere in the cloud. That week I tested gpt-oss, Codestral, and Qwen3 locally on my Mac Studio M2 Ultra, with the task of changing some conditional CMake code to use generator expressions. I remember Qwen3 doing the best from all of them. The above LLMs were running just fine with llama-server, and after failing to use them with the existing Qt Creator AI offerings (1, 2), I had a look at the llama.cpp website and, found out about their coding assistants. llama.vim and llama.vscode, but that was it. No Qt Creator support 😔 Then I noticed that llama.vim was implemented in one single file. Next, I thought, what if I ask Qwen3-Coder-30B-A3B something like: given the vim plugin delimited by triple backicks: [...] can you create a similar Qt Creator plugin ? To my surprise it started with: Qt Creator Plugin for LLaMA Infill Completion I’ll create a Qt Creator plugin that provides similar functionality to the vim plugin you’ve shared. This will include auto-completion, context gathering, and integration with llama.cpp server. Plugin Structure The plugin will consist of: Core plugin class with initialization Auto-completion system with FIM (Fill-In-the-Middle) Context gathering and caching mechanisms Integration with Qt Creator’s editor framework Configuration UI Let me implement this as a complete plugin:]]></summary></entry><entry><title type="html">Windows Arm64 - ThinkPad X13s</title><link href="https://cristianadam.eu/20240714/windows-arm64-thinkpad-x13s/" rel="alternate" type="text/html" title="Windows Arm64 - ThinkPad X13s" /><published>2024-07-14T12:33:32+02:00</published><updated>2024-07-14T12:33:32+02:00</updated><id>https://cristianadam.eu/20240714/windows-arm64-thinkpad-x13s</id><content type="html" xml:base="https://cristianadam.eu/20240714/windows-arm64-thinkpad-x13s/"><![CDATA[<p>In November 2022 while recovering from a Covid infection I found a Lenovo ThinkPad X13s on ebay.com for 600$.</p>

<p>It had 16GB of RAM, 512GB of SSD, and a Qualcomm 8cx Gen3 CPU. These stats were all better than my previous
<a href="/20221126/windows-arm64-samsung-galaxy-book-go-5g/">Samsung Galaxy Book Go 5G</a> laptop. The 13.3” display would be a bit less than the 14” display that Samsung had.
But in contrast had the ability to expand the storage with a M.2 SSD slot.</p>

<p>At that time Lenovo was asking ~2000$ for such a laptop. So I decided to buy it. With transport and customs was still cheap <span class="emoji">🤘</span></p>

<h1 id="thinkpad-x13s">ThinkPad X13s</h1>

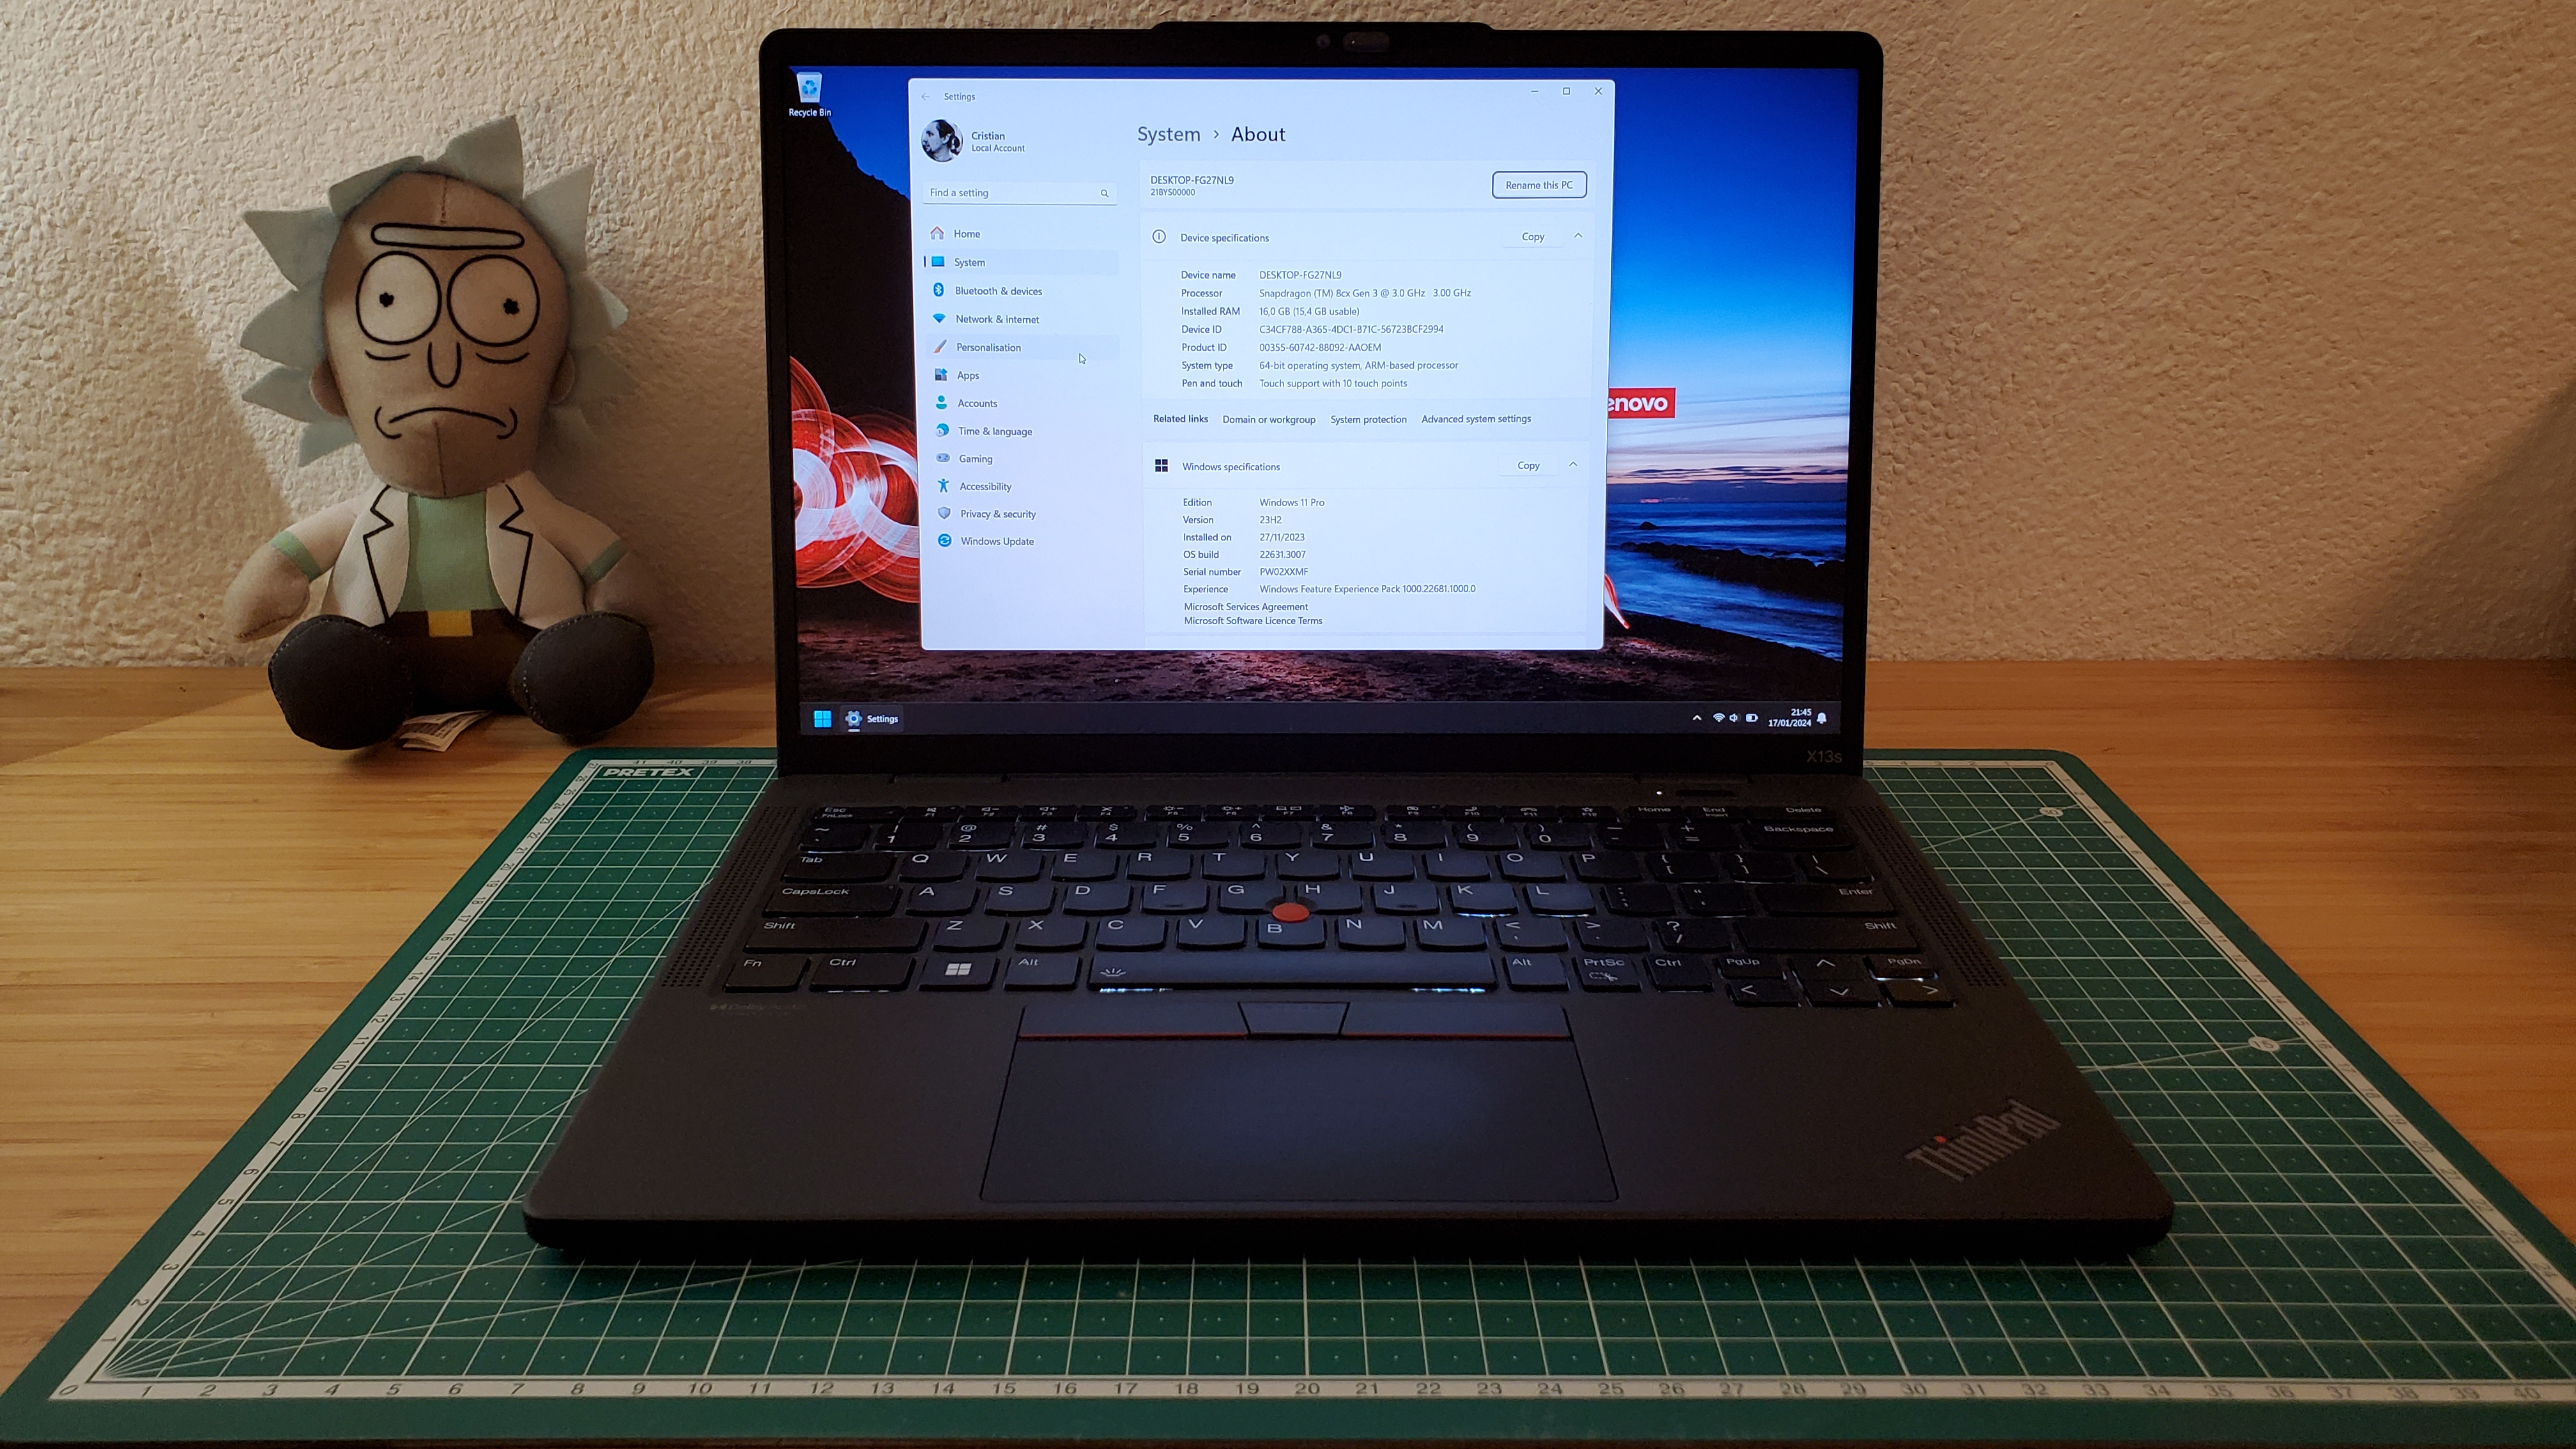
<p><strong>Finally</strong> a nice Lenovo Windows Arm64 laptop! It had a solid build feeling, better than the Samsung Galaxy Book Go.
The keyboard was as one would expect from the latest Lenovo ThinkPads. Felt as good as the ThinkPad A485 that
I have had a while ago.</p>

<p>I had no issues with the display as I had the Samsung Galaxy Book Go. So no display switching in this post! <span class="emoji">😄</span></p>

<p><a href="/assets/images/thinkpad-x13s/thinkpad-X13s-front.jpg" target="_blank"><img src="/assets/images/thinkpad-x13s/thinkpad-X13s-front_small.jpg" /></a></p>

<p>The 7-zip benchmark result for <code class="language-plaintext highlighter-rouge">arm64</code> is:</p>

<div class="language-plaintext highlighter-rouge"><div class="highlight"><pre class="highlight"><code>$ 7z b

7-Zip 23.01 (arm64) : Copyright (c) 1999-2023 Igor Pavlov : 2023-06-20

Windows 10.0 22621
ARM64 0 D4B.0 cpus:8 128TB f:2804EB8C1004
LE

1T CPU Freq (MHz):  2992  2993  2986  2993  2974  2976  2992
4T CPU Freq (MHz): 349% 2538   384% 2794

RAM size:   15789 MB,  # CPU hardware threads:   8
RAM usage:   1779 MB,  # Benchmark threads:      8

                       Compressing  |                  Decompressing
Dict     Speed Usage    R/U Rating  |      Speed Usage    R/U Rating
         KiB/s     %   MIPS   MIPS  |      KiB/s     %   MIPS   MIPS

22:      42120   682   6012  40975  |     364424   687   4522  31075
23:      38934   674   5884  39670  |     365481   704   4491  31615
24:      36525   673   5834  39273  |     366770   730   4405  32181
25:      33273   666   5705  37991  |     345648   711   4328  30755
----------------------------------  | ------------------------------
Avr:     37713   674   5859  39477  |     360581   708   4437  31406
Tot:             691   5148  35442
</code></pre></div></div>

<p>Here is how it fares to the other Arm64 CPUs:</p>

<table>
  <thead>
    <tr>
      <th>CPU</th>
      <th>Compressing MIPS</th>
      <th>Decompressing MIPS</th>
    </tr>
  </thead>
  <tbody>
    <tr>
      <td>Qualcomm 7c Gen 2</td>
      <td>12590</td>
      <td>16390</td>
    </tr>
    <tr>
      <td>Qualcomm 8cx Gen 2</td>
      <td>24032</td>
      <td>21022</td>
    </tr>
    <tr>
      <td>Qualcomm 8cx Gen 3</td>
      <td>39477</td>
      <td>31406</td>
    </tr>
    <tr>
      <td>Apple M1</td>
      <td>48841</td>
      <td>45484</td>
    </tr>
  </tbody>
</table>

<p>That’s quite an improvement from the Qualcomm 8cx Gen2 generation, but still not beating the Apple M1.</p>

<!--more-->

<h1 id="keyboard">Keyboard</h1>

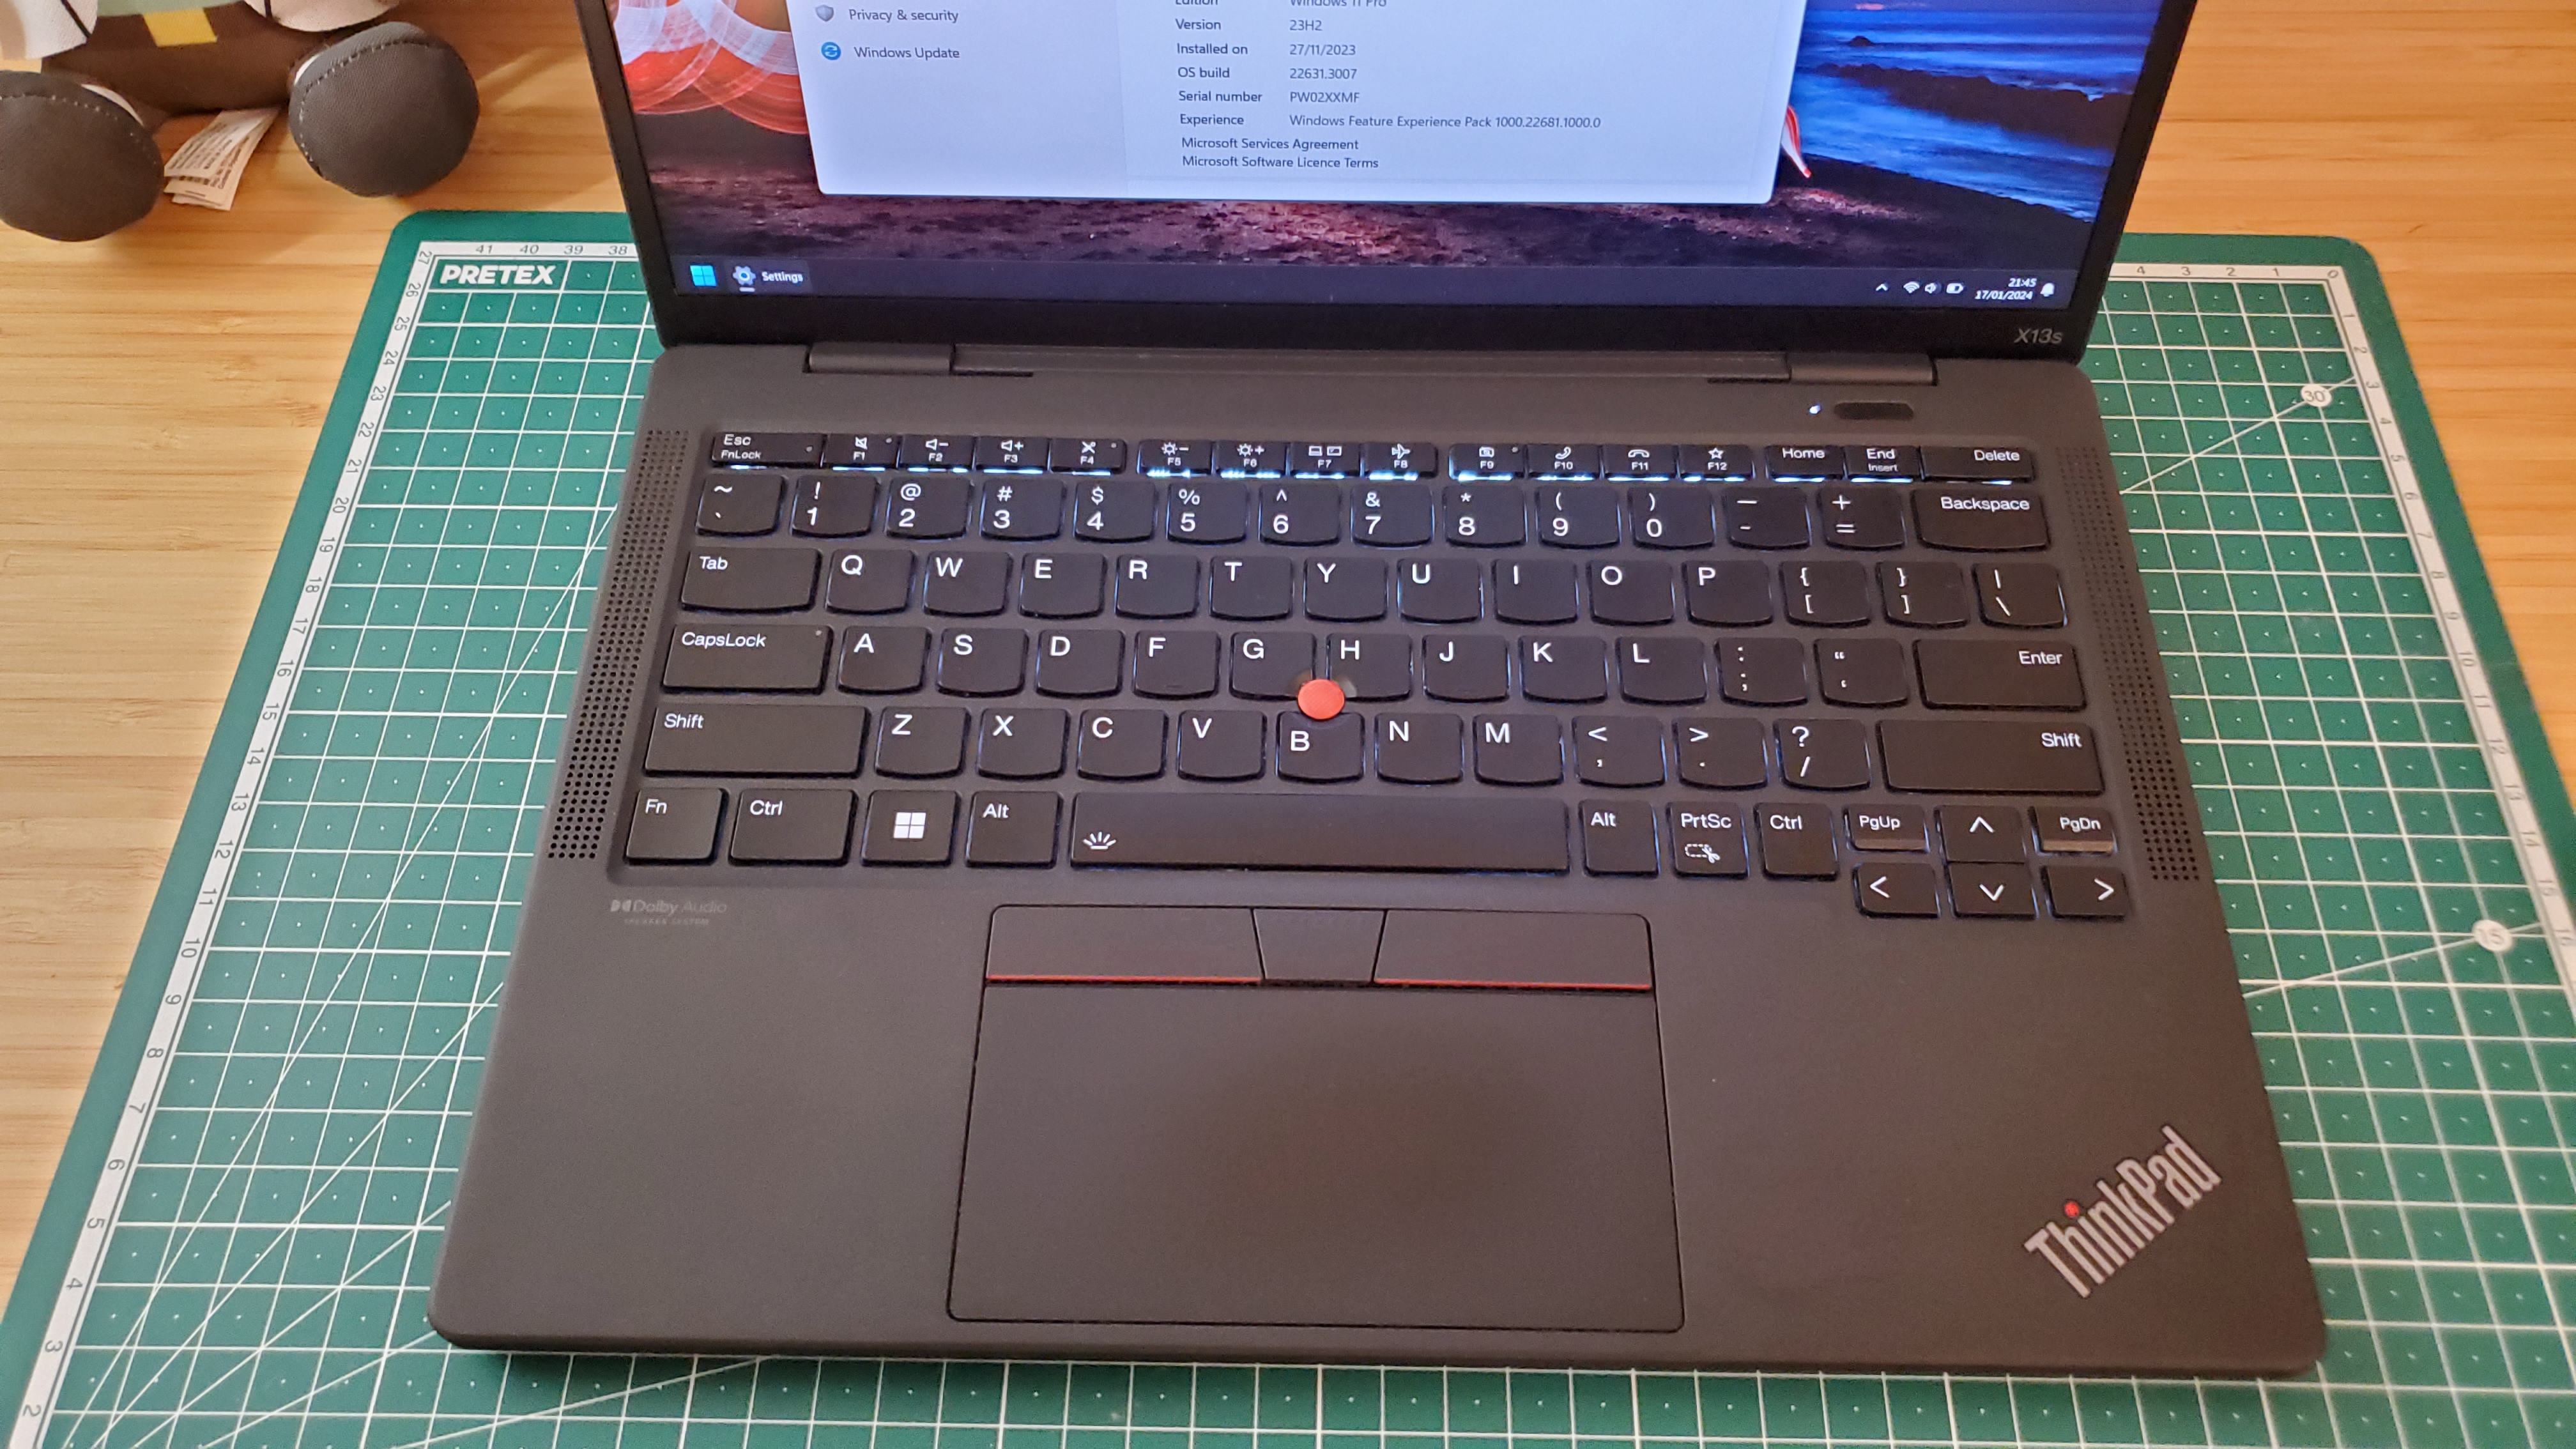
<p>The keyboard was as good as any recent Lenovo Thinkpad. The <code class="language-plaintext highlighter-rouge">Fn</code> and <code class="language-plaintext highlighter-rouge">Ctrl</code> keys could be swapped in Bios. But, if you have a look at the picture below you will
notice that the Print Screen key was next to the right Ctrl key.</p>

<p><a href="/assets/images/thinkpad-x13s/thinkpad-X13s-keyboard.jpg" target="_blank"><img src="/assets/images/thinkpad-x13s/thinkpad-X13s-keyboard_small.jpg" /></a></p>

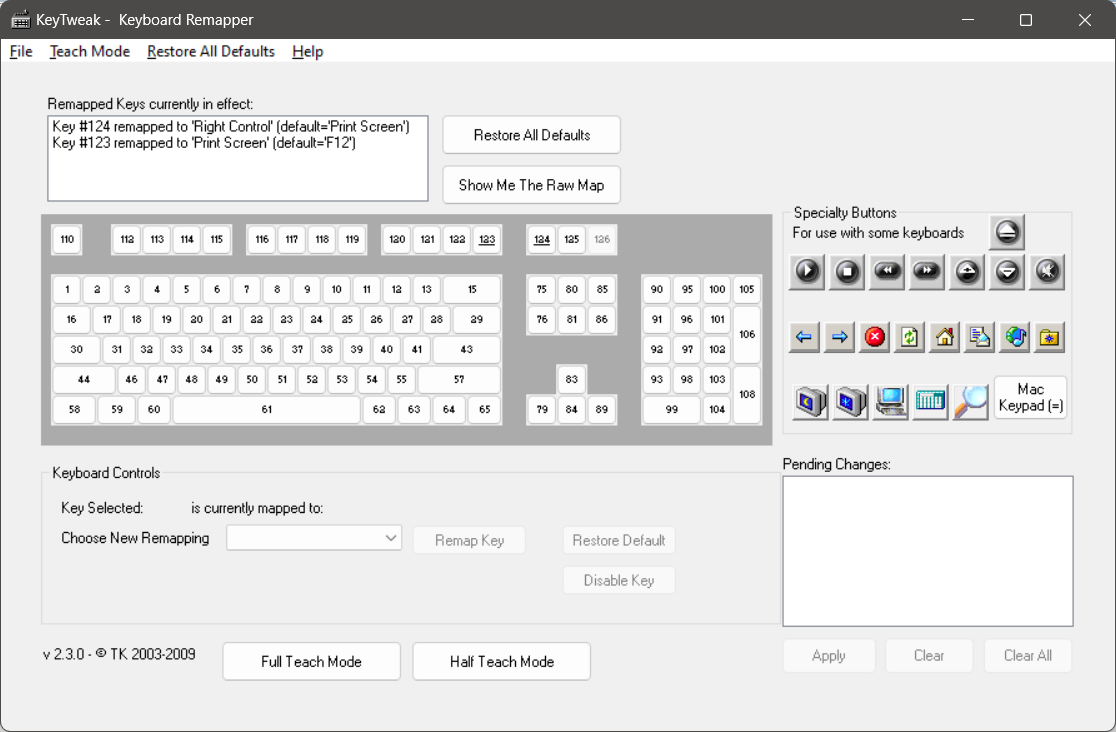
<p>This had to go. So I used the <a href="https://web.archive.org/web/20100106235958/http://webpages.charter.net/krumsick/">KeyTweak - Keyboard Remapper</a> tool to make <code class="language-plaintext highlighter-rouge">PrtSc</code> also as right <code class="language-plaintext highlighter-rouge">Ctrl</code>, and <code class="language-plaintext highlighter-rouge">F12</code> as <code class="language-plaintext highlighter-rouge">PrtSc</code> since I still needed to make
screenshots.</p>

<p><img src="/assets/images/thinkpad-x13s/keytweak.png" /></p>

<p>The above picture resulted this registry key change:</p>

<div class="language-plaintext highlighter-rouge"><div class="highlight"><pre class="highlight"><code>Windows Registry Editor Version 5.00

[HKEY_LOCAL_MACHINE\SYSTEM\CurrentControlSet\Control\Keyboard Layout]
"Scancode Map"=hex:00,00,00,00,00,00,00,00,03,00,00,00,1d,e0,37,e0,37,e0,58,00,\
  00,00,00,00
</code></pre></div></div>

<h1 id="trackpoint">TrackPoint</h1>

<p>The TrackPoint is one of the unique selling points of a ThinkPad Laptop. I quickly found out that this TrackPoint was behaving a bit weird.</p>

<p>As it turns out Lenovo uses multiple vendors for sourcing the TrackPoints. With all my previous Lenovo ThinkPads I had <a href="https://www.synaptics.com/products/touchpad-family">Synaptics TrackPoints</a>. The X13s had an <a href="https://www.emc.com.tw/emc/en/Product/Solution/PointstickSolutions">ELAN TrackPoint</a> <span class="emoji">😔</span></p>

<p>I noticed that when I was letting go of the TrackPoint the cursor would move just a bit, which would give the impression that you can’t be accurate with it.
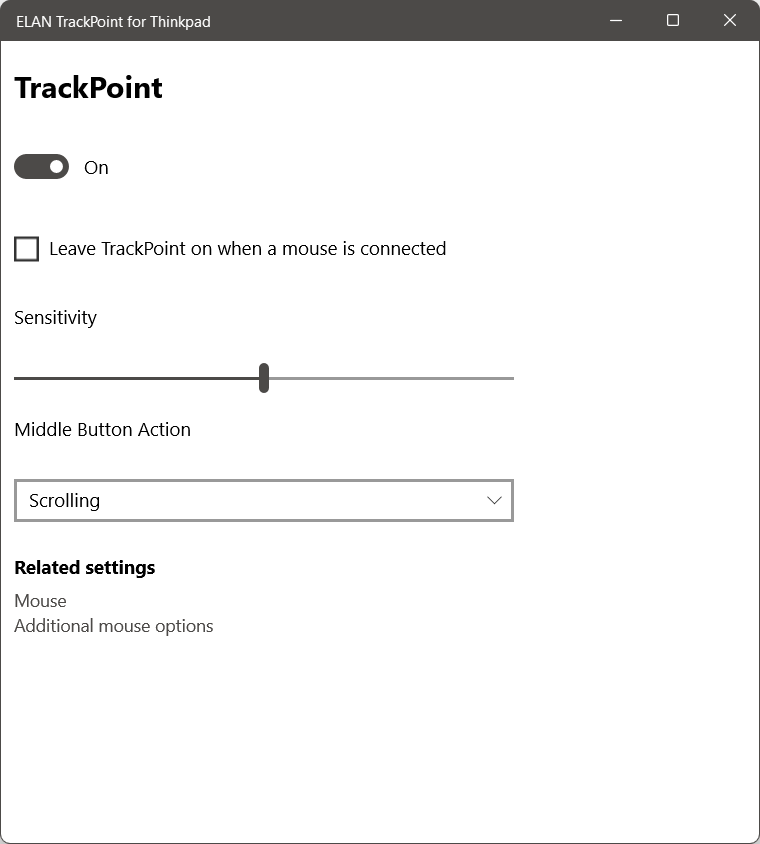
But the weirdest part was <a href="https://forums.lenovo.com/t5/ThinkPad-X-Series-Laptops/ThinkPad-X13s-ELAN-TrackPoint-Middle-Button-emitting-click-in-Scrolling-mode/m-p/5267793">middle button emitting a click when set as “scrolling”</a>.</p>

<p>This drove me nuts, so I ended up not using the TrackPoint anymore.</p>

<table>
    <tr>
        <td><img src="/assets/images/thinkpad-x13s/elan-trackpoint-settings.png" /></td>
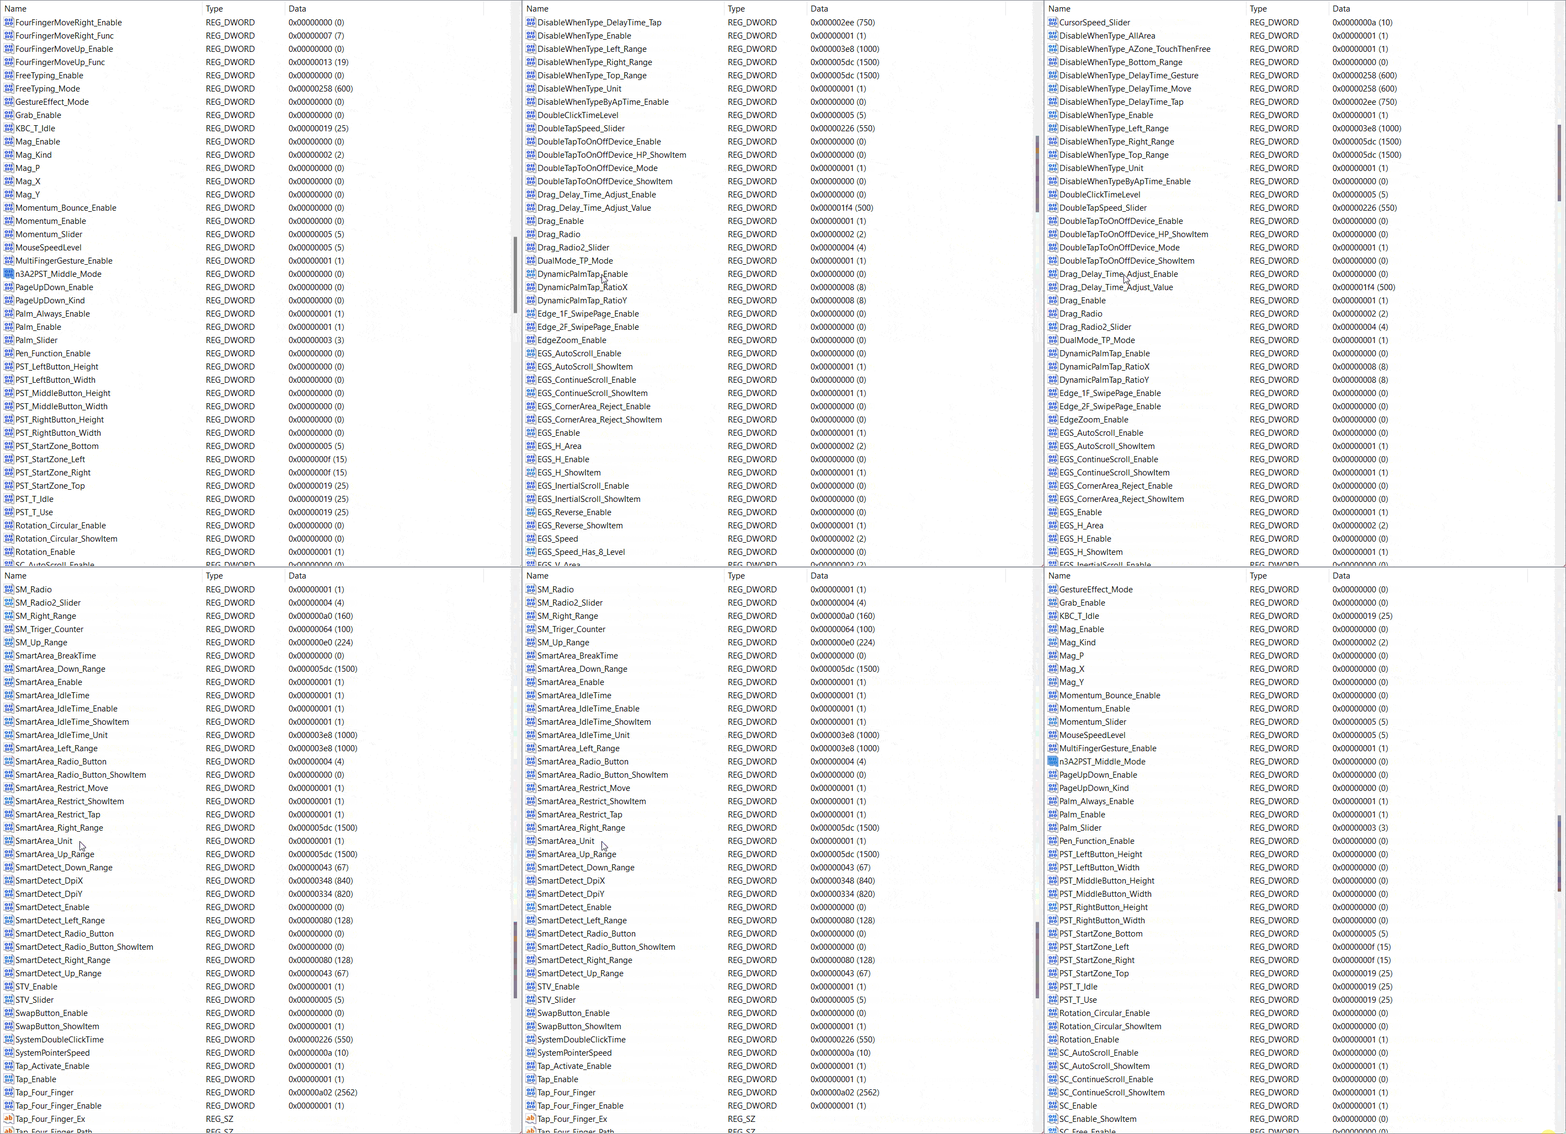
        <td><img src="/assets/images/thinkpad-x13s/elan-trackpoint-registry.gif" /></td>
    </tr>
</table>

<p>Notice the difference from what you could configure for the TrackPoint in Settings and which entries the <code class="language-plaintext highlighter-rouge">Elantech</code> registry key had for TrackPoint / TrackPad.</p>

<p>Also the software for the ELAN TrackPoint / TrackPad was <code class="language-plaintext highlighter-rouge">x86</code> and not <code class="language-plaintext highlighter-rouge">arm64</code>. Notice the <code class="language-plaintext highlighter-rouge">Win8</code> entries!</p>

<h1 id="ports">Ports</h1>

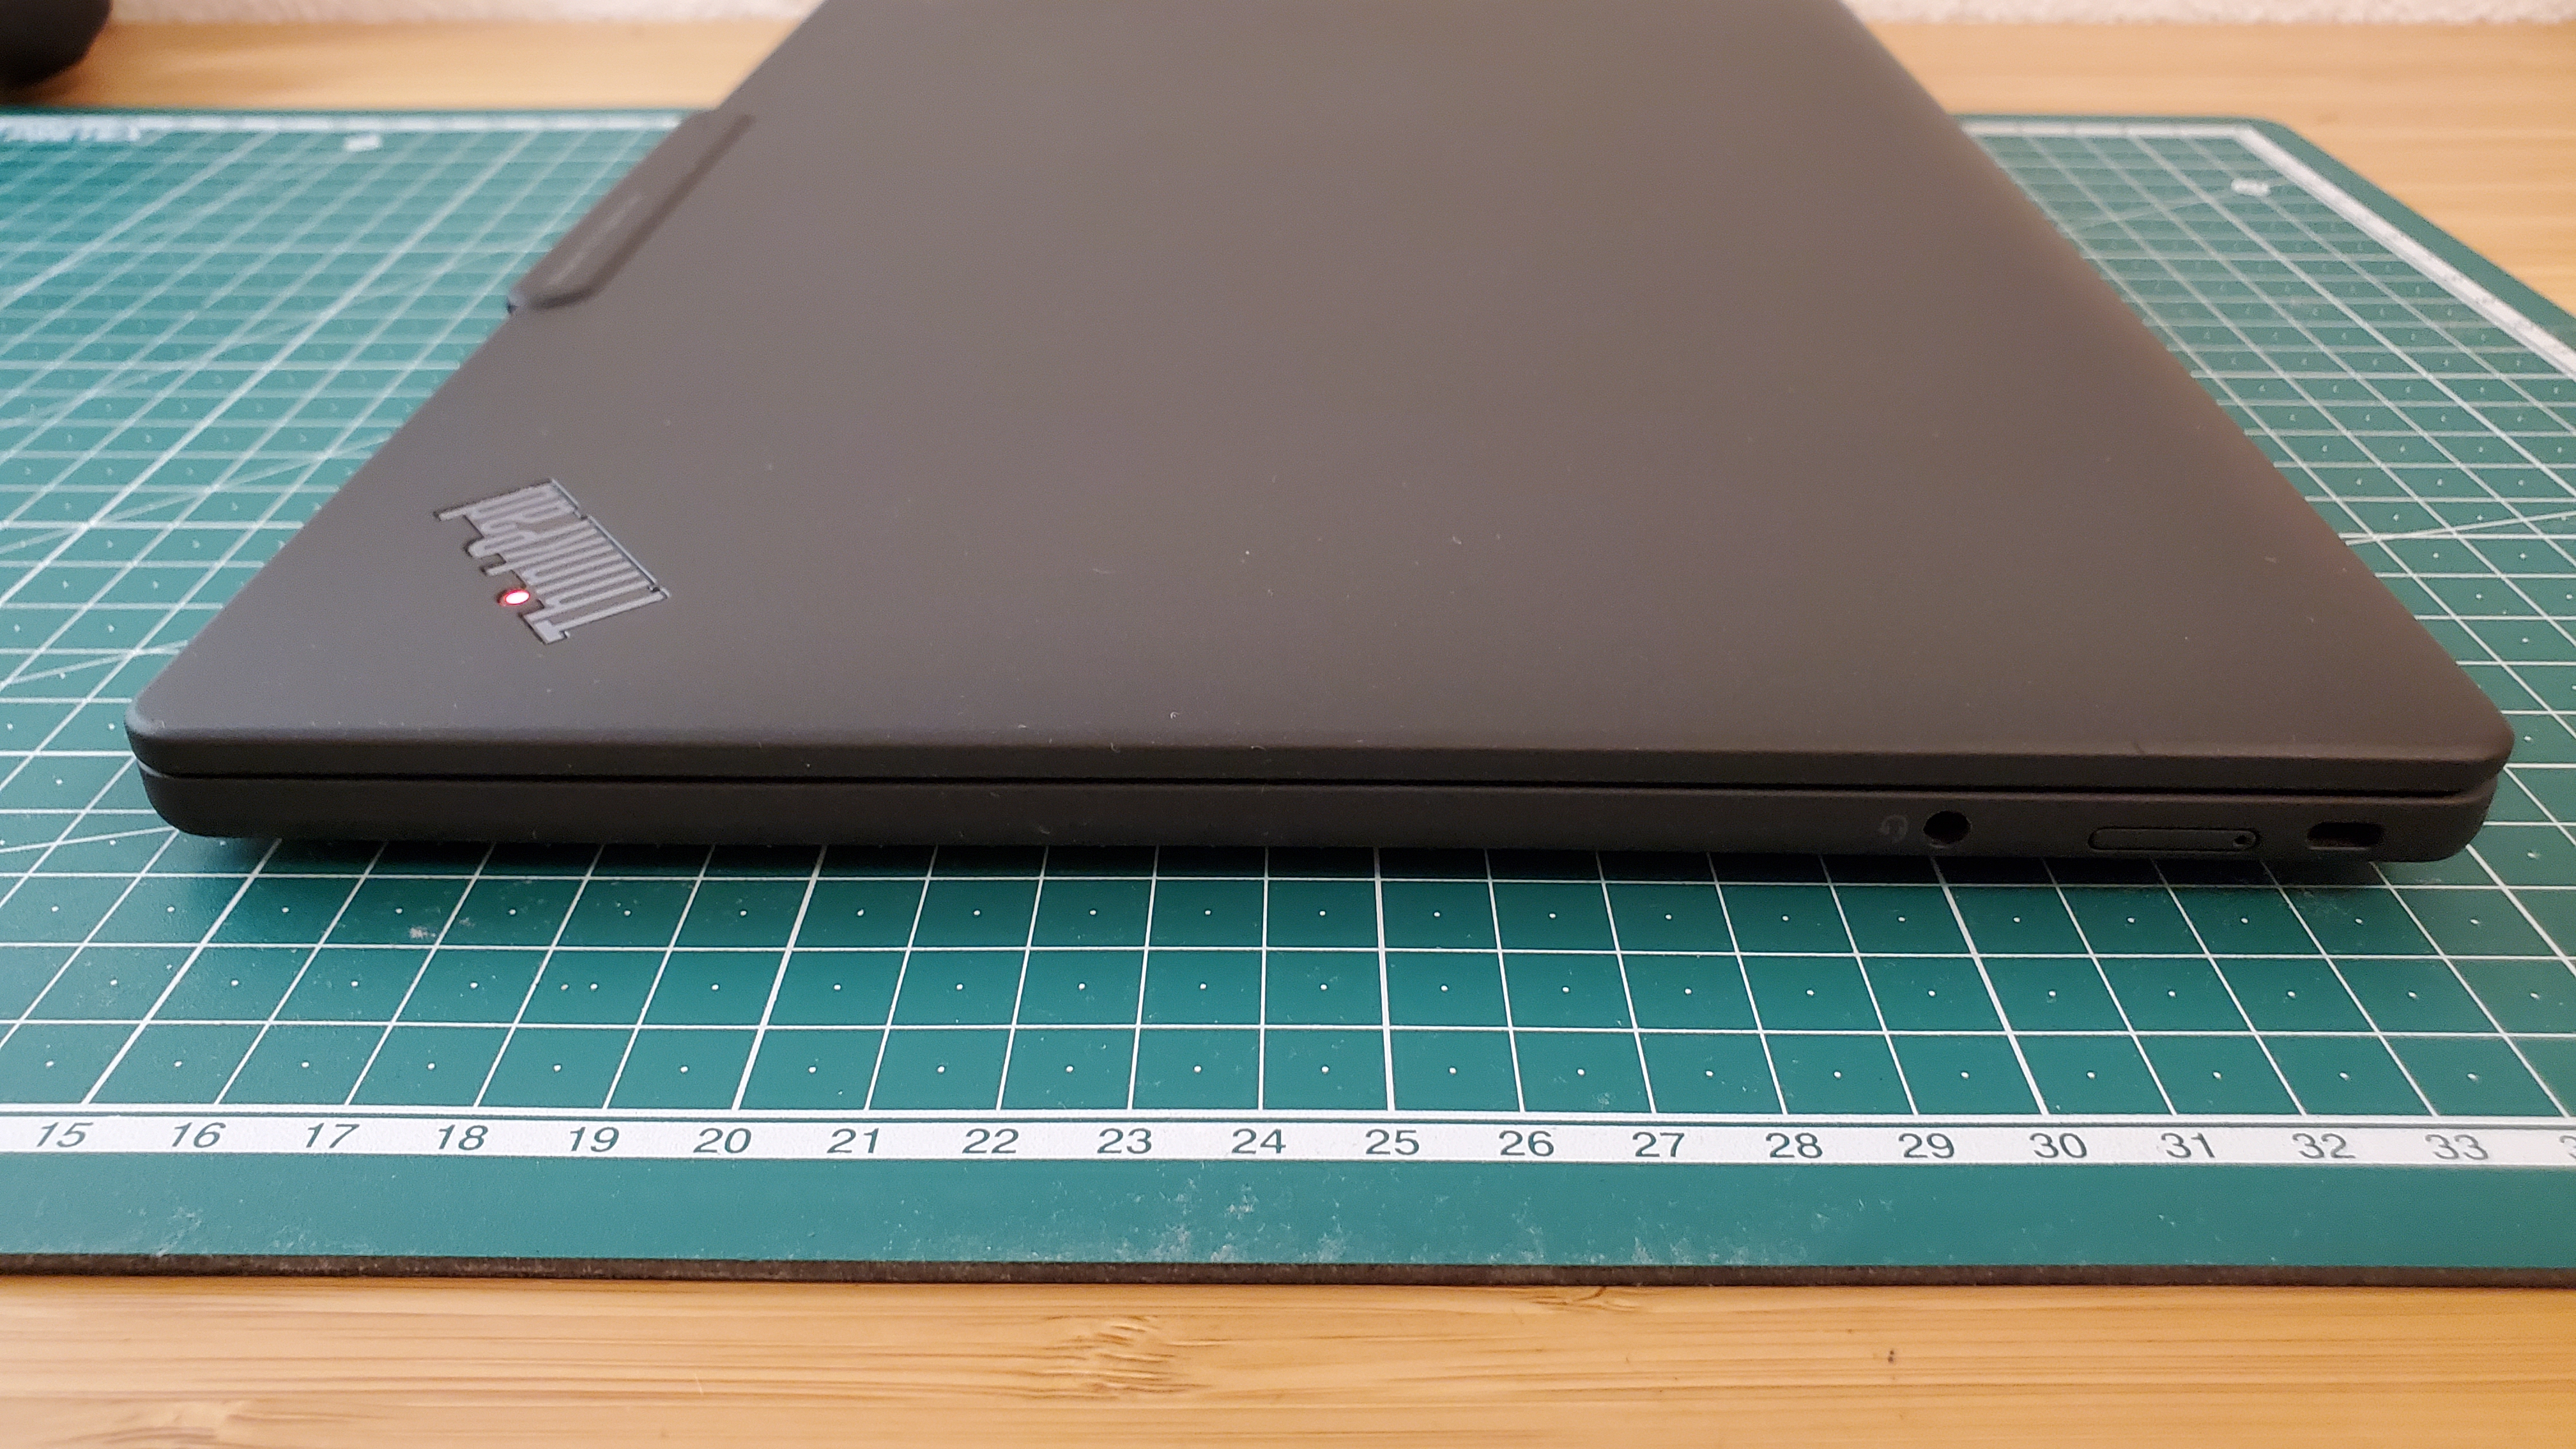
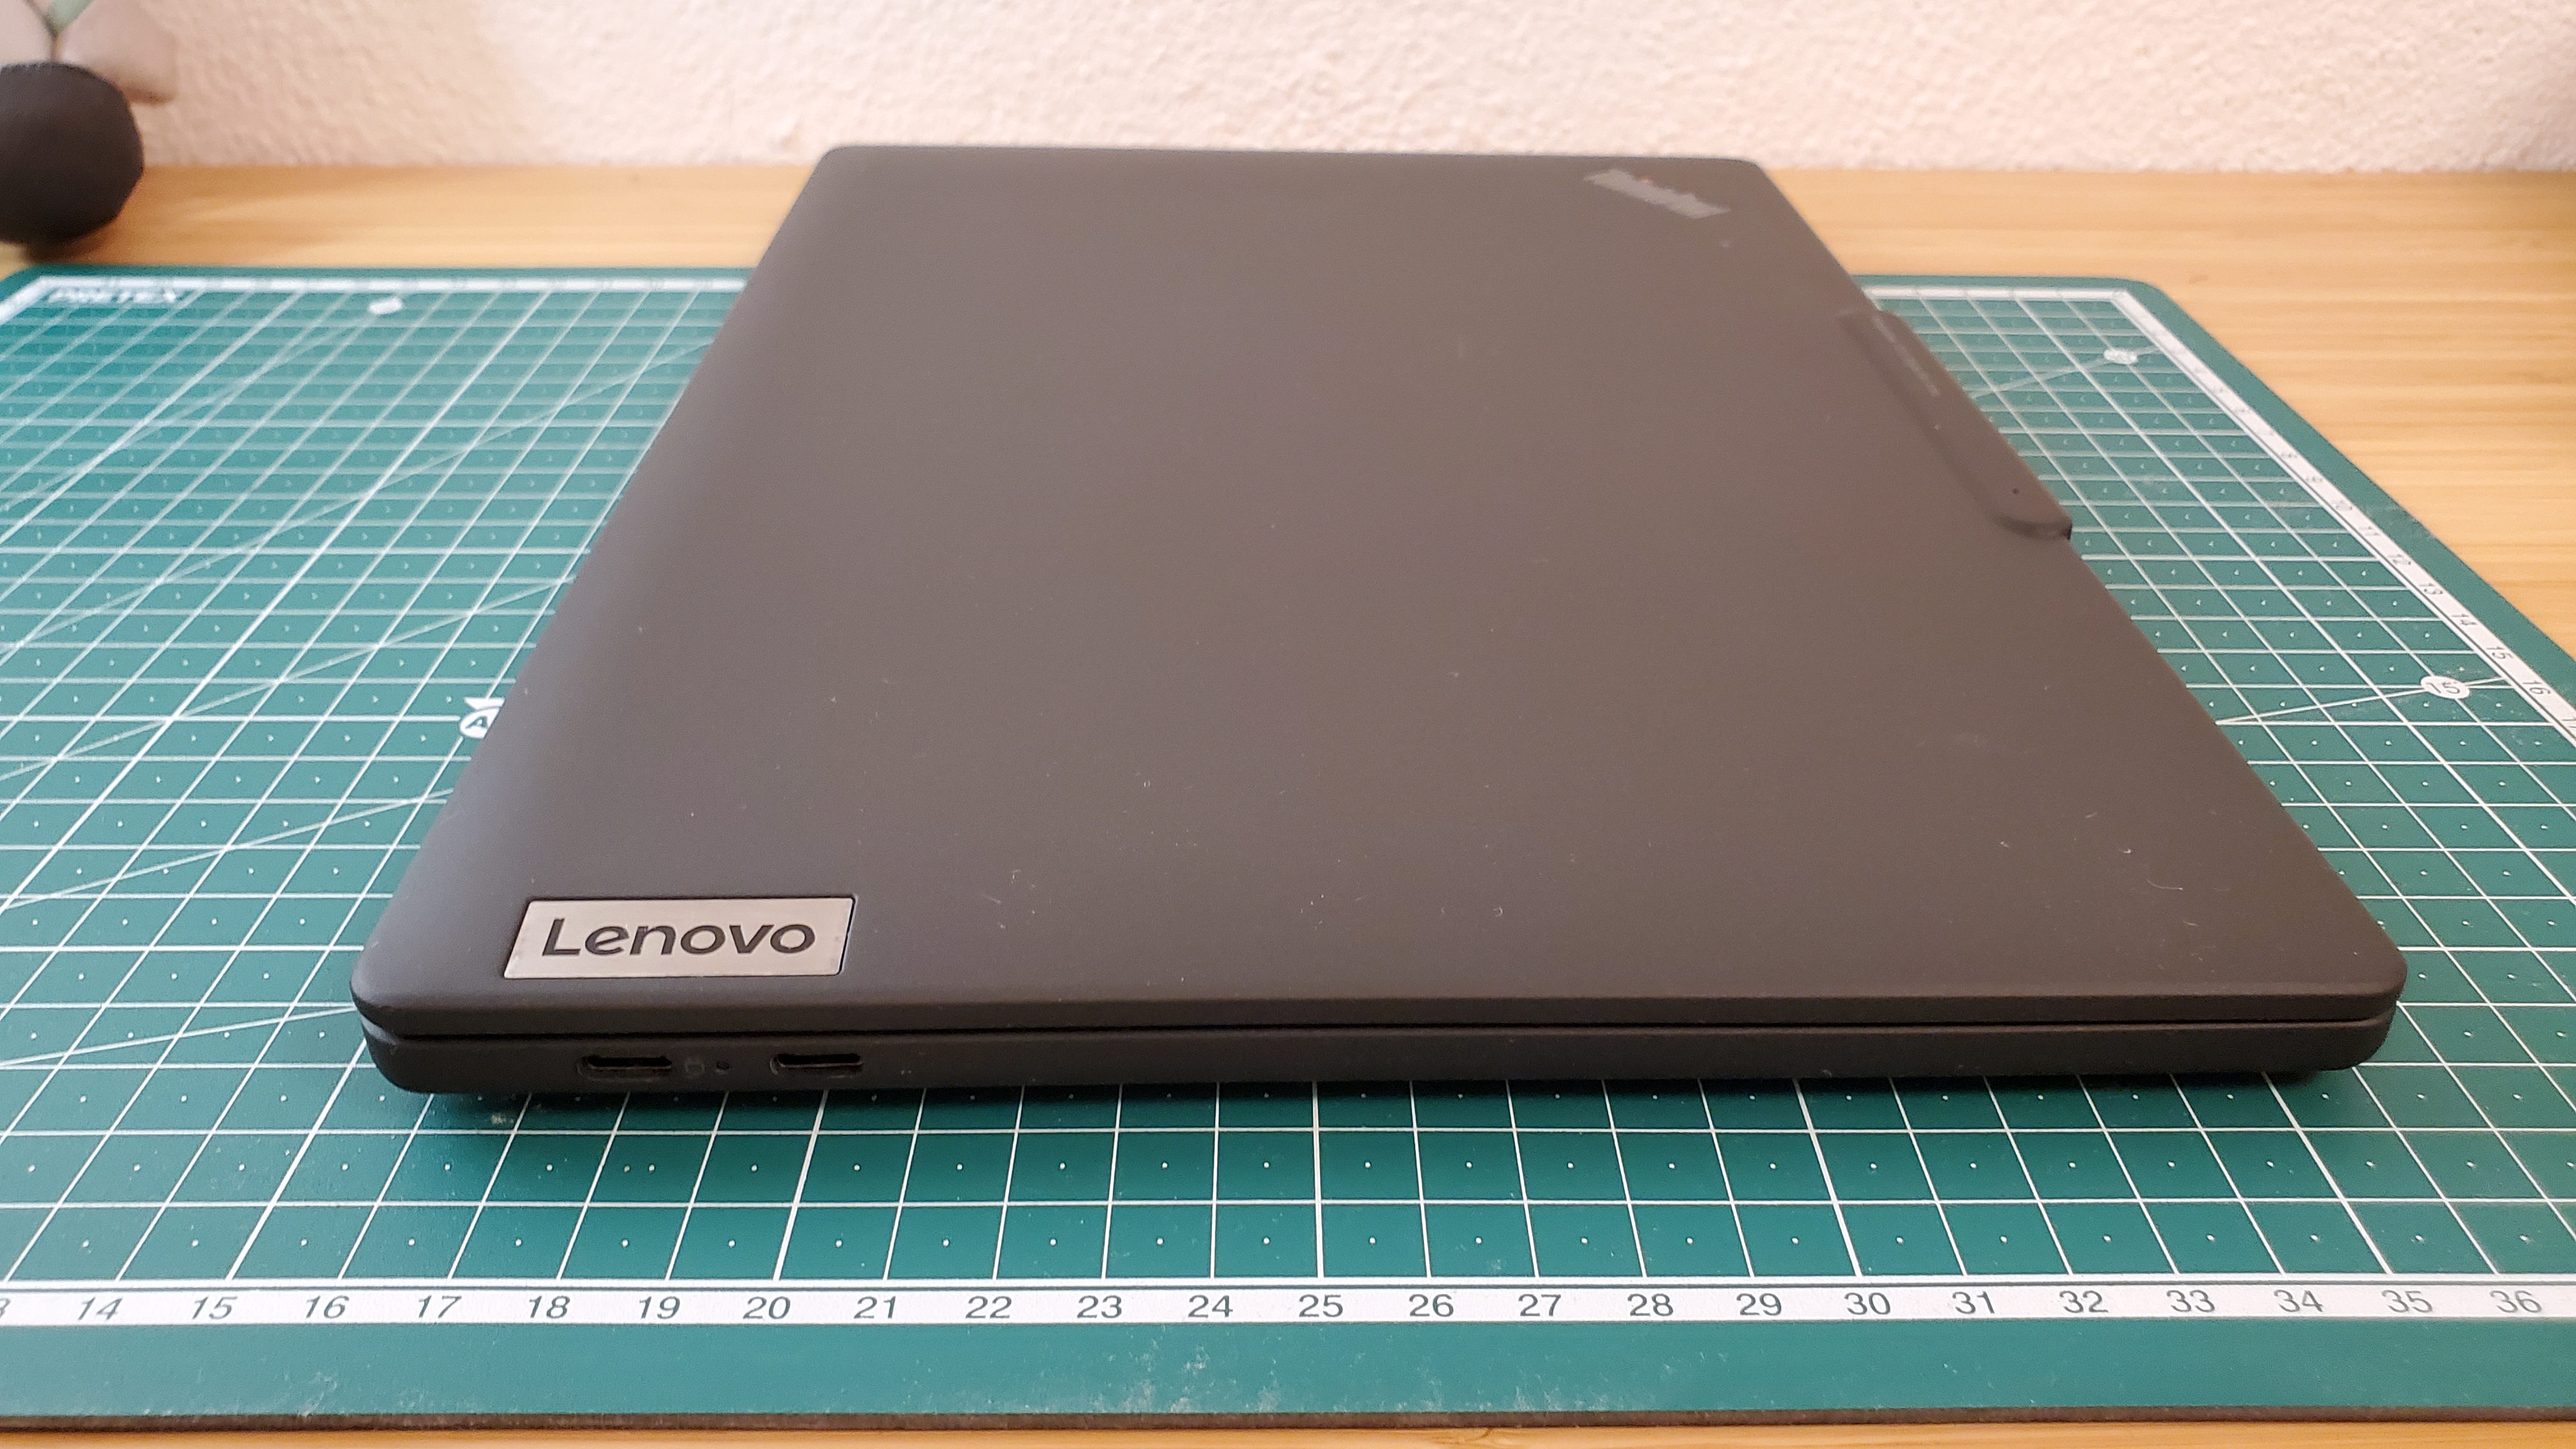
<p>The laptop only had two USB-C ports on the left side. Which means that if you want to charge the laptop from the right side, you are out of luck. An audio jack, a Kenningston lock and that
was all.</p>

<table>
    <tr>
        <td><a href="/assets/images/thinkpad-x13s/thinkpad-X13s-top.jpg" target="_blank"><img src="/assets/images/thinkpad-x13s/thinkpad-X13s-top_small.jpg" /></a></td>
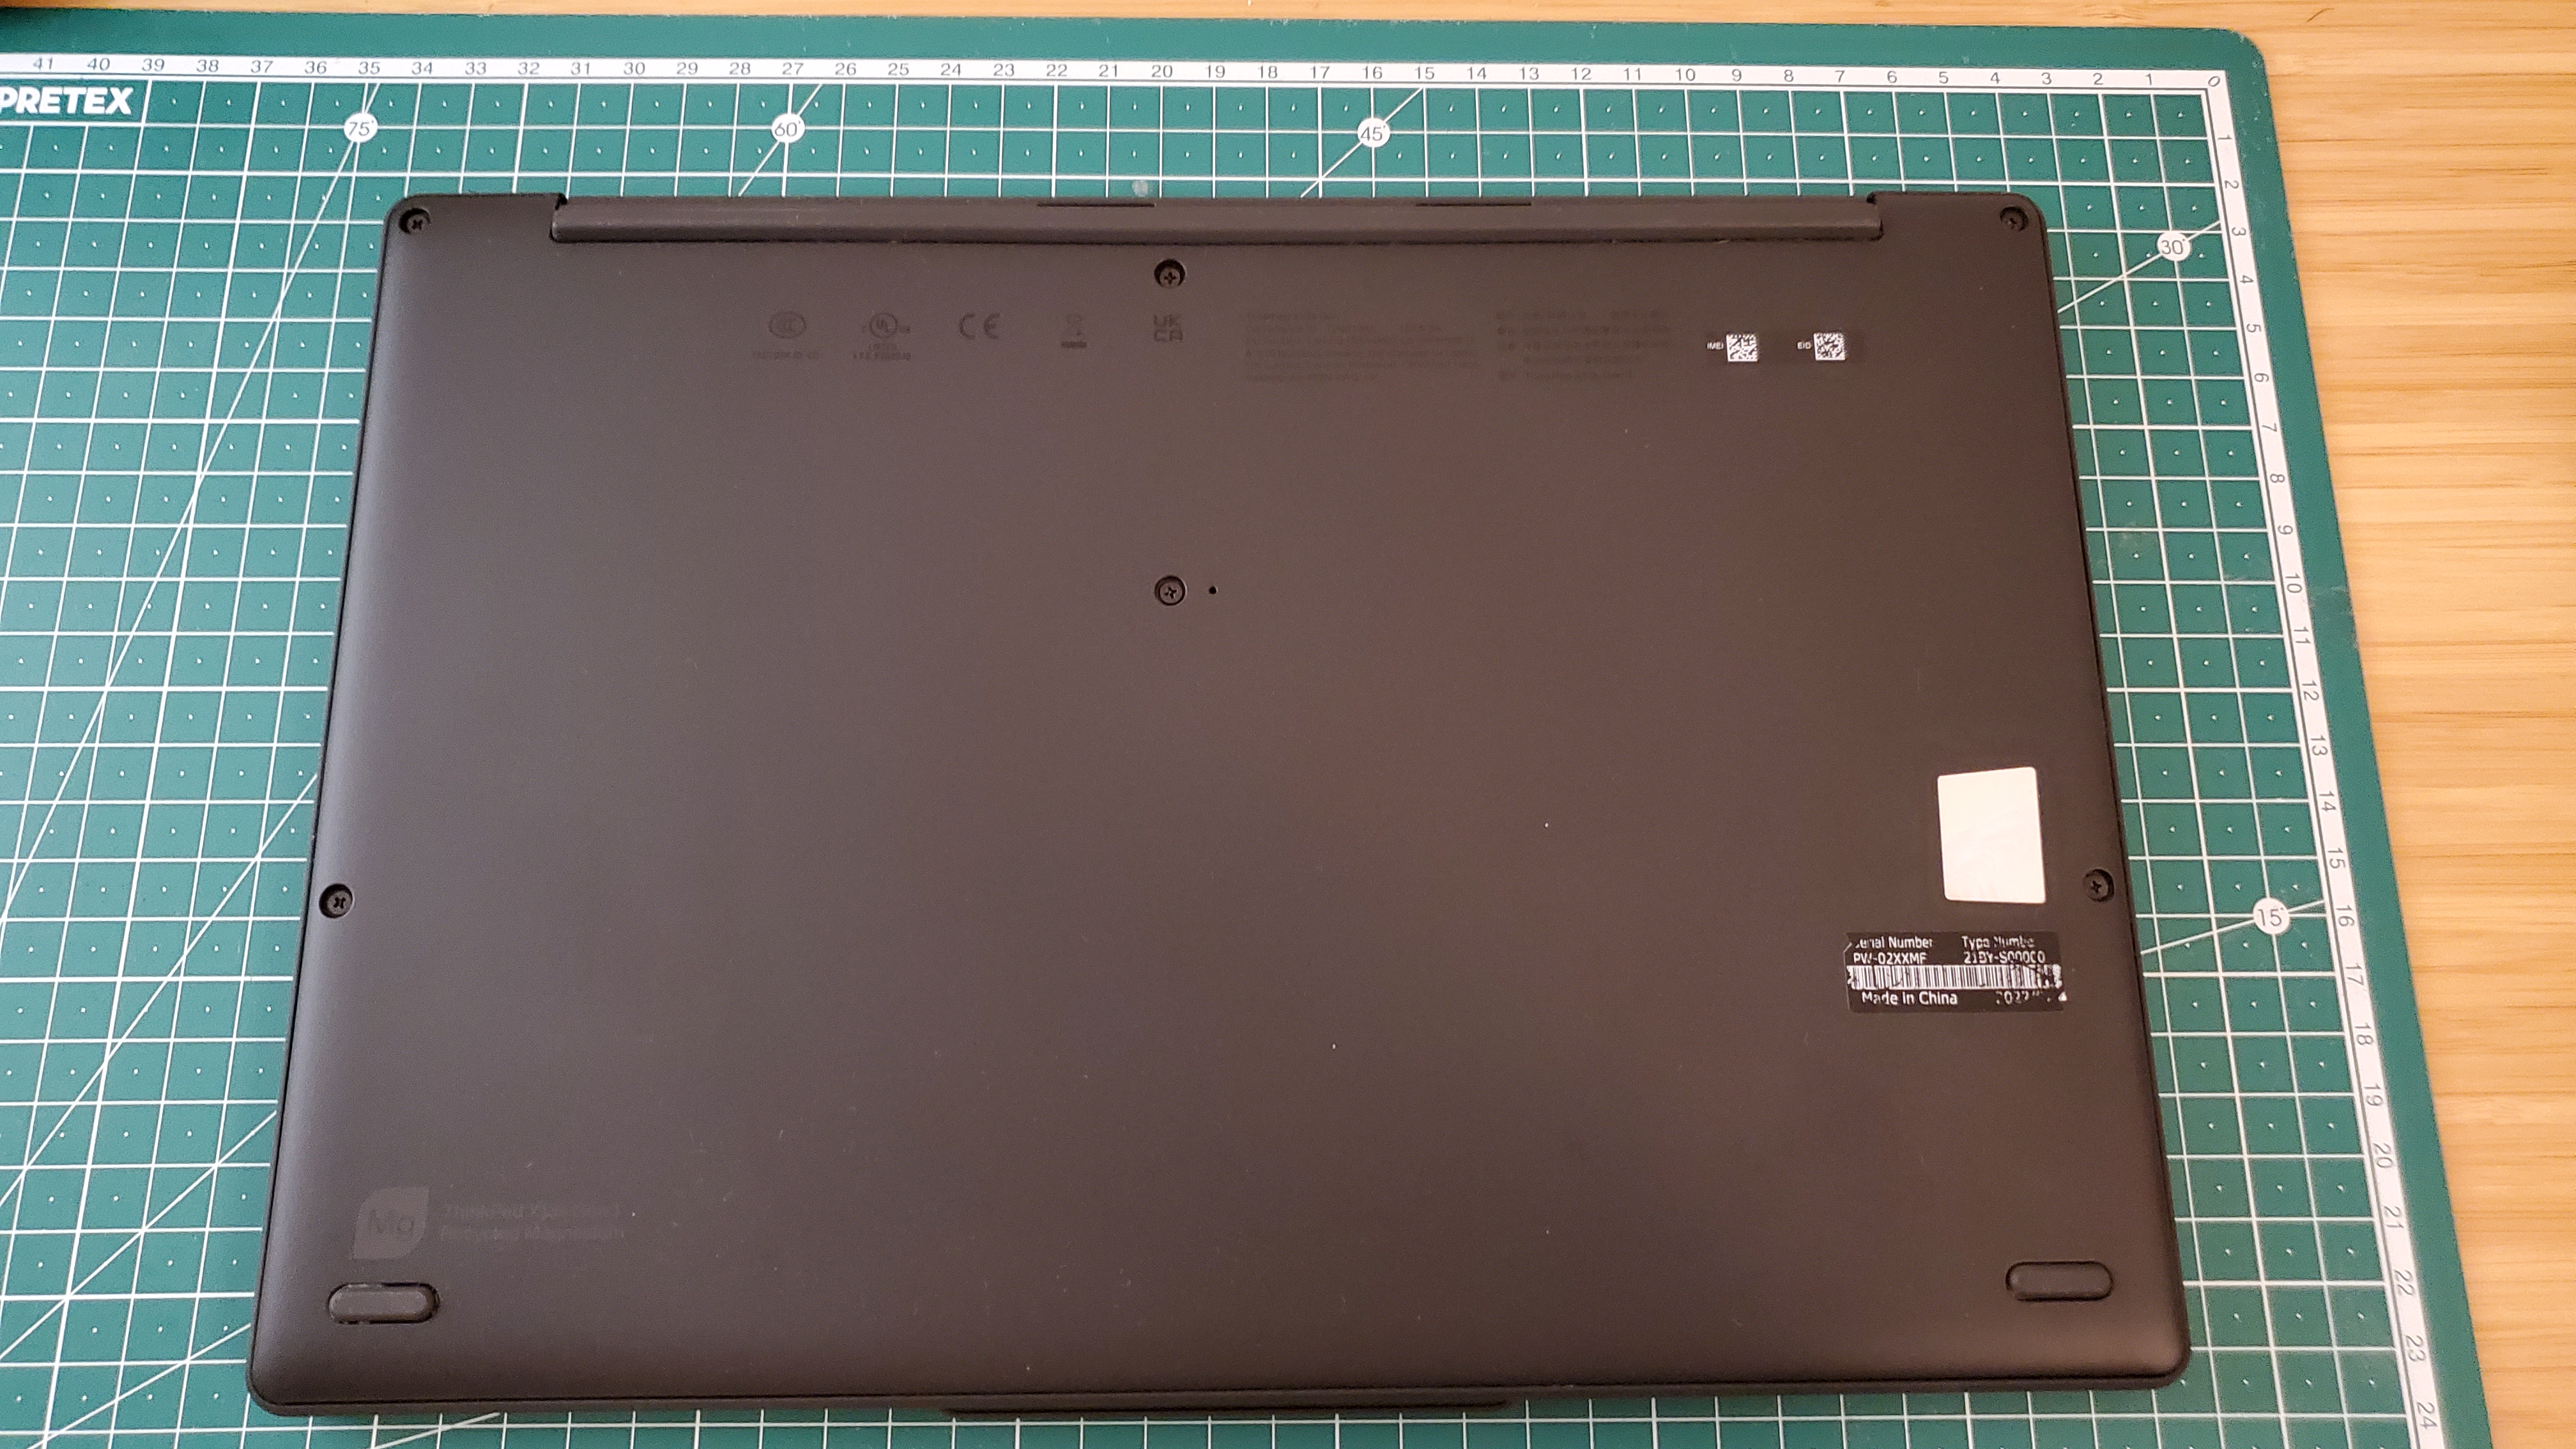
        <td><a href="/assets/images/thinkpad-x13s/thinkpad-X13s-bottom.jpg" target="_blank"><img src="/assets/images/thinkpad-x13s/thinkpad-X13s-bottom_small.jpg" /></a></td>
    </tr>
    <tr>
        <td><a href="/assets/images/thinkpad-x13s/thinkpad-X13s-left.jpg" target="_blank"><img src="/assets/images/thinkpad-x13s/thinkpad-X13s-left_small.jpg" /></a></td>
        <td><a href="/assets/images/thinkpad-x13s/thinkpad-X13s-right.jpg" target="_blank"><img src="/assets/images/thinkpad-x13s/thinkpad-X13s-right_small.jpg" /></a></td>
    </tr>
</table>

<p>I’ve also noticed that while charging the laptop would really heat up close to the charging port. Speaking of heating up …</p>

<h1 id="cpu-throttling">CPU Throttling</h1>

<p>The Lenovo ThinkPad X13s has only passive CPU cooling, no fans at all. Which is great if you don’t stress the CPU. But if you want to get things done, the CPU will get throttled due to
overheating. That was not great.</p>

<p>I had to buy an external cooling pad (Cooler Master) for the cases when I had to compile C++ code.</p>

<div class="language-plaintext highlighter-rouge"><div class="highlight"><pre class="highlight"><code>Visual Studio 2022 Developer Command Prompt v17.7.6

Qt Base 6.6.0, antivirus disabled.

With external cooling:

Elapsed time (seconds): 602.558
Elapsed time (seconds): 611.888
Elapsed time (seconds): 611.726

Without external cooling:

Elapsed time (seconds): 846.824
Elapsed time (seconds): 924.314
Elapsed time (seconds): 930.777
</code></pre></div></div>

<p>From 600s to 900s that’s quite some throttling there!</p>

<h1 id="lenovos-system-update">Lenovo’s system update</h1>

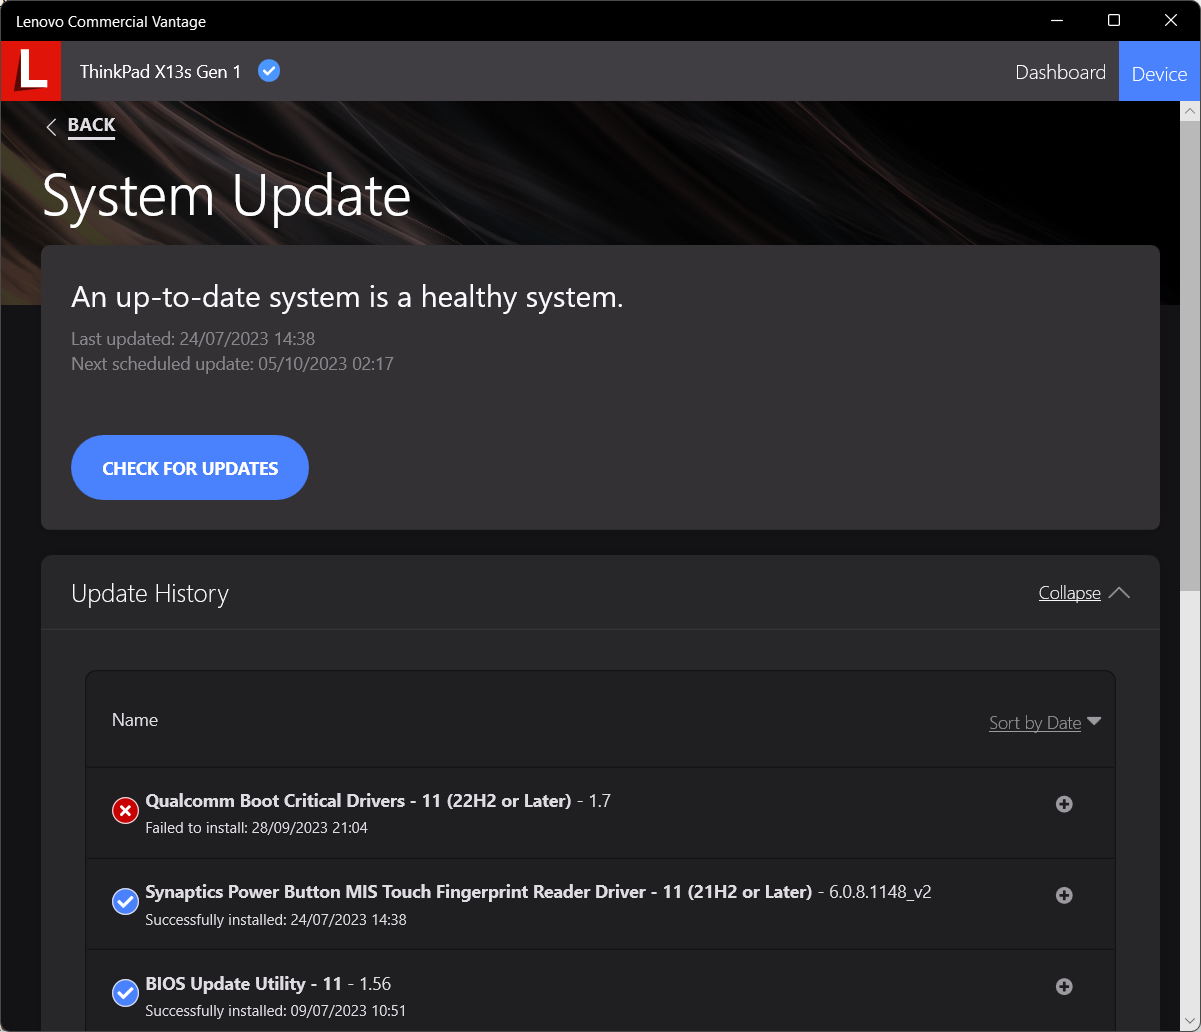
<p>I had installed the <a href="https://apps.microsoft.com/detail/9nr5b8gvvm13?hl=en-us&amp;gl=US">Lenovo Commercial Vantage</a> application for software updates and other things that would come from the
OEM’s software update tool.</p>

<p>At some point I’ve got a failure for <em>Qualcomm Boot Critical Drivers - 11 (22H2 or Later) - 1.7</em>.</p>

<p><img src="/assets/images/thinkpad-x13s/vantage-qualcomm-boot-critical-drivers.png" /></p>

<p>That can’t be good, right?</p>

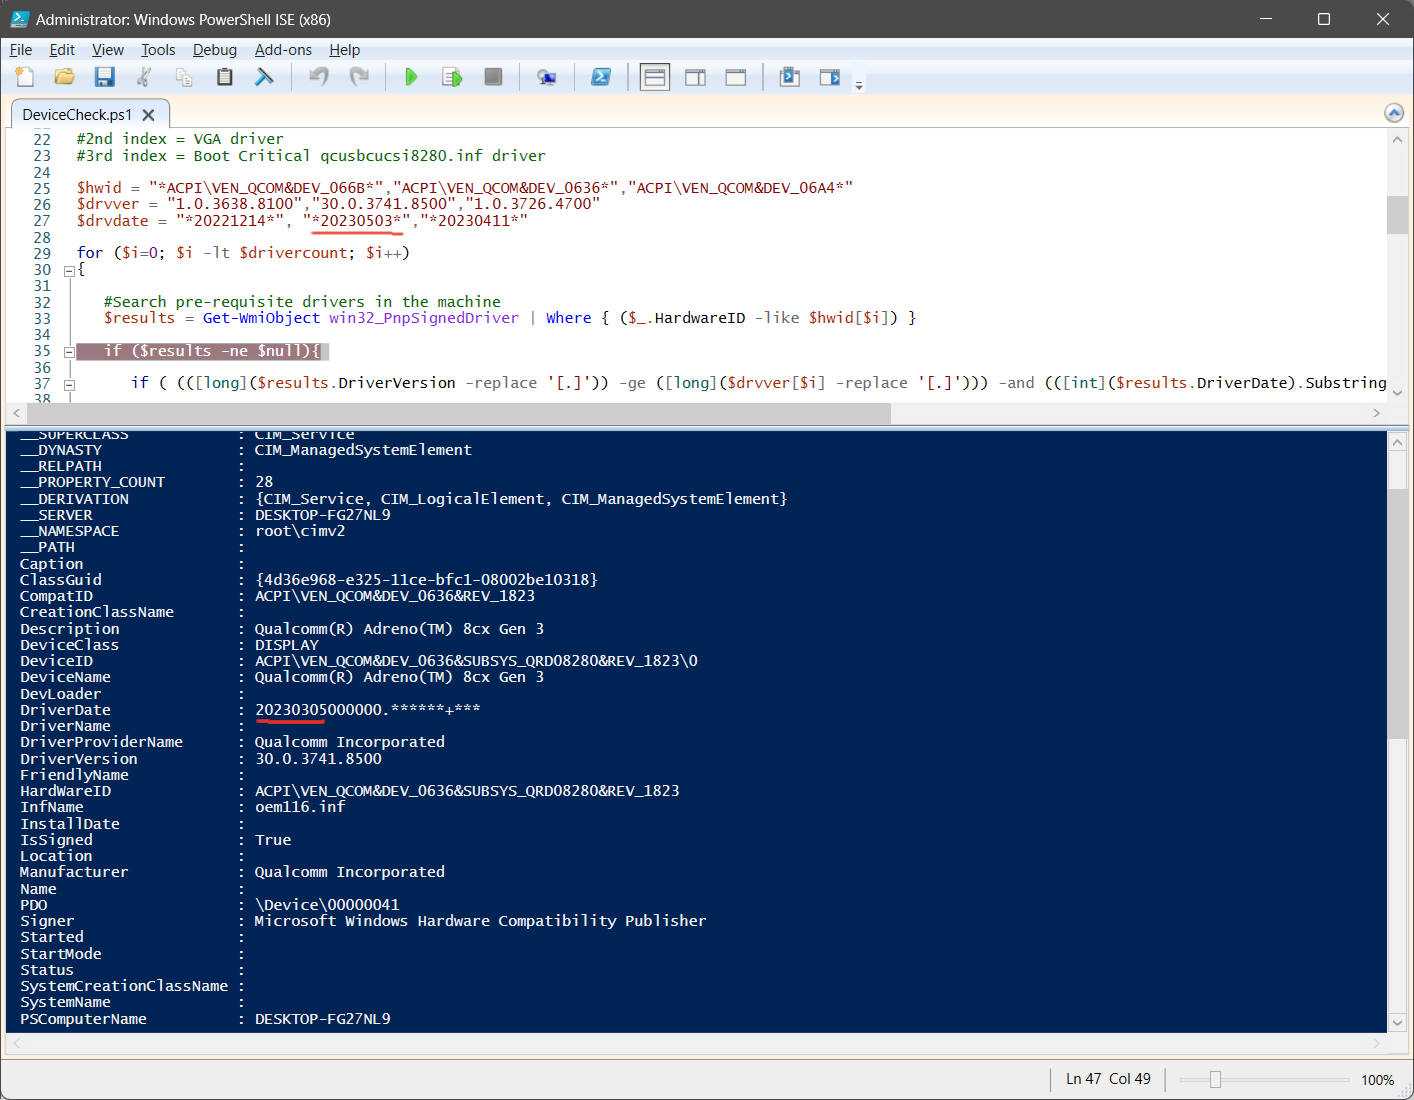
<p>As it turns out is just an error from Lenovo’s driver update packaging team. Lenovo is packaging software updates like for example <code class="language-plaintext highlighter-rouge">n3hdr19w.exe</code>, which is actually a self extractable archive,
which then runs a PowerShell script to do some sanity checks, and then a batch file is executed to install the software.</p>

<p>In this case the <code class="language-plaintext highlighter-rouge">DeviceCheck.ps1</code> had an error:</p>

<p><img src="/assets/images/thinkpad-x13s/powershell-drivercheck.png" /></p>

<p>The developer used <code class="language-plaintext highlighter-rouge">20230503</code> instead of <code class="language-plaintext highlighter-rouge">20230305</code>. I’ve reported the issue at <a href="https://forums.lenovo.com/t5/ThinkPad-X-Series-Laptops/ThinkPad-X13s-Arm64-21BYS00000-can-t-install-critical-updates/m-p/5256136">forums.lenovo.com</a>, but I haven’t really received feedback. Reporting bugs to Lenovo is not easy.</p>

<h1 id="blue-screens-of-death">Blue screens of death</h1>

<p>Over the time I’ve got some blue screen of death crashes. I had two category of crashes:</p>

<ol>
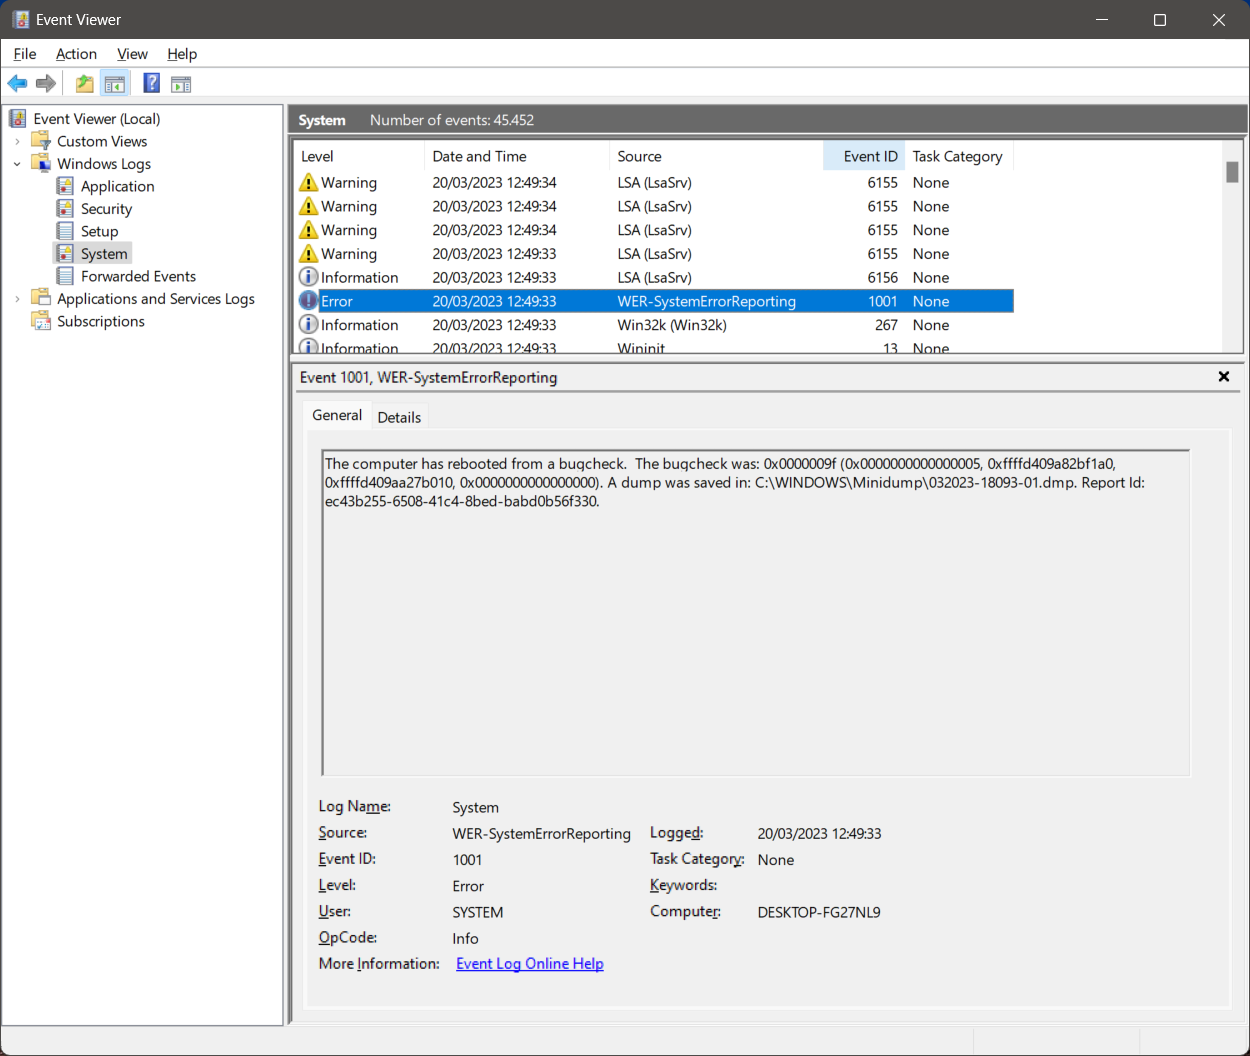
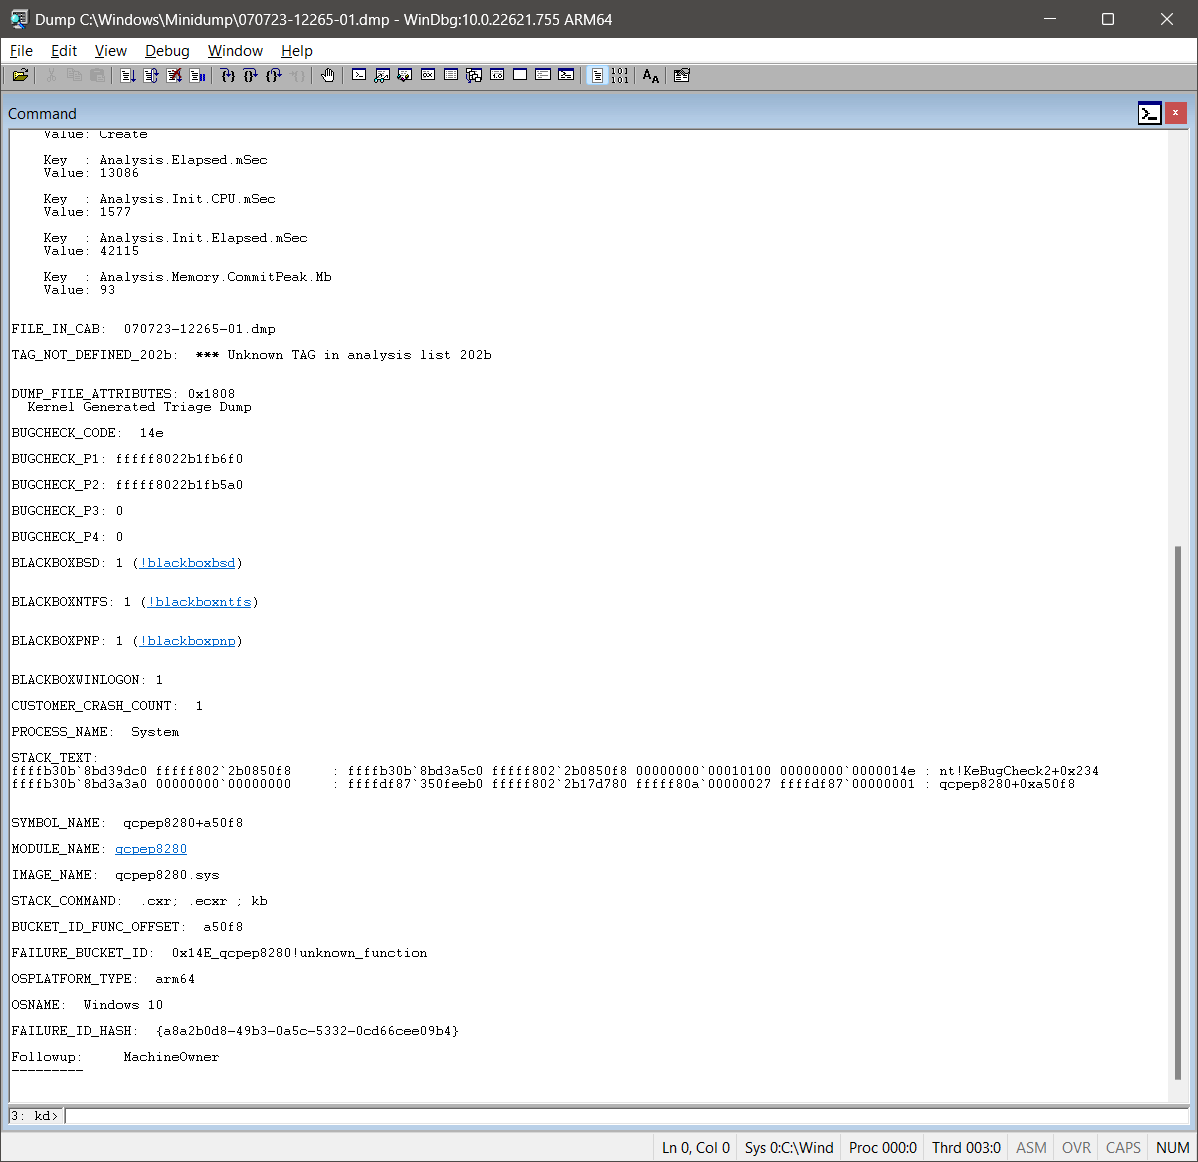
  <li>Coming back to the PC to notice that it rebooted itself. I think that this was due my usage of RDP to a different machine.</li>
  <li>While compiling C++ code and watching something on YouTube.</li>
</ol>

<table>
    <tr>
        <td><a href="/assets/images/thinkpad-x13s/windbg-processexpired.png" target="_blank"><img src="/assets/images/thinkpad-x13s/windbg-processexpired.png" /></a></td>
        <td><a href="/assets/images/thinkpad-x13s/eventviewer-reboot.png" target="_blank"><img src="/assets/images/thinkpad-x13s/eventviewer-reboot.png" /></a></td>
    </tr>
    <tr>
        <td><a href="/assets/images/thinkpad-x13s/windbg-crash-while-compiling.png" target="_blank"><img src="/assets/images/thinkpad-x13s/windbg-crash-while-compiling.png" /></a></td>
    </tr>
</table>

<p>My impression is that Qualcomm is relatively new in the Windows PC drivers market, and their audio and video drivers were not bug free.</p>

<h1 id="dxdiag">DxDiag</h1>

<p>The result of <a href="https://en.wikipedia.org/wiki/DirectX_Diagnostic_Tool">DxDiag</a> can be found <a href="/assets/thinkpad-x13s/DxDiag.txt">here</a>.
Windows 11 can cast the display via <em>Miracast</em> to a TV or compatible projector. Just press <code class="language-plaintext highlighter-rouge">Win + K</code> key combination.</p>

<p>Unfortunatelly, this is not supported:</p>

<div class="language-plaintext highlighter-rouge"><div class="highlight"><pre class="highlight"><code>---------------
Display Devices
---------------
           Card name: Qualcomm(R) Adreno(TM) 8cx Gen 3
        Manufacturer: Qualcomm Incorporated
           Chip type: Adreno 690
            DAC type: InternalDAC
         Device Type: Full Device (POST)
          Device Key: Enum\ACPI\VEN_QCOM&amp;DEV_0636&amp;SUBSYS_QRD08280&amp;REV_1823
       Device Status: 0180200A [DN_DRIVER_LOADED|DN_STARTED|DN_DISABLEABLE|DN_NT_ENUMERATOR|DN_NT_DRIVER]
 Device Problem Code: No Problem
 Driver Problem Code: Unknown
      Display Memory: 7894 MB
    Dedicated Memory: 0 MB
       Shared Memory: 7894 MB
        Current Mode: 1920 x 1200 (32 bit) (60Hz)
         HDR Support: Not Supported
    Display Topology: Internal
 Display Color Space: DXGI_COLOR_SPACE_RGB_FULL_G22_NONE_P709
     Color Primaries: Red(0.639648,0.329102), Green(0.299805,0.599609), Blue(0.149414,0.059570), White Point(0.312500,0.328125)
   Display Luminance: Min Luminance = 0.500000, Max Luminance = 375.500000, MaxFullFrameLuminance = 375.500000
        Monitor Name: Wide viewing angle &amp; High density FlexView Display 1920x1200
       Monitor Model: unknown
          Monitor Id: LEN41A0
         Native Mode: 1920 x 1200(p) (59.999Hz)
         Output Type: Internal
Monitor Capabilities: HDR Not Supported
Display Pixel Format: DISPLAYCONFIG_PIXELFORMAT_32BPP
      Advanced Color: Not Supported
         Driver Name: &lt;&gt;,C:\WINDOWS\System32\DriverStore\FileRepository\qcdx8280.inf_arm64_f2df01705e71231b\qcdx11arm64xum8280.dll,C:\WINDOWS\System32\DriverStore\FileRepository\qcdx8280.inf_arm64_f2df01705e71231b\qcdx11arm64xum8280.dll,C:\WINDOWS\System32\DriverStore\FileRepository\qcdx8280.inf_arm64_f2df01705e71231b\qcdx12arm64xum8280.dll
 Driver File Version: 30.00.3741.8500 (English)
      Driver Version: 30.0.3741.8500
         DDI Version: 12
      Feature Levels: 11_1,11_0,10_1,10_0,9_3,9_2,9_1
        Driver Model: WDDM 2.9
 Hardware Scheduling: DriverSupportState:AlwaysOff Enabled:False
         Displayable: Not Supported
 Graphics Preemption: DMA
  Compute Preemption: DMA
            Miracast: Not Supported by Graphics driver
</code></pre></div></div>

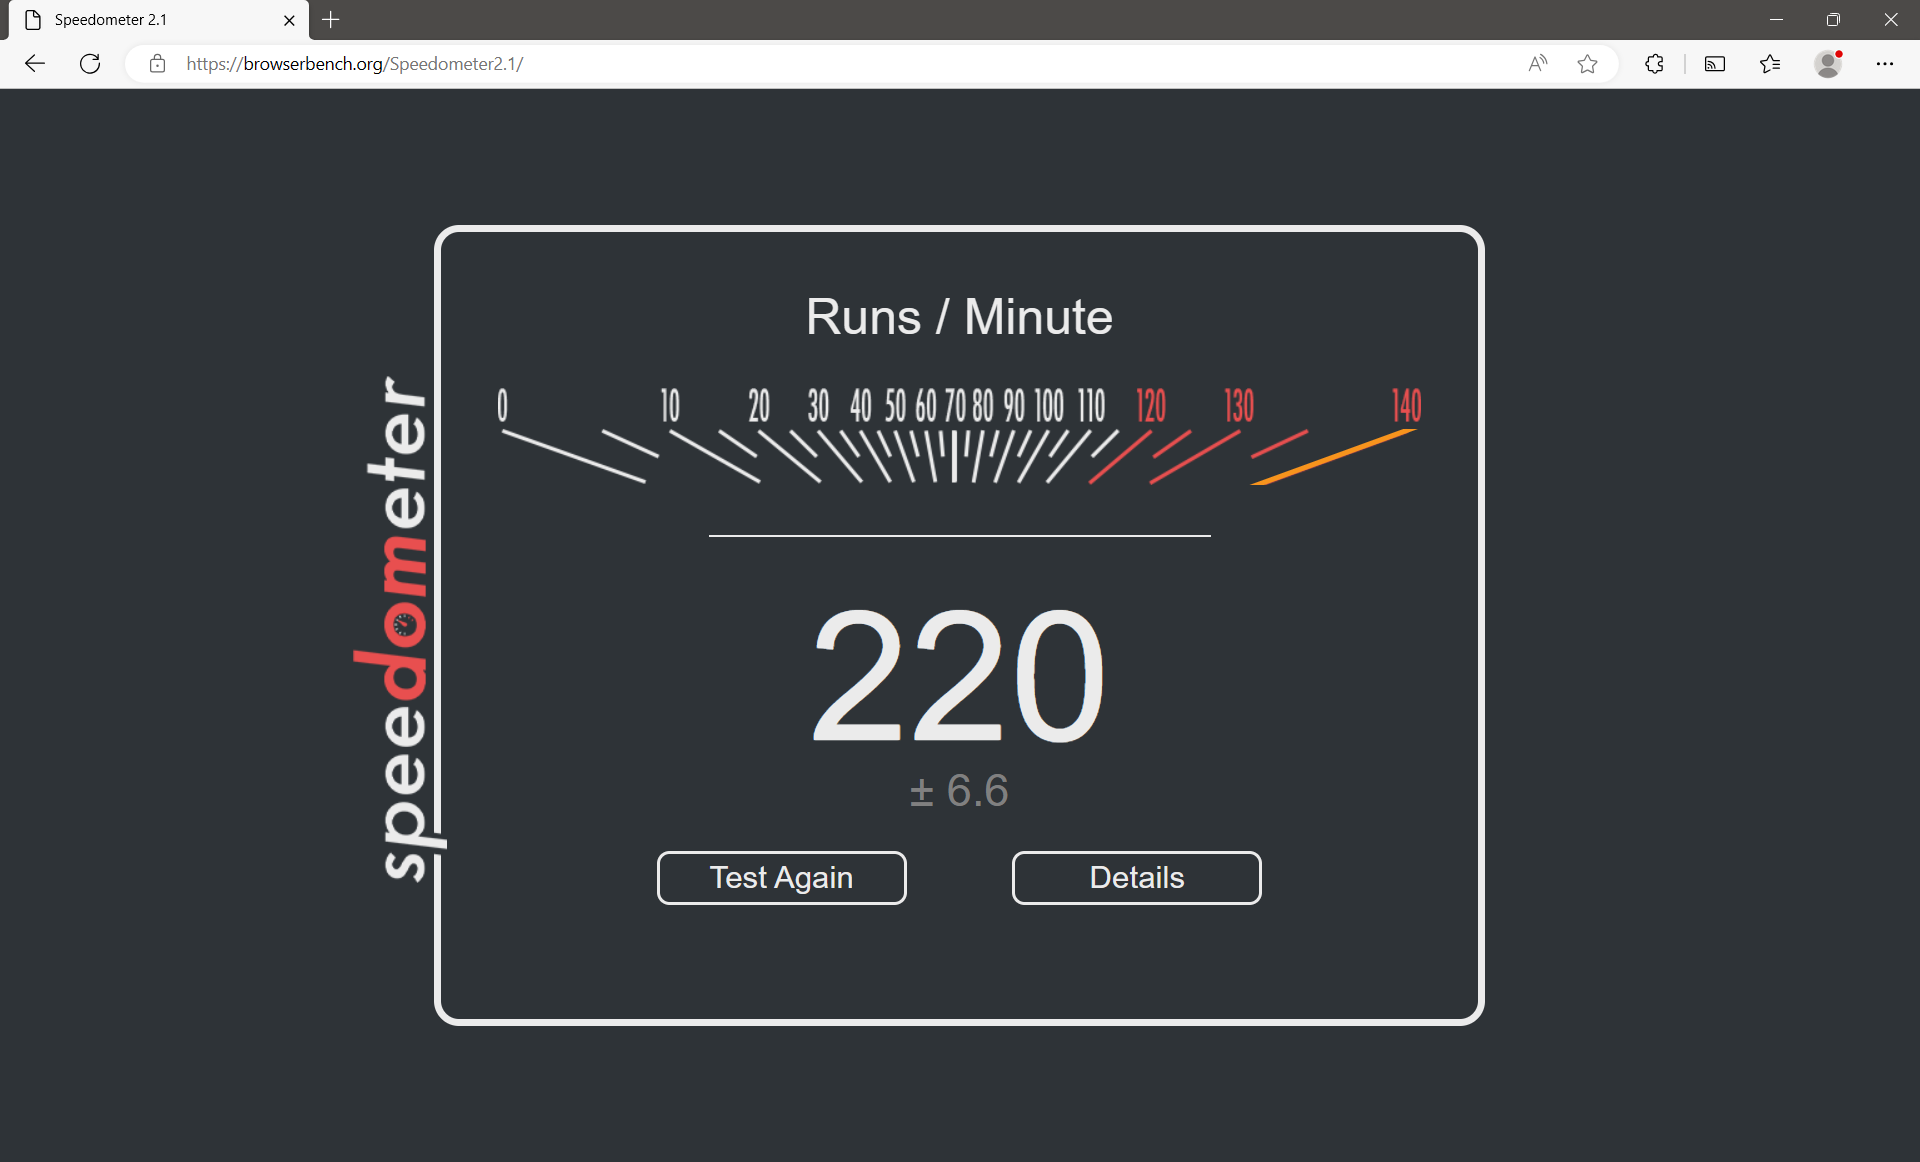
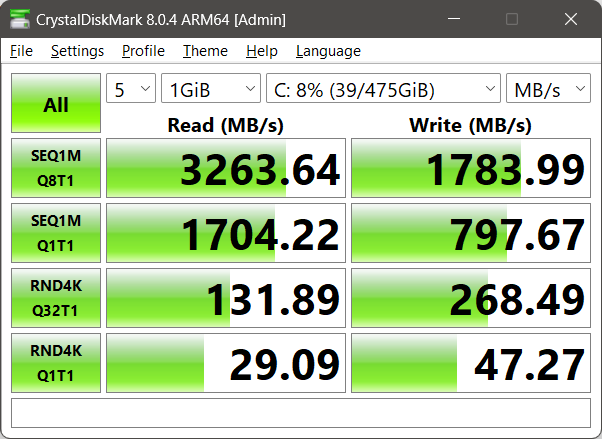
<h1 id="other-benchmarks">Other benchmarks</h1>

<p><img src="/assets/images/thinkpad-x13s/speedometer2.1.png" /></p>

<p><img src="/assets/images/thinkpad-x13s/crystal-disk-mark.png" /></p>

<h1 id="closing-words">Closing words</h1>

<p>I have used the Lenovo ThinkPad X13 until November 2023, when I decided that I needed a laptop with an Arm64 CPU that can do more – I’ve bought an Apple MacBook Pro M1 Max. First time Mac after 25 years of using PCs. <span class="emoji">😳</span></p>

<p>The ThinkPad X13s was not good enough for my needs. The software was also not 100% ready for prime time. The reboots, the helplessness of getting help on forums.lenovo.com, where
when you get some feedback, it’s all about to re-install drivers / Windows. <span class="emoji">😔</span></p>

<p>Now we have July 2024 and Lenovo has released the <a href="https://www.lenovo.com/us/en/p/laptops/thinkpad/thinkpadt/lenovo-thinkpad-t14s-gen-6-(14-inch-snapdragon)/len101t0099">ThinkPad T14s Gen6 14”</a> with a Snapdragon X Elite CPU, which apparently can compete with the Apple Silicon CPUs.</p>]]></content><author><name></name></author><category term="Windows" /><category term="Arm64" /><summary type="html"><![CDATA[In November 2022 while recovering from a Covid infection I found a Lenovo ThinkPad X13s on ebay.com for 600$. It had 16GB of RAM, 512GB of SSD, and a Qualcomm 8cx Gen3 CPU. These stats were all better than my previous Samsung Galaxy Book Go 5G laptop. The 13.3” display would be a bit less than the 14” display that Samsung had. But in contrast had the ability to expand the storage with a M.2 SSD slot. At that time Lenovo was asking ~2000$ for such a laptop. So I decided to buy it. With transport and customs was still cheap 🤘 ThinkPad X13s Finally a nice Lenovo Windows Arm64 laptop! It had a solid build feeling, better than the Samsung Galaxy Book Go. The keyboard was as one would expect from the latest Lenovo ThinkPads. Felt as good as the ThinkPad A485 that I have had a while ago. I had no issues with the display as I had the Samsung Galaxy Book Go. So no display switching in this post! 😄 The 7-zip benchmark result for arm64 is: $ 7z b 7-Zip 23.01 (arm64) : Copyright (c) 1999-2023 Igor Pavlov : 2023-06-20 Windows 10.0 22621 ARM64 0 D4B.0 cpus:8 128TB f:2804EB8C1004 LE 1T CPU Freq (MHz): 2992 2993 2986 2993 2974 2976 2992 4T CPU Freq (MHz): 349% 2538 384% 2794 RAM size: 15789 MB, # CPU hardware threads: 8 RAM usage: 1779 MB, # Benchmark threads: 8 Compressing | Decompressing Dict Speed Usage R/U Rating | Speed Usage R/U Rating KiB/s % MIPS MIPS | KiB/s % MIPS MIPS 22: 42120 682 6012 40975 | 364424 687 4522 31075 23: 38934 674 5884 39670 | 365481 704 4491 31615 24: 36525 673 5834 39273 | 366770 730 4405 32181 25: 33273 666 5705 37991 | 345648 711 4328 30755 ---------------------------------- | ------------------------------ Avr: 37713 674 5859 39477 | 360581 708 4437 31406 Tot: 691 5148 35442 Here is how it fares to the other Arm64 CPUs: CPU Compressing MIPS Decompressing MIPS Qualcomm 7c Gen 2 12590 16390 Qualcomm 8cx Gen 2 24032 21022 Qualcomm 8cx Gen 3 39477 31406 Apple M1 48841 45484 That’s quite an improvement from the Qualcomm 8cx Gen2 generation, but still not beating the Apple M1.]]></summary></entry><entry><title type="html">WSLg and Qt Creator</title><link href="https://cristianadam.eu/20221222/wslg-and-qt-creator/" rel="alternate" type="text/html" title="WSLg and Qt Creator" /><published>2022-12-22T14:48:52+01:00</published><updated>2022-12-22T14:48:52+01:00</updated><id>https://cristianadam.eu/20221222/wslg-and-qt-creator</id><content type="html" xml:base="https://cristianadam.eu/20221222/wslg-and-qt-creator/"><![CDATA[<p>For the CMake presets feature presentation in <a href="https://www.qt.io/blog/qt-creator-9-cmakepresets">Qt Creator 9</a> I needed a cross platform Windows and Linux screencast.</p>

<p>My Windows Arm64 laptop was the perfect platform for the use case of registering a CMake preset with a self built Qt.</p>

<p>Quickly I found out that I only had one option to run Qt Creator as a Linux application, and that’s via Ubuntu 22.04 running under <a href="https://github.com/microsoft/wslg">Windows Subsystem For Linux GUI (WSLg)</a>.</p>

<p>That’s because there is no <a href="https://answers.microsoft.com/en-us/windows/forum/all/virtual-machine-on-arm64/4526063e-bb43-4ae2-82b8-f9a5f2e13683">Virtual Box</a> or <a href="https://communities.vmware.com/t5/Fusion-22H2-Tech-Preview/VMWare-tools-for-Windows-ARM64/td-p/2877643">VMware Player</a> running on Windows Arm64.</p>

<p>Also I’ve tried using Hyper-V, which WSLg under the hood uses, but the Ubuntu 22.04 image wouldn’t <a href="https://answers.microsoft.com/en-us/windows/forum/all/hyper-v-on-win11arm64/0ffd1787-e0a1-4a91-9173-2cdf9bfbf394">boot</a>.</p>

<p>WSL2 and WSLg was the way to go! I’ve installed Qt Creator via <code class="language-plaintext highlighter-rouge">sudo apt install qtcreator</code> and then started Qt Creator via the Windows shortcut named <em>Qt Creator (Ubuntu-22.04)</em>!
This is a short cut for <code class="language-plaintext highlighter-rouge">C:\Windows\System32\wslg.exe ~ -d Ubuntu-22.04 qtcreator</code></p>

<p>Qt Creator would look like this:</p>

<p><img src="/assets/wslg-qtcreator/qt-creator-6-wsl2-arm64.webp" class="noborder" /></p>

<p>It’s very hard not to notice that the windows title bar looks a bit weird. The generic window icon, the mouse cursor that does strange theme changes, and the bit fat window borders!</p>

<p>My goal was to have Qt Creator 9 look similar on Windows 11 as a native Windows Arm64 application and as native Ubuntu 22.04 Linux application running with WSLg.</p>

<!--more-->

<h1 id="windows-native-look">Windows native look</h1>

<p>On Windows 11 I am using a 125% font scaling and having “Storm” (some sort of dark gray #4C4A48) as a Windows color with <em>Show accent color on title bars and windows borders</em> enabled.</p>

<p>This is how it looks below:</p>

<p><img src="/assets/wslg-qtcreator/qt-creator-9-windows-arm64.webp" class="noborder" /></p>

<h1 id="wslg-with-wayland">WSLg with Wayland</h1>

<p>I’ve build Qt 6.4.0 and Qt Creator 9.0.1 myself. I decided to build the QtWayland module so that I can have my own compositor, with the hope that I could get the chance of fixing
some of the issues that I mentioned above.</p>

<p>Which looks like this:</p>

<p><img src="/assets/wslg-qtcreator/qt-creator-9-wsl2-wayland-arm64.webp" class="noborder" /></p>

<p>This doesn’t look necessarily better. The application icon is there, but there are no window borders, no resize cursors (not seen in the screencast), and no window shadows. The last part is not that important, I can’t live without, but the rest. Auch.</p>

<h1 id="improving-the-wayland-experience">Improving the Wayland experience</h1>

<p>I took a shot at hacking the <code class="language-plaintext highlighter-rouge">qtwayland/src/plugins/decorations/bradient</code> default Wayland decoration plugin to match my Windows 11 setup.</p>

<p>I was pretty happy with how it looks now <span class="emoji">❤️</span></p>

<p><img src="/assets/wslg-qtcreator/qt-creator-9-wsl2-wayland-improved-arm64.webp" class="noborder" /></p>

<p>In order to achieve the Windows 11 look I had to change three things:</p>

<ol>
  <li>fonts</li>
  <li>cursor theme</li>
  <li>Wayland “bradient” theme configuration</li>
</ol>

<h2 id="fonts">Fonts</h2>

<p>Since I was running an Ubuntu Linux virtual machine on Windows and my goal was to have a similar look &amp; feel as the Windows application, why not use the Windows fonts?</p>

<p>First I tried removing the Linux fonts. If you uninstall one font package Ubuntu Linux will install a fallback font package. So I had to issue multiple font removal commands:</p>

<div class="language-plaintext highlighter-rouge"><div class="highlight"><pre class="highlight"><code>sudo apt purge fonts-dejavu-core
sudo apt purge fonts-dejavu-core ttf-bitstream-vera
sudo apt purge fonts-dejavu-core ttf-bitstream-vera fonts-liberation
sudo apt purge fonts-dejavu-core ttf-bitstream-vera fonts-liberation fonts-liberation2 fonts-croscore
sudo apt purge fonts-dejavu-core ttf-bitstream-vera fonts-liberation fonts-liberation2 fonts-croscore fonts-freefont-otf
sudo apt purge fonts-dejavu-core ttf-bitstream-vera fonts-liberation fonts-liberation2 fonts-croscore fonts-freefont-otf fonts-freefont-ttf
sudo apt purge fonts-dejavu-core ttf-bitstream-vera fonts-liberation fonts-liberation2 fonts-croscore fonts-freefont-otf fonts-freefont-ttf fonts-urw-base35
</code></pre></div></div>

<p>Then I edited the <code class="language-plaintext highlighter-rouge">/etc/fonts/local.conf</code> file with the content:</p>

<div class="language-xml highlighter-rouge"><div class="highlight"><pre class="highlight"><code><span class="cp">&lt;?xml version="1.0"?&gt;</span>
<span class="cp">&lt;!DOCTYPE fontconfig SYSTEM "fonts.dtd"&gt;</span>
<span class="nt">&lt;fontconfig&gt;</span>
    <span class="nt">&lt;dir&gt;</span>/mnt/c/Windows/Fonts<span class="nt">&lt;/dir&gt;</span>

    <span class="nt">&lt;match</span> <span class="na">target=</span><span class="s">"font"</span> <span class="nt">&gt;</span>
        <span class="nt">&lt;edit</span> <span class="na">mode=</span><span class="s">"assign"</span> <span class="na">name=</span><span class="s">"lcdfilter"</span> <span class="nt">&gt;</span>
            <span class="nt">&lt;const&gt;</span>lcddefault<span class="nt">&lt;/const&gt;</span>
        <span class="nt">&lt;/edit&gt;</span>
        <span class="nt">&lt;edit</span> <span class="na">mode=</span><span class="s">"assign"</span> <span class="na">name=</span><span class="s">"hinting"</span> <span class="nt">&gt;</span>
            <span class="nt">&lt;bool&gt;</span>true<span class="nt">&lt;/bool&gt;</span>
        <span class="nt">&lt;/edit&gt;</span>
        <span class="nt">&lt;edit</span> <span class="na">mode=</span><span class="s">"assign"</span> <span class="na">name=</span><span class="s">"hintstyle"</span> <span class="nt">&gt;</span>
            <span class="nt">&lt;const&gt;</span>hintslight<span class="nt">&lt;/const&gt;</span>
        <span class="nt">&lt;/edit&gt;</span>
        <span class="nt">&lt;edit</span> <span class="na">mode=</span><span class="s">"assign"</span> <span class="na">name=</span><span class="s">"rgba"</span> <span class="nt">&gt;</span>
            <span class="nt">&lt;const&gt;</span>rgb<span class="nt">&lt;/const&gt;</span>
        <span class="nt">&lt;/edit&gt;</span>
        <span class="nt">&lt;edit</span> <span class="na">mode=</span><span class="s">"assign"</span> <span class="na">name=</span><span class="s">"antialias"</span><span class="nt">&gt;</span>
            <span class="nt">&lt;bool&gt;</span>true<span class="nt">&lt;/bool&gt;</span>
        <span class="nt">&lt;/edit&gt;</span>
    <span class="nt">&lt;/match&gt;</span>

    <span class="nt">&lt;alias&gt;</span>
        <span class="nt">&lt;family&gt;</span>sans-serif<span class="nt">&lt;/family&gt;</span>
        <span class="nt">&lt;prefer&gt;</span>
            <span class="nt">&lt;family&gt;</span>Segoe UI<span class="nt">&lt;/family&gt;</span>
        <span class="nt">&lt;/prefer&gt;</span>
    <span class="nt">&lt;/alias&gt;</span>

    <span class="nt">&lt;match</span> <span class="na">target=</span><span class="s">"pattern"</span><span class="nt">&gt;</span>
        <span class="nt">&lt;test</span> <span class="na">qual=</span><span class="s">"any"</span> <span class="na">name=</span><span class="s">"family"</span><span class="nt">&gt;&lt;string&gt;</span>monospace<span class="nt">&lt;/string&gt;&lt;/test&gt;</span>
        <span class="nt">&lt;edit</span> <span class="na">name=</span><span class="s">"family"</span> <span class="na">mode=</span><span class="s">"assign"</span> <span class="na">binding=</span><span class="s">"same"</span><span class="nt">&gt;&lt;string&gt;</span>Courier New<span class="nt">&lt;/string&gt;&lt;/edit&gt;</span>
    <span class="nt">&lt;/match&gt;</span>
    <span class="nt">&lt;match</span> <span class="na">target=</span><span class="s">"pattern"</span><span class="nt">&gt;</span>
        <span class="nt">&lt;test</span> <span class="na">qual=</span><span class="s">"any"</span> <span class="na">name=</span><span class="s">"family"</span><span class="nt">&gt;&lt;string&gt;</span>DejaVu LGC Sans<span class="nt">&lt;/string&gt;&lt;/test&gt;</span>
        <span class="nt">&lt;edit</span> <span class="na">name=</span><span class="s">"family"</span> <span class="na">mode=</span><span class="s">"assign"</span> <span class="na">binding=</span><span class="s">"same"</span><span class="nt">&gt;&lt;string&gt;</span>Segoe UI<span class="nt">&lt;/string&gt;&lt;/edit&gt;</span>
    <span class="nt">&lt;/match&gt;</span>

<span class="nt">&lt;/fontconfig&gt;</span>
</code></pre></div></div>

<p>And finally I’ve updated the font database <code class="language-plaintext highlighter-rouge">sudo fc-cache -f -v</code>. This was my best attempt at having a Windows like font rendering with the Windows
fonts and some fonts substitutions for Qt Creator.</p>

<p>In order to have a bigger font in Qt Creator I had to have the following environment variable set:</p>

<div class="language-plaintext highlighter-rouge"><div class="highlight"><pre class="highlight"><code>QT_WAYLAND_FORCE_DPI=120
</code></pre></div></div>

<p>Funnily enough <code class="language-plaintext highlighter-rouge">125</code> was bigger than what Windows would set for <code class="language-plaintext highlighter-rouge">125%</code>.</p>

<h2 id="cursor-theme">Cursor theme</h2>

<p>Ubuntu 22.04 comes with a basic X11 font theme. I’ve installed one from KDE which had more cursors and looked nicer:</p>

<div class="language-plaintext highlighter-rouge"><div class="highlight"><pre class="highlight"><code>sudo apt install breeze-cursor-theme
</code></pre></div></div>

<p>Quickly I noticed that the mouse cursors are HUGE, in order to have them at proper size, I needed to have the following environment variable set:</p>

<div class="language-plaintext highlighter-rouge"><div class="highlight"><pre class="highlight"><code>XCURSOR_SIZE=16
</code></pre></div></div>

<h2 id="wayland-bradient-theme">Wayland “bradient” theme</h2>

<p>First I hacked Qt Wayland’s <code class="language-plaintext highlighter-rouge">qtwayland/src/plugins/decorations/bradient</code> plugin with this <a href="/assets/wslg-qtcreator/qtwayland-6.4.0-bradient-windows11.patch">qtwayland-6.4.0-bradient-windows11.patch</a>. This was my first time trying to hack a theme plugin. It’s not perfect, but it’s good enough for me.</p>

<p>Now the plugin looks after a few environment variables in order to configure the window titlebar colors, the border colors, the alignment of the window title, and so on.</p>

<p>As it turns out the Windows 11 shortcut dialog has a limit on the edit line for the executable, and I was not able to pass all the parameters to the shortcut.</p>

<p>I had to use a WScript script to achieve this:</p>

<div class="language-javascript highlighter-rouge"><div class="highlight"><pre class="highlight"><code><span class="kd">function</span> <span class="nf">wslgLink</span><span class="p">()</span> <span class="p">{</span>
  <span class="kd">var</span> <span class="nx">commandArguments</span> <span class="o">=</span> <span class="dl">""</span><span class="p">;</span>
  <span class="k">for </span><span class="p">(</span><span class="kd">var</span> <span class="nx">i</span> <span class="o">=</span> <span class="mi">0</span><span class="p">;</span> <span class="nx">i</span> <span class="o">&lt;</span> <span class="nx">arguments</span><span class="p">.</span><span class="nx">length</span><span class="p">;</span> <span class="o">++</span><span class="nx">i</span><span class="p">)</span> <span class="p">{</span>
    <span class="nx">commandArguments</span> <span class="o">+=</span> <span class="nx">arguments</span><span class="p">[</span><span class="nx">i</span><span class="p">]</span> <span class="o">+</span> <span class="dl">"</span><span class="s2"> </span><span class="dl">"</span><span class="p">;</span>
  <span class="p">}</span>

  <span class="kd">var</span> <span class="nx">shell</span> <span class="o">=</span> <span class="k">new</span> <span class="nc">ActiveXObject</span><span class="p">(</span><span class="dl">"</span><span class="s2">WScript.Shell</span><span class="dl">"</span><span class="p">);</span>

  <span class="kd">var</span> <span class="nx">strStartMenu</span> <span class="o">=</span> <span class="nx">shell</span><span class="p">.</span><span class="nc">SpecialFolders</span><span class="p">(</span><span class="dl">"</span><span class="s2">StartMenu</span><span class="dl">"</span><span class="p">)</span>
  <span class="kd">var</span> <span class="nx">shortcut</span> <span class="o">=</span> <span class="nx">shell</span><span class="p">.</span><span class="nc">CreateShortcut</span><span class="p">(</span><span class="nx">strStartMenu</span> <span class="o">+</span> <span class="dl">"</span><span class="se">\\</span><span class="s2">Programs</span><span class="se">\\</span><span class="s2">Qt Creator Linux.lnk</span><span class="dl">"</span><span class="p">)</span>
  <span class="nx">shortcut</span><span class="p">.</span><span class="nx">WindowStyle</span> <span class="o">=</span> <span class="mi">4</span><span class="p">;</span>
  <span class="nx">shortcut</span><span class="p">.</span><span class="nx">IconLocation</span> <span class="o">=</span> <span class="dl">"</span><span class="s2">%userProfile%</span><span class="se">\\</span><span class="s2">wsl</span><span class="se">\\</span><span class="s2">qtcreator.ico</span><span class="dl">"</span><span class="p">;</span>
  <span class="nx">shortcut</span><span class="p">.</span><span class="nx">TargetPath</span> <span class="o">=</span> <span class="dl">"</span><span class="s2">c:</span><span class="se">\\</span><span class="s2">windows</span><span class="se">\\</span><span class="s2">system32</span><span class="se">\\</span><span class="s2">wslg.exe</span><span class="dl">"</span>
  <span class="nx">shortcut</span><span class="p">.</span><span class="nx">Arguments</span> <span class="o">=</span> <span class="nx">commandArguments</span><span class="p">;</span>
  <span class="nx">shortcut</span><span class="p">.</span><span class="nx">WorkingDirectory</span> <span class="o">=</span> <span class="dl">"</span><span class="s2">c:</span><span class="se">\\</span><span class="s2">windows</span><span class="se">\\</span><span class="s2">system32</span><span class="dl">"</span><span class="p">;</span>
  <span class="nx">shortcut</span><span class="p">.</span><span class="nc">Save</span><span class="p">()</span>
<span class="p">}</span>

<span class="nf">wslgLink</span><span class="p">(</span>
  <span class="dl">"</span><span class="s2">-d Ubuntu-22.04</span><span class="dl">"</span><span class="p">,</span>
  <span class="dl">"</span><span class="s2">QT_WAYLAND_FORCE_DPI=120</span><span class="dl">"</span><span class="p">,</span>
  <span class="dl">"</span><span class="s2">XCURSOR_SIZE=16</span><span class="dl">"</span><span class="p">,</span>
  <span class="dl">"</span><span class="s2">QT_WAYLAND_DECORATION_FG_COLOR=#ffffff</span><span class="dl">"</span><span class="p">,</span>
  <span class="dl">"</span><span class="s2">QT_WAYLAND_DECORATION_FG_INACTIVE_COLOR=#919191</span><span class="dl">"</span><span class="p">,</span>
  <span class="dl">"</span><span class="s2">QT_WAYLAND_DECORATION_BG_COLOR=#4c4a48</span><span class="dl">"</span><span class="p">,</span>
  <span class="dl">"</span><span class="s2">QT_WAYLAND_DECORATION_BG_INACTIVE_COLOR=#f3f3f3</span><span class="dl">"</span><span class="p">,</span>
  <span class="dl">"</span><span class="s2">QT_WAYLAND_DECORATION_BORDER_COLOR=#4c4a48</span><span class="dl">"</span><span class="p">,</span>
  <span class="dl">"</span><span class="s2">QT_WAYLAND_DECORATION_BORDER_INACTIVE_COLOR=#b3b3b3</span><span class="dl">"</span><span class="p">,</span>
  <span class="dl">"</span><span class="s2">QT_WAYLAND_BUTTONS_HOVER_BG_COLOR=#575553</span><span class="dl">"</span><span class="p">,</span>
  <span class="dl">"</span><span class="s2">QT_WAYLAND_CLOSE_BUTTON_HOVER_BG_COLOR=#C42B1C</span><span class="dl">"</span><span class="p">,</span>
  <span class="dl">"</span><span class="s2">QT_WAYLAND_DECORATION_LEFT_WINDOW_TEXT=1</span><span class="dl">"</span><span class="p">,</span>
  <span class="dl">"</span><span class="s2">~/Qt/qtcreator/bin/qtcreator</span><span class="dl">"</span>
<span class="p">);</span>
</code></pre></div></div>

<p>For a dark Windows theme the following values work better:</p>

<div class="language-plaintext highlighter-rouge"><div class="highlight"><pre class="highlight"><code>"QT_WAYLAND_DECORATION_BG_INACTIVE_COLOR=#202020",
"QT_WAYLAND_DECORATION_BORDER_INACTIVE_COLOR=#2F3039",
</code></pre></div></div>

<p>You can get the Qt Creator icon with a Linux overlay from <a href="/assets/wslg-qtcreator/qtcreator-linux.ico">here</a>.</p>

<h1 id="conclusion">Conclusion</h1>

<p>I was able to run Qt Creator 9.0.1 both for Windows 11 arm64 natively and Ubuntu 22.04 having a consistent Windows 11 look and feel! <span class="emoji">🤘</span></p>

<p>Oh, one more thing. My Ubuntu 22.04 WSL2 installation got only 1GB of swap, which is not enough to compile LLVM / Clang for example. I had to edit the Windows <code class="language-plaintext highlighter-rouge">%userprofile%\.wslconfig</code> ini file with the following content:</p>

<div class="language-ini highlighter-rouge"><div class="highlight"><pre class="highlight"><code><span class="nn">[wsl2]</span><span class="w">
</span><span class="py">swap</span><span class="p">=</span><span class="s">16GB</span>
<span class="py">swapFile</span><span class="p">=</span><span class="s">%USERPROFILE%</span><span class="se">\w</span><span class="s">sl2swap.vhdx</span>
</code></pre></div></div>]]></content><author><name></name></author><category term="Windows" /><category term="WSL2" /><category term="WSLg" /><category term="QtCreator" /><summary type="html"><![CDATA[For the CMake presets feature presentation in Qt Creator 9 I needed a cross platform Windows and Linux screencast. My Windows Arm64 laptop was the perfect platform for the use case of registering a CMake preset with a self built Qt. Quickly I found out that I only had one option to run Qt Creator as a Linux application, and that’s via Ubuntu 22.04 running under Windows Subsystem For Linux GUI (WSLg). That’s because there is no Virtual Box or VMware Player running on Windows Arm64. Also I’ve tried using Hyper-V, which WSLg under the hood uses, but the Ubuntu 22.04 image wouldn’t boot. WSL2 and WSLg was the way to go! I’ve installed Qt Creator via sudo apt install qtcreator and then started Qt Creator via the Windows shortcut named Qt Creator (Ubuntu-22.04)! This is a short cut for C:\Windows\System32\wslg.exe ~ -d Ubuntu-22.04 qtcreator Qt Creator would look like this: It’s very hard not to notice that the windows title bar looks a bit weird. The generic window icon, the mouse cursor that does strange theme changes, and the bit fat window borders! My goal was to have Qt Creator 9 look similar on Windows 11 as a native Windows Arm64 application and as native Ubuntu 22.04 Linux application running with WSLg.]]></summary></entry><entry><title type="html">Windows Arm64 - Samsung Galaxy Book Go 5G</title><link href="https://cristianadam.eu/20221126/windows-arm64-samsung-galaxy-book-go-5g/" rel="alternate" type="text/html" title="Windows Arm64 - Samsung Galaxy Book Go 5G" /><published>2022-11-26T15:57:53+01:00</published><updated>2022-11-26T15:57:53+01:00</updated><id>https://cristianadam.eu/20221126/windows-arm64-samsung-galaxy-book-go-5g</id><content type="html" xml:base="https://cristianadam.eu/20221126/windows-arm64-samsung-galaxy-book-go-5g/"><![CDATA[<p>We all know the Arm CPU architecture from smartphones, which have a long battery life and passive cooling.</p>

<p>Apple has shown with the M1/2 laptops that you can have a laptop that kicks ass with an Arm CPU.</p>

<p>In November 2021 I had a look to see if there was something like that for Windows.</p>

<p>I found a handful of models. Microsoft Surface Pro X, Lenovo Flex 5G, Acer Spin 7 at prices between <code class="language-plaintext highlighter-rouge">1000 - 1500$</code>, and lastly Samsung Galaxy Book Go 5G at <code class="language-plaintext highlighter-rouge">800$</code> (<code class="language-plaintext highlighter-rouge">400$</code> on eBay).</p>

<h1 id="samsung-galaxy-book-go">Samsung Galaxy Book Go</h1>

<p>In Germany I could only buy the <em>Samsung Galaxy Book Go</em> “European” LTE version. Which came with a Qualcomm Snapdragon (TM) 7c Gen 2 CPU, 4GB of RAM and 128GB SSD.</p>

<p>I bought a refurbished model for 300€.</p>

<p><a href="/assets/images/samsung-galaxy-book-go-5g/galaxy-book-go.jpg" target="_blank"><img src="/assets/images/samsung-galaxy-book-go-5g/galaxy-book-go_small.jpg" /></a></p>

<p>I took 7zip and run <code class="language-plaintext highlighter-rouge">7z -b</code> to benchmark for <code class="language-plaintext highlighter-rouge">arm64</code>, <code class="language-plaintext highlighter-rouge">x86_64</code> and <code class="language-plaintext highlighter-rouge">x86</code>. The results are <a href="/assets/samsung-galaxy-book-go-5g/7zip-benchmark-galaxy-book-go.txt">here</a>, below you have the <code class="language-plaintext highlighter-rouge">arm64</code> results:</p>

<div class="language-plaintext highlighter-rouge"><div class="highlight"><pre class="highlight"><code>C:\Program Files (Arm)\7-Zip&gt;7z b

7-Zip 21.04 beta (arm64) : Copyright (c) 1999-2021 Igor Pavlov : 2021-11-02

Windows 10.0 22000
ARM64 0 805.D0E cpus:8 128T f:804EB8C1004
LE

1T CPU Freq (MHz):  1931  2549  2550  2493  2488  2549  2545
4T CPU Freq (MHz): 346% 1903   354% 1952

RAM size:    3659 MB,  # CPU hardware threads:   8
RAM usage:   1779 MB,  # Benchmark threads:      8

                       Compressing  |                  Decompressing
Dict     Speed Usage    R/U Rating  |      Speed Usage    R/U Rating
         KiB/s     %   MIPS   MIPS  |      KiB/s     %   MIPS   MIPS

22:      12741   678   1828  12395  |     194291   705   2349  16568
23:      12388   722   1749  12622  |     185160   687   2333  16017
24:      11760   729   1735  12645  |     187951   720   2290  16491
25:      11119   753   1686  12696  |     185261   739   2232  16484
----------------------------------  | ------------------------------
Avr:     12002   720   1750  12590  |     188166   713   2301  16390
Tot:             716   2025  14490
</code></pre></div></div>

<p>The numbers by themselves do not mean much, but let’s compare them with the Apple M1 results from <a href="https://7-cpu.com/cpu/Apple_M1.html">7-cpu.com</a>:</p>

<table>
  <thead>
    <tr>
      <th>CPU</th>
      <th>Compressing MIPS</th>
      <th>Decompressing MIPS</th>
    </tr>
  </thead>
  <tbody>
    <tr>
      <td>Qualcomm 7c Gen 2</td>
      <td>12590</td>
      <td>16390</td>
    </tr>
    <tr>
      <td>Apple M1</td>
      <td>48841</td>
      <td>45484</td>
    </tr>
  </tbody>
</table>

<p>That’s not that good, isn’t it? Also 4GB of RAM, and 128GB SSD with no means to upgrade, made the offering a bit uncool.</p>

<p>Another thing that I’ve noticed was the screen quality. It wasn’t at the same level as my previous Lenovo laptops. The colors would change depending how I moved my head.</p>

<p>Notebookcheck.net has an article named <a href="https://www.notebookcheck.net/Samsung-Galaxy-Book-Go-in-review-Silent-office-notebook.555454.0.html">Samsung Galaxy Book Go in review: Silent office notebook</a> (<a href="https://web.archive.org/web/20220524192551/https://www.notebookcheck.net/Samsung-Galaxy-Book-Go-in-review-Silent-office-notebook.555454.0.html">archive.org copy</a>), and their conclusion:</p>
<blockquote>
  <p>A better display could have made the Samsung Galaxy Book Go a good and inexpensive notebook.</p>
</blockquote>

<!--more-->

<h1 id="samsung-galaxy-book-go-5g">Samsung Galaxy Book Go 5G</h1>

<p>When I found out that Samsung sells the <em>Samsung Galaxy Book Go 5G</em> in USA with better specs, I ordered one from ebay.com for 475€ (70€ customs), and sent back the “European” model.</p>

<p>The better specs were: Qualcomm Snapdragon(TM) 8cx Gen 2, 8GB of RAM and 256 GB SSD.</p>

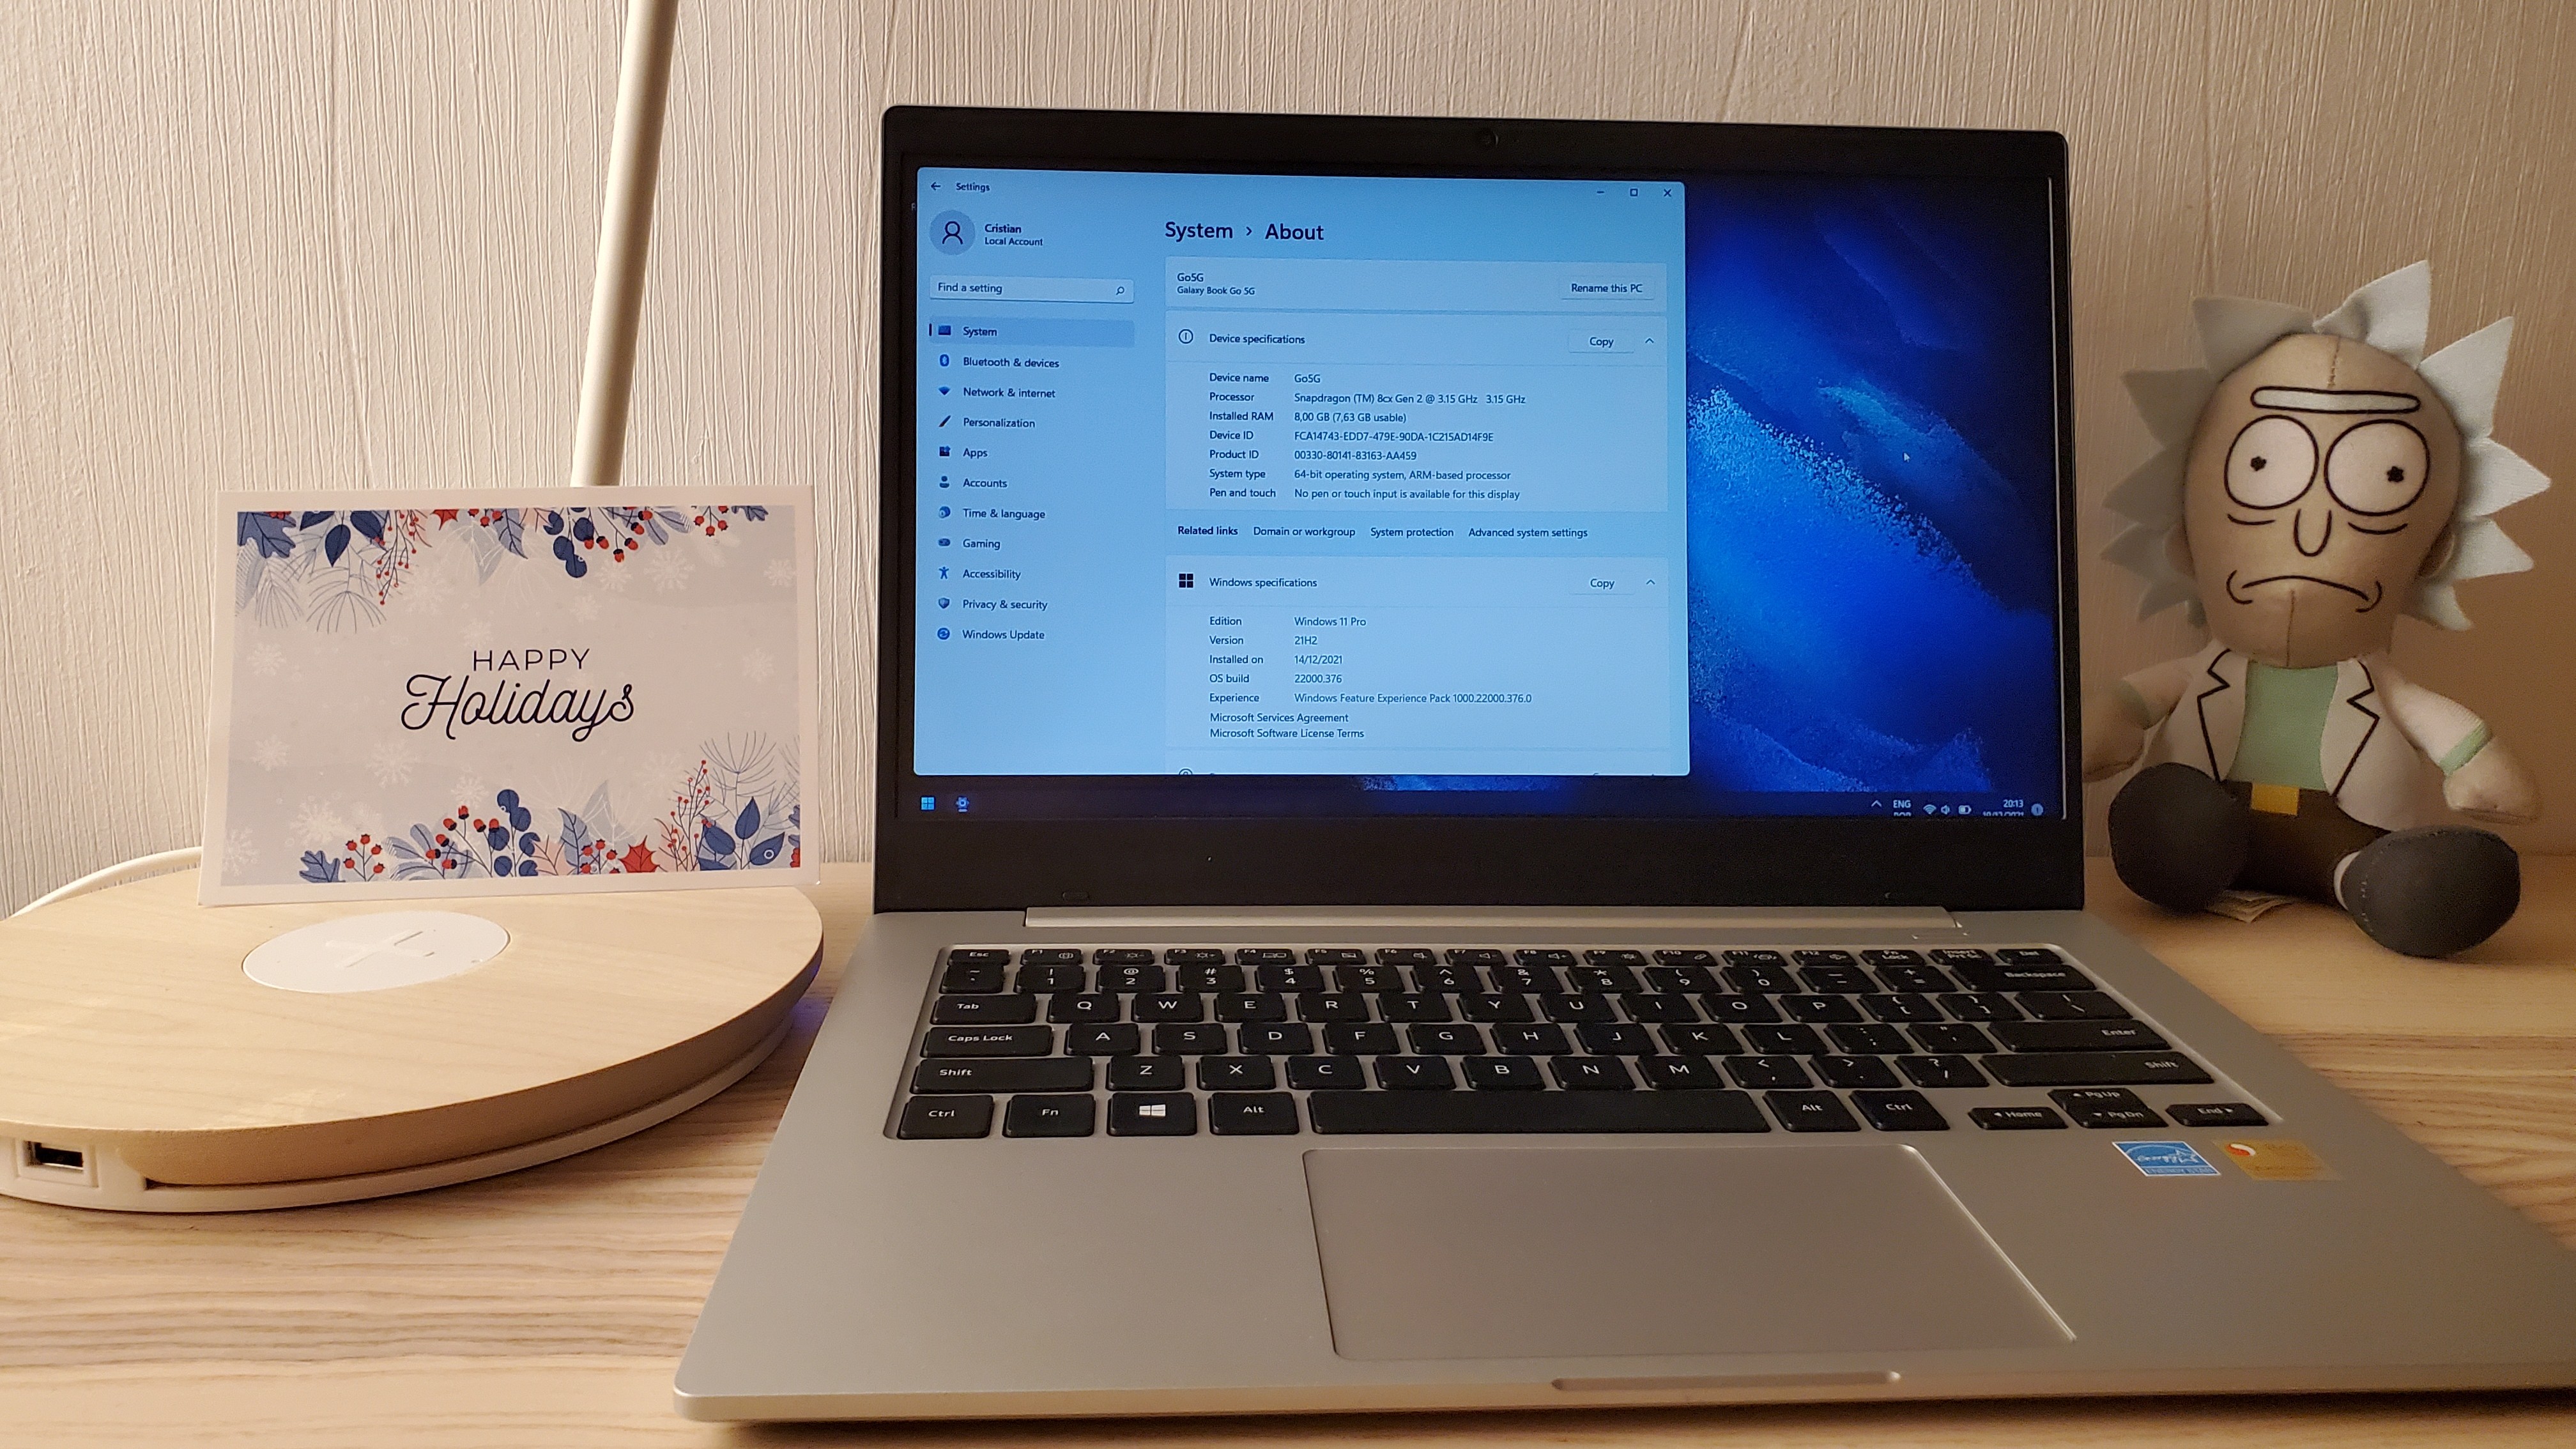
<p><a href="/assets/images/samsung-galaxy-book-go-5g/galaxy-book-go-5g.jpg" target="_blank"><img src="/assets/images/samsung-galaxy-book-go-5g/galaxy-book-go-5g_small.jpg" /></a></p>

<p>The 7-zip benchmark <a href="/assets/samsung-galaxy-book-go-5g/7zip-benchmark-galaxy-book-go-5g.txt">results</a> for <code class="language-plaintext highlighter-rouge">arm64</code> are below:</p>

<div class="language-plaintext highlighter-rouge"><div class="highlight"><pre class="highlight"><code>7-Zip 21.06 (arm64) : Copyright (c) 1999-2021 Igor Pavlov : 2021-11-24

Windows 10.0 22000
ARM64 0 805.D0E cpus:8 128T f:804EB8C1004
LE

1T CPU Freq (MHz):  2599  3138  3128  3145  3144  3144  3145
4T CPU Freq (MHz): 398% 3102   398% 3141

RAM size:    7816 MB,  # CPU hardware threads:   8
RAM usage:   1779 MB,  # Benchmark threads:      8

                       Compressing  |                  Decompressing
Dict     Speed Usage    R/U Rating  |      Speed Usage    R/U Rating
         KiB/s     %   MIPS   MIPS  |      KiB/s     %   MIPS   MIPS

22:      23531   683   3349  22891  |     253881   659   3285  21649
23:      24711   758   3323  25178  |     244390   655   3230  21140
24:      22059   731   3243  23719  |     240148   658   3201  21071
25:      21317   756   3220  24340  |     227340   651   3107  20228
----------------------------------  | ------------------------------
Avr:     22904   732   3284  24032  |     241440   656   3206  21022
Tot:             694   3245  22527
</code></pre></div></div>

<p>Now the comparison table looks like this:</p>

<table>
  <thead>
    <tr>
      <th>CPU</th>
      <th>Compressing MIPS</th>
      <th>Decompressing MIPS</th>
    </tr>
  </thead>
  <tbody>
    <tr>
      <td>Qualcomm 7c Gen 2</td>
      <td>12590</td>
      <td>16390</td>
    </tr>
    <tr>
      <td>Qualcomm 8cx Gen 2</td>
      <td>24032</td>
      <td>21022</td>
    </tr>
    <tr>
      <td>Apple M1</td>
      <td>48841</td>
      <td>45484</td>
    </tr>
  </tbody>
</table>

<p>That’s more like it, but it’s like half of the CPU performance of an Apple M1 <span class="emoji">😐</span></p>

<h1 id="professional-screen-replacement">‘Professional’ screen replacement</h1>

<p>The <em>Galaxy Book Go 5G</em>  had the same problem with the screen. I did a bit of research and found out that the are 14” LCD screens. Because of one YouTube video that showed (a different Galaxy Book) that you had to use a heat gun to replace the LCD, I decided to ask a computer repair shop in Berlin Adlershof to do the work.</p>

<p>Two weeks later and some <span class="emoji">💩</span> from the guy (apparently he had to “cut some braces” to fit the new LCD) and 280€ later I got the laptop with a way better screen.</p>

<p>This should have been the end of the story, unfortunately it was just the beginning.</p>

<h1 id="ui-freezing">UI freezing</h1>

<p>I noticed that the Windows 11 UI would freeze from time to time. Here is a video for me trying to showcase the issue.</p>

<video preload="none" controls="" poster="/assets/images/samsung-galaxy-book-go-5g/video-ui-freeze-poster.jpg" width="100%">
   <source src="/assets/images/samsung-galaxy-book-go-5g/video-ui-freeze.mp4" type="video/mp4" />
</video>

<p>At first I thought there was a problem with the Qualcomm Adreno 690 GPU driver. I bought a license of Treexy Driver Fusion for 20€, tested all drivers it had to offer, but the problem was still there.</p>

<p>The weird issue was that the stock Windows graphics driver was fine, but I had no graphics acceleration and no screen dimming anymore. Bypassing the LCD connecting to an external monitor via USB-C was fine.</p>

<p>Then I thought there was a problem with the EDID LCD parameters, like refresh rate and what not. It was not.</p>

<p>Then I decided to reinstall Windows.</p>

<h1 id="windows-reinstallation-1">Windows reinstallation #1</h1>

<p>Windows reinstallation was not as easy as one would think. Samsung was not offering a way to download a Windows ISO image for the laptop, something that Lenovo offers.</p>

<p>Microsoft was also not offering an Arm64 Windows 11 ISO image for <a href="https://www.microsoft.com/en-us/software-download/windows11">download</a>:</p>
<blockquote>
  <p>The Windows 11 ISO is only available for devices with x64 processors. For ARM-based PCs, you should wait until you are notified through Windows Update that the upgrade is ready for your PC.</p>
</blockquote>

<p>The internet wisdom was: look at pictures of Microsoft Surface Pro X on ebay, get a serial number and then download a <a href="https://support.microsoft.com/en-us/surface-recovery-image">recovery image</a>.</p>

<p>You need a USB Ethernet adapter to get Windows update to fetch the right drivers after Windows installation. Did this, got Windows 10 to work, but no luck, the problem persisted.</p>

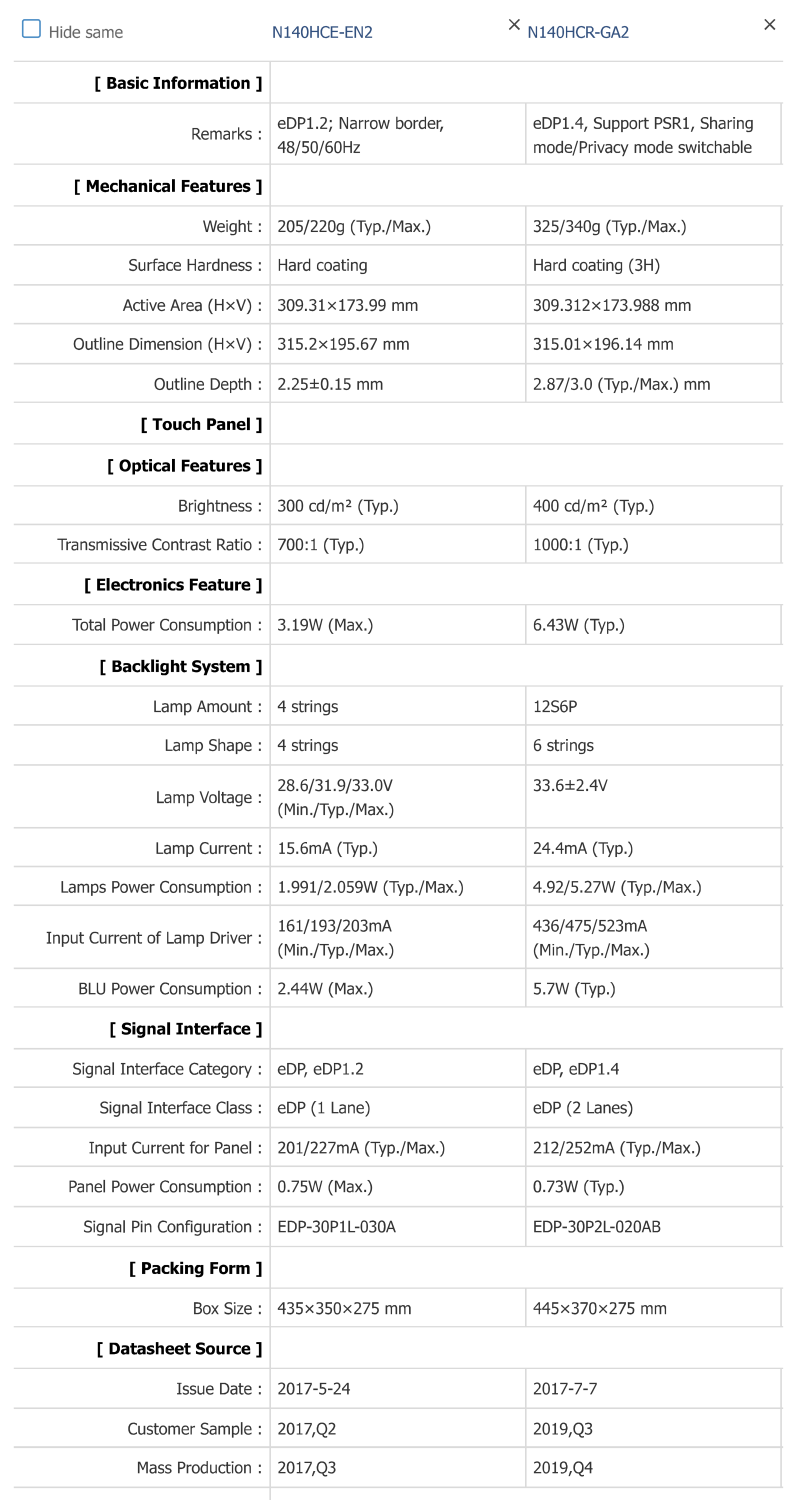
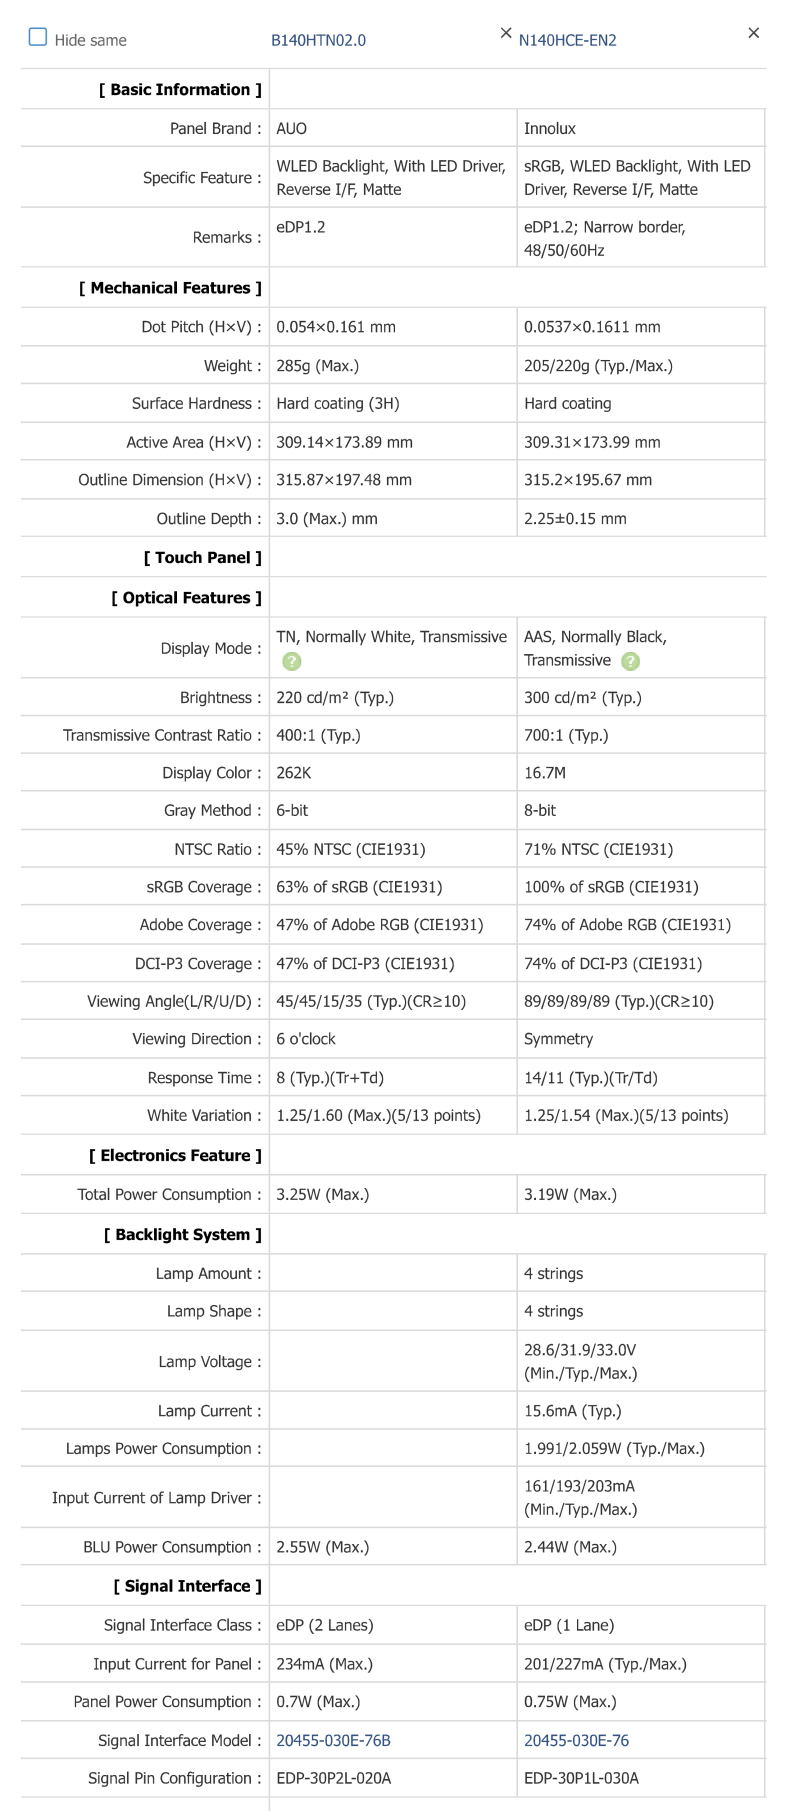
<p>Then I looked at the parameters of the LCD that the repair shop installed <a href="https://www.panelook.com/N140HCR-GA2_Innolux_14.0_LCM_parameter_42986.html">N140HCR-GA2</a>, and a different LCD that used half the power <a href="https://www.panelook.com/N140HCE-EN2_Innolux_14.0_LCM_parameter_30961.html">N140HCE-EN2</a>. The important part was the signal interface <code class="language-plaintext highlighter-rouge">20455-030E-76</code>.</p>

<p><img src="/assets/images/samsung-galaxy-book-go-5g/lcd-vs-lcd-2x-power.png" /></p>

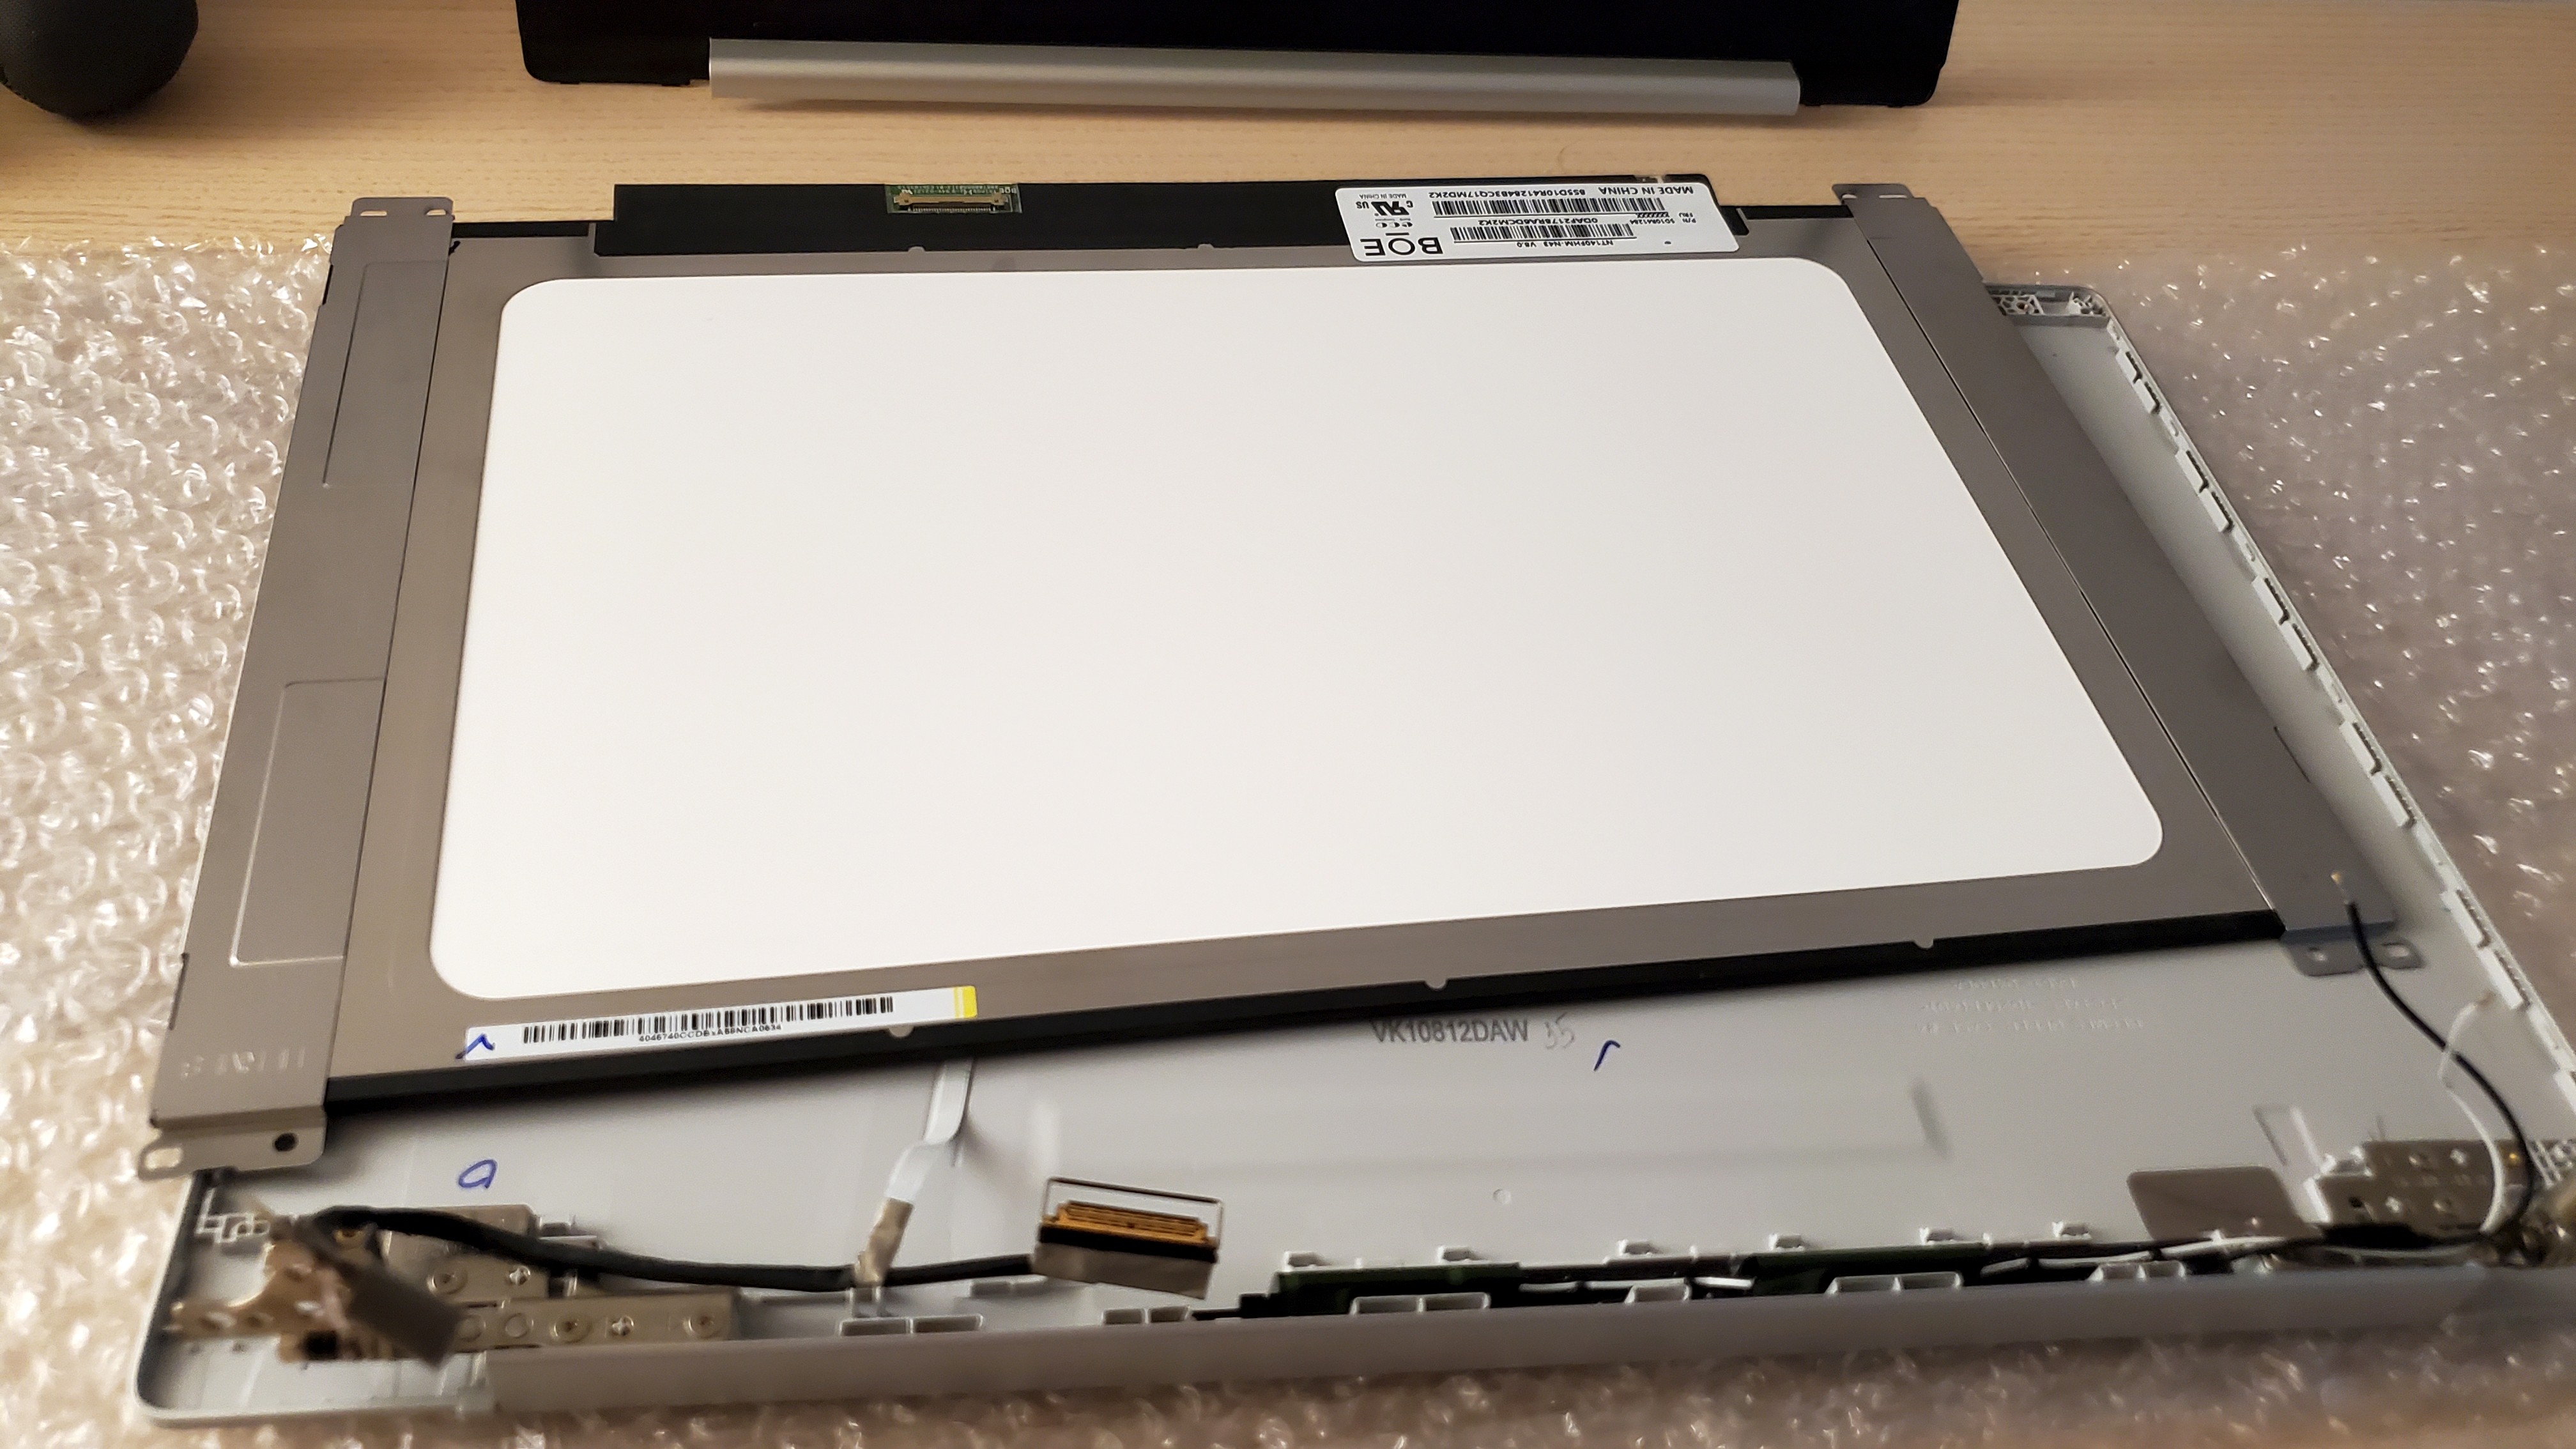
<p>So I decided to buy a <code class="language-plaintext highlighter-rouge">N140HCE-EN2</code> LCD from eBay for 84€ and 10€ for an iFixit repair kit.</p>

<p>Did the replacement myself and … GREAT SUCCESS. The UI freeze was gone! <span class="emoji">🎉</span></p>

<h1 id="windows-reinstallation-2">Windows reinstallation #2</h1>

<p>Because I have installed Windows via a Microsoft Surface Pro X image, and even though Windows has picked up the Samsung driver package, some things were tuned differently.</p>

<p>The first problem that I’ve encountered: USB-C ports were not working. This was a bummer since I had moved a 512GB M.2 drive into a USB-C enclosure.</p>

<p>I decided to use a different Surface Pro X serial key and recovery image.</p>

<p>This time the USB-C ports were working <span class="emoji">🎉</span></p>

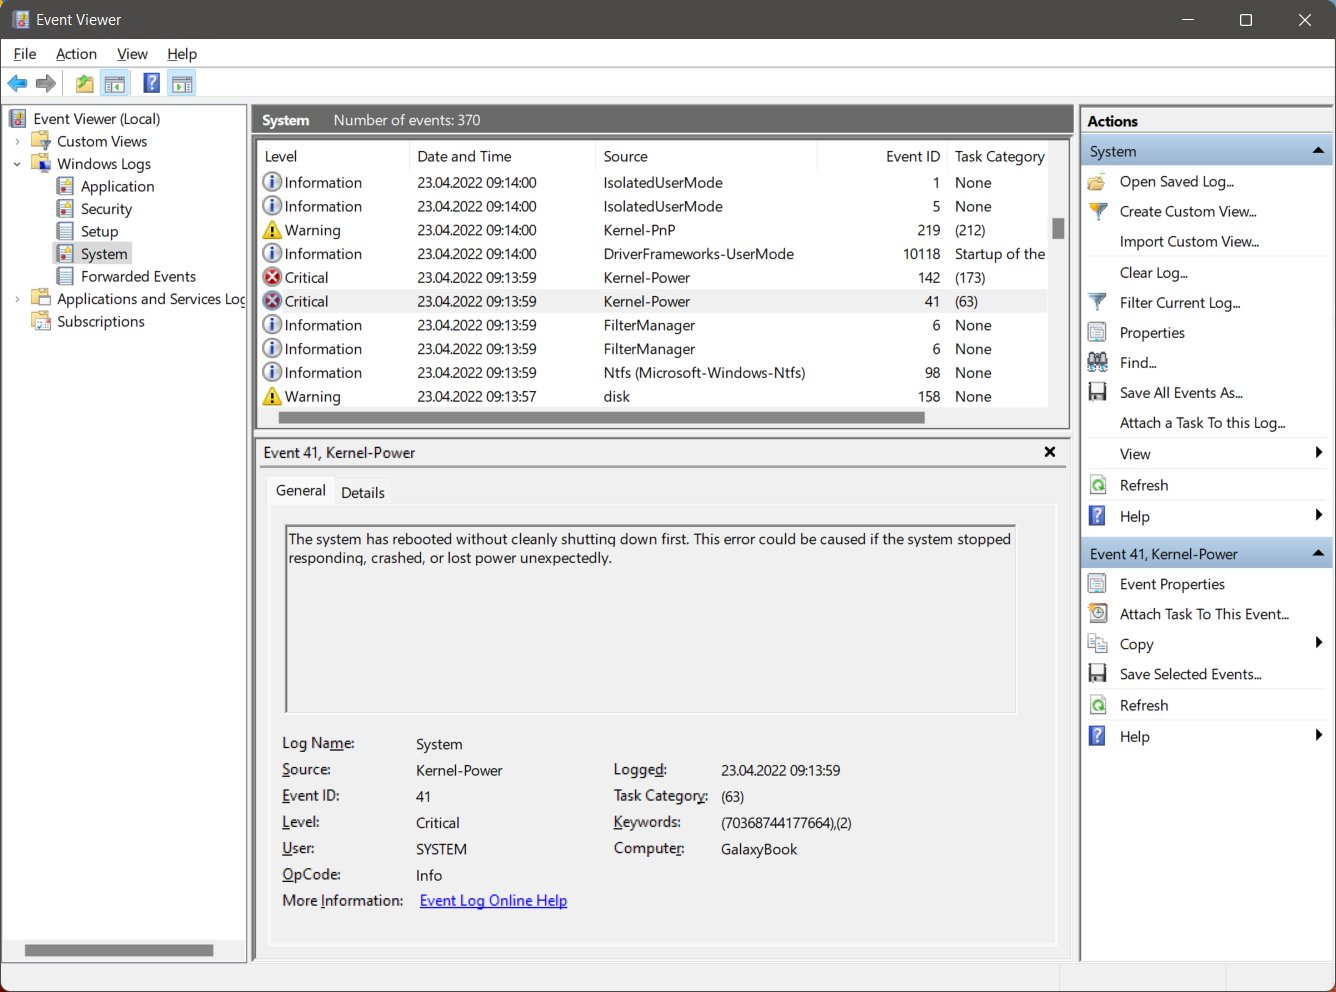
<p>But soon I’ve got random Windows 11 blue screens of death with the <code class="language-plaintext highlighter-rouge">CLOCK_WATCHDOG_TIMEOUT</code> as main culprit!</p>

<p><img src="/assets/images/samsung-galaxy-book-go-5g/kernel-power.jpg" /></p>

<p>I’ve ran all the Windows 11 troubleshooters, but nothing helped. <span class="emoji">😔</span></p>

<p>Since there was no way for me to get a Windows 11 clean Arm64 ISO image, I decided to order another Samsung Galaxy Book Go 5G from eBay USA for 332€ <span class="emoji">😒</span></p>

<p>My idea was to get the Windows installation from the new laptop.</p>

<h1 id="clean-windows-reinstallation">Clean Windows reinstallation</h1>

<p>By using <a href="https://uupdump.net/">UUP Dump</a> you can create a Arm64 ISO image. I have tried such an ISO image multiple times, but my problem was that at installation
time there was no mouse and keyboard support. I was not able to actually do the Windows installation.</p>

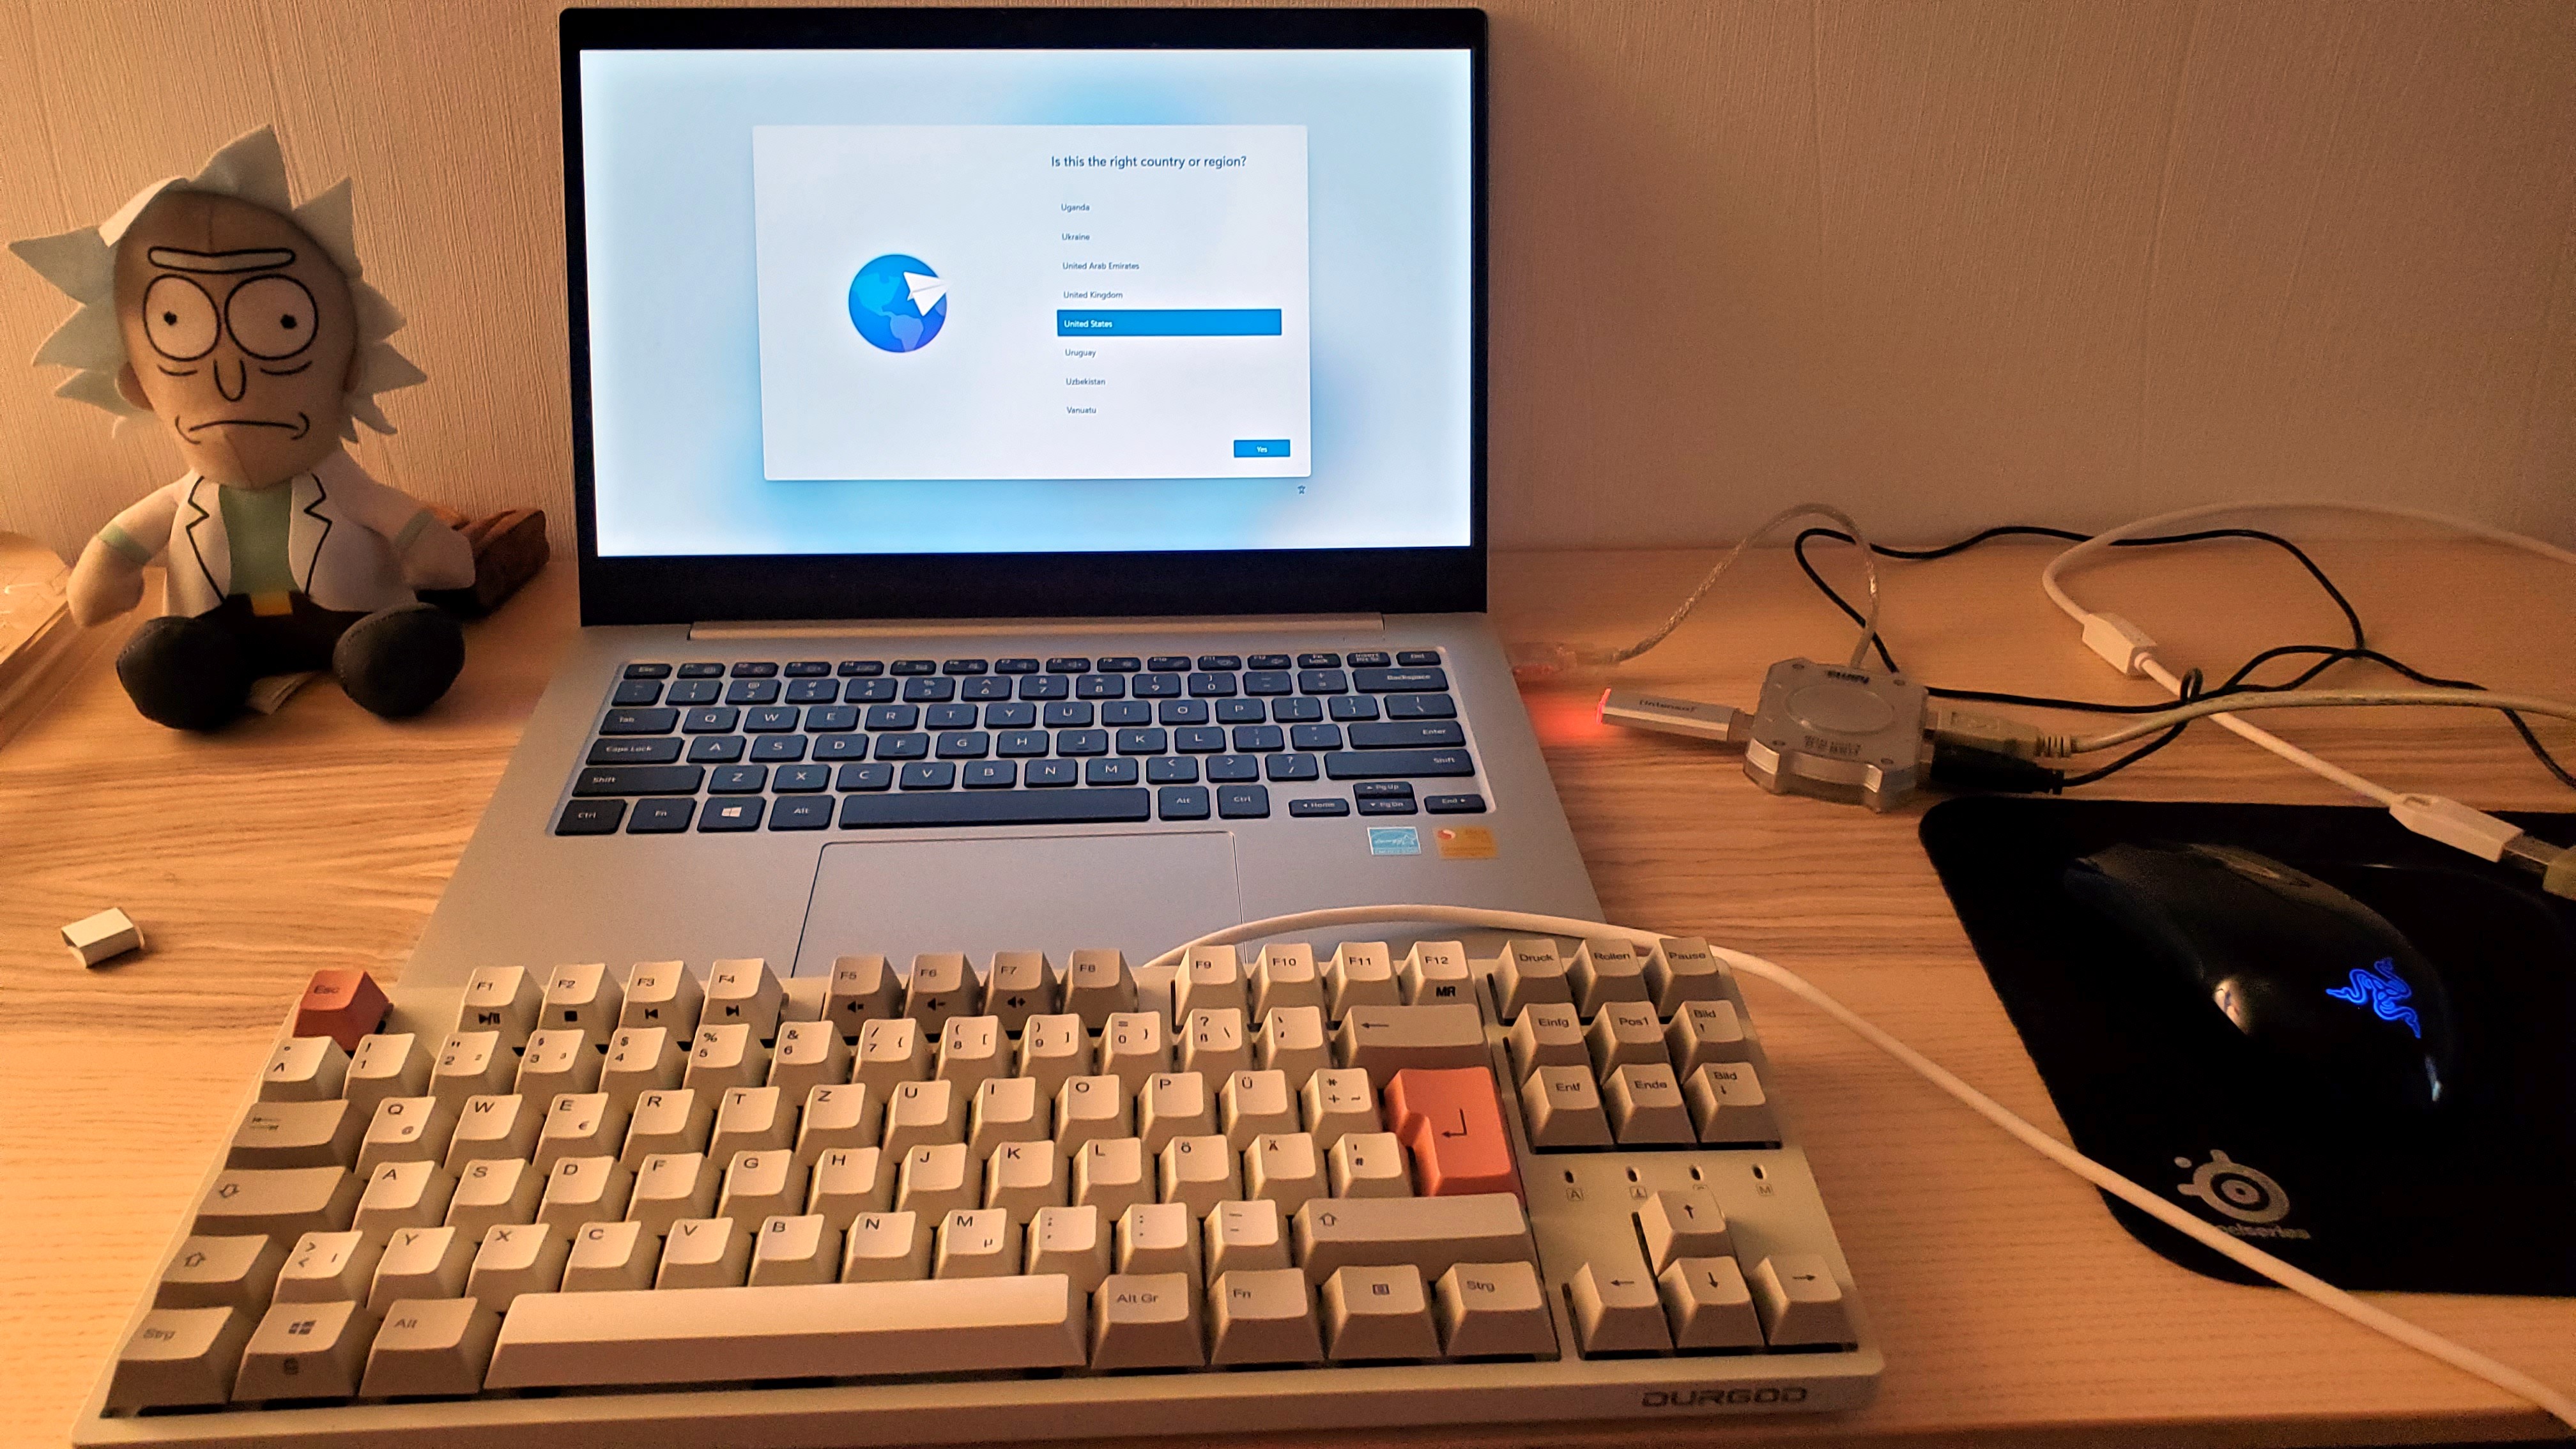
<p>While waiting for the second Galaxy Book Go 5G to arrive, I’ve tried something else. I’ve used a USB 2A hub to connect the USB with Windows 11 and a mouse and keyboard.
This actually WORKED <span class="emoji">🎉</span></p>

<p>I was able to do a clean install of Windows 11, with USB-C port working and not having random reboots!</p>

<p>At installation I had to press Shift-F10 to open a command prompt window, run <code class="language-plaintext highlighter-rouge">regedit</code>, add the <code class="language-plaintext highlighter-rouge">LabConfig</code> key under <code class="language-plaintext highlighter-rouge">HKEY_LOCAL_MACHINE\SYSTEM\Setup</code>, add the values <code class="language-plaintext highlighter-rouge">BypassTPMCheck</code>, <code class="language-plaintext highlighter-rouge">BypassRAMCheck</code>, <code class="language-plaintext highlighter-rouge">BypassSecureBootCheck </code>as <code class="language-plaintext highlighter-rouge">1</code> (32 bit DWORD).</p>

<p><a href="/assets/images/samsung-galaxy-book-go-5g/clean_windows_setup.jpg" target="_blank"><img src="/assets/images/samsung-galaxy-book-go-5g/clean_windows_setup_small.jpg" /></a></p>

<h1 id="second-lcd-replacement">Second LCD replacement</h1>

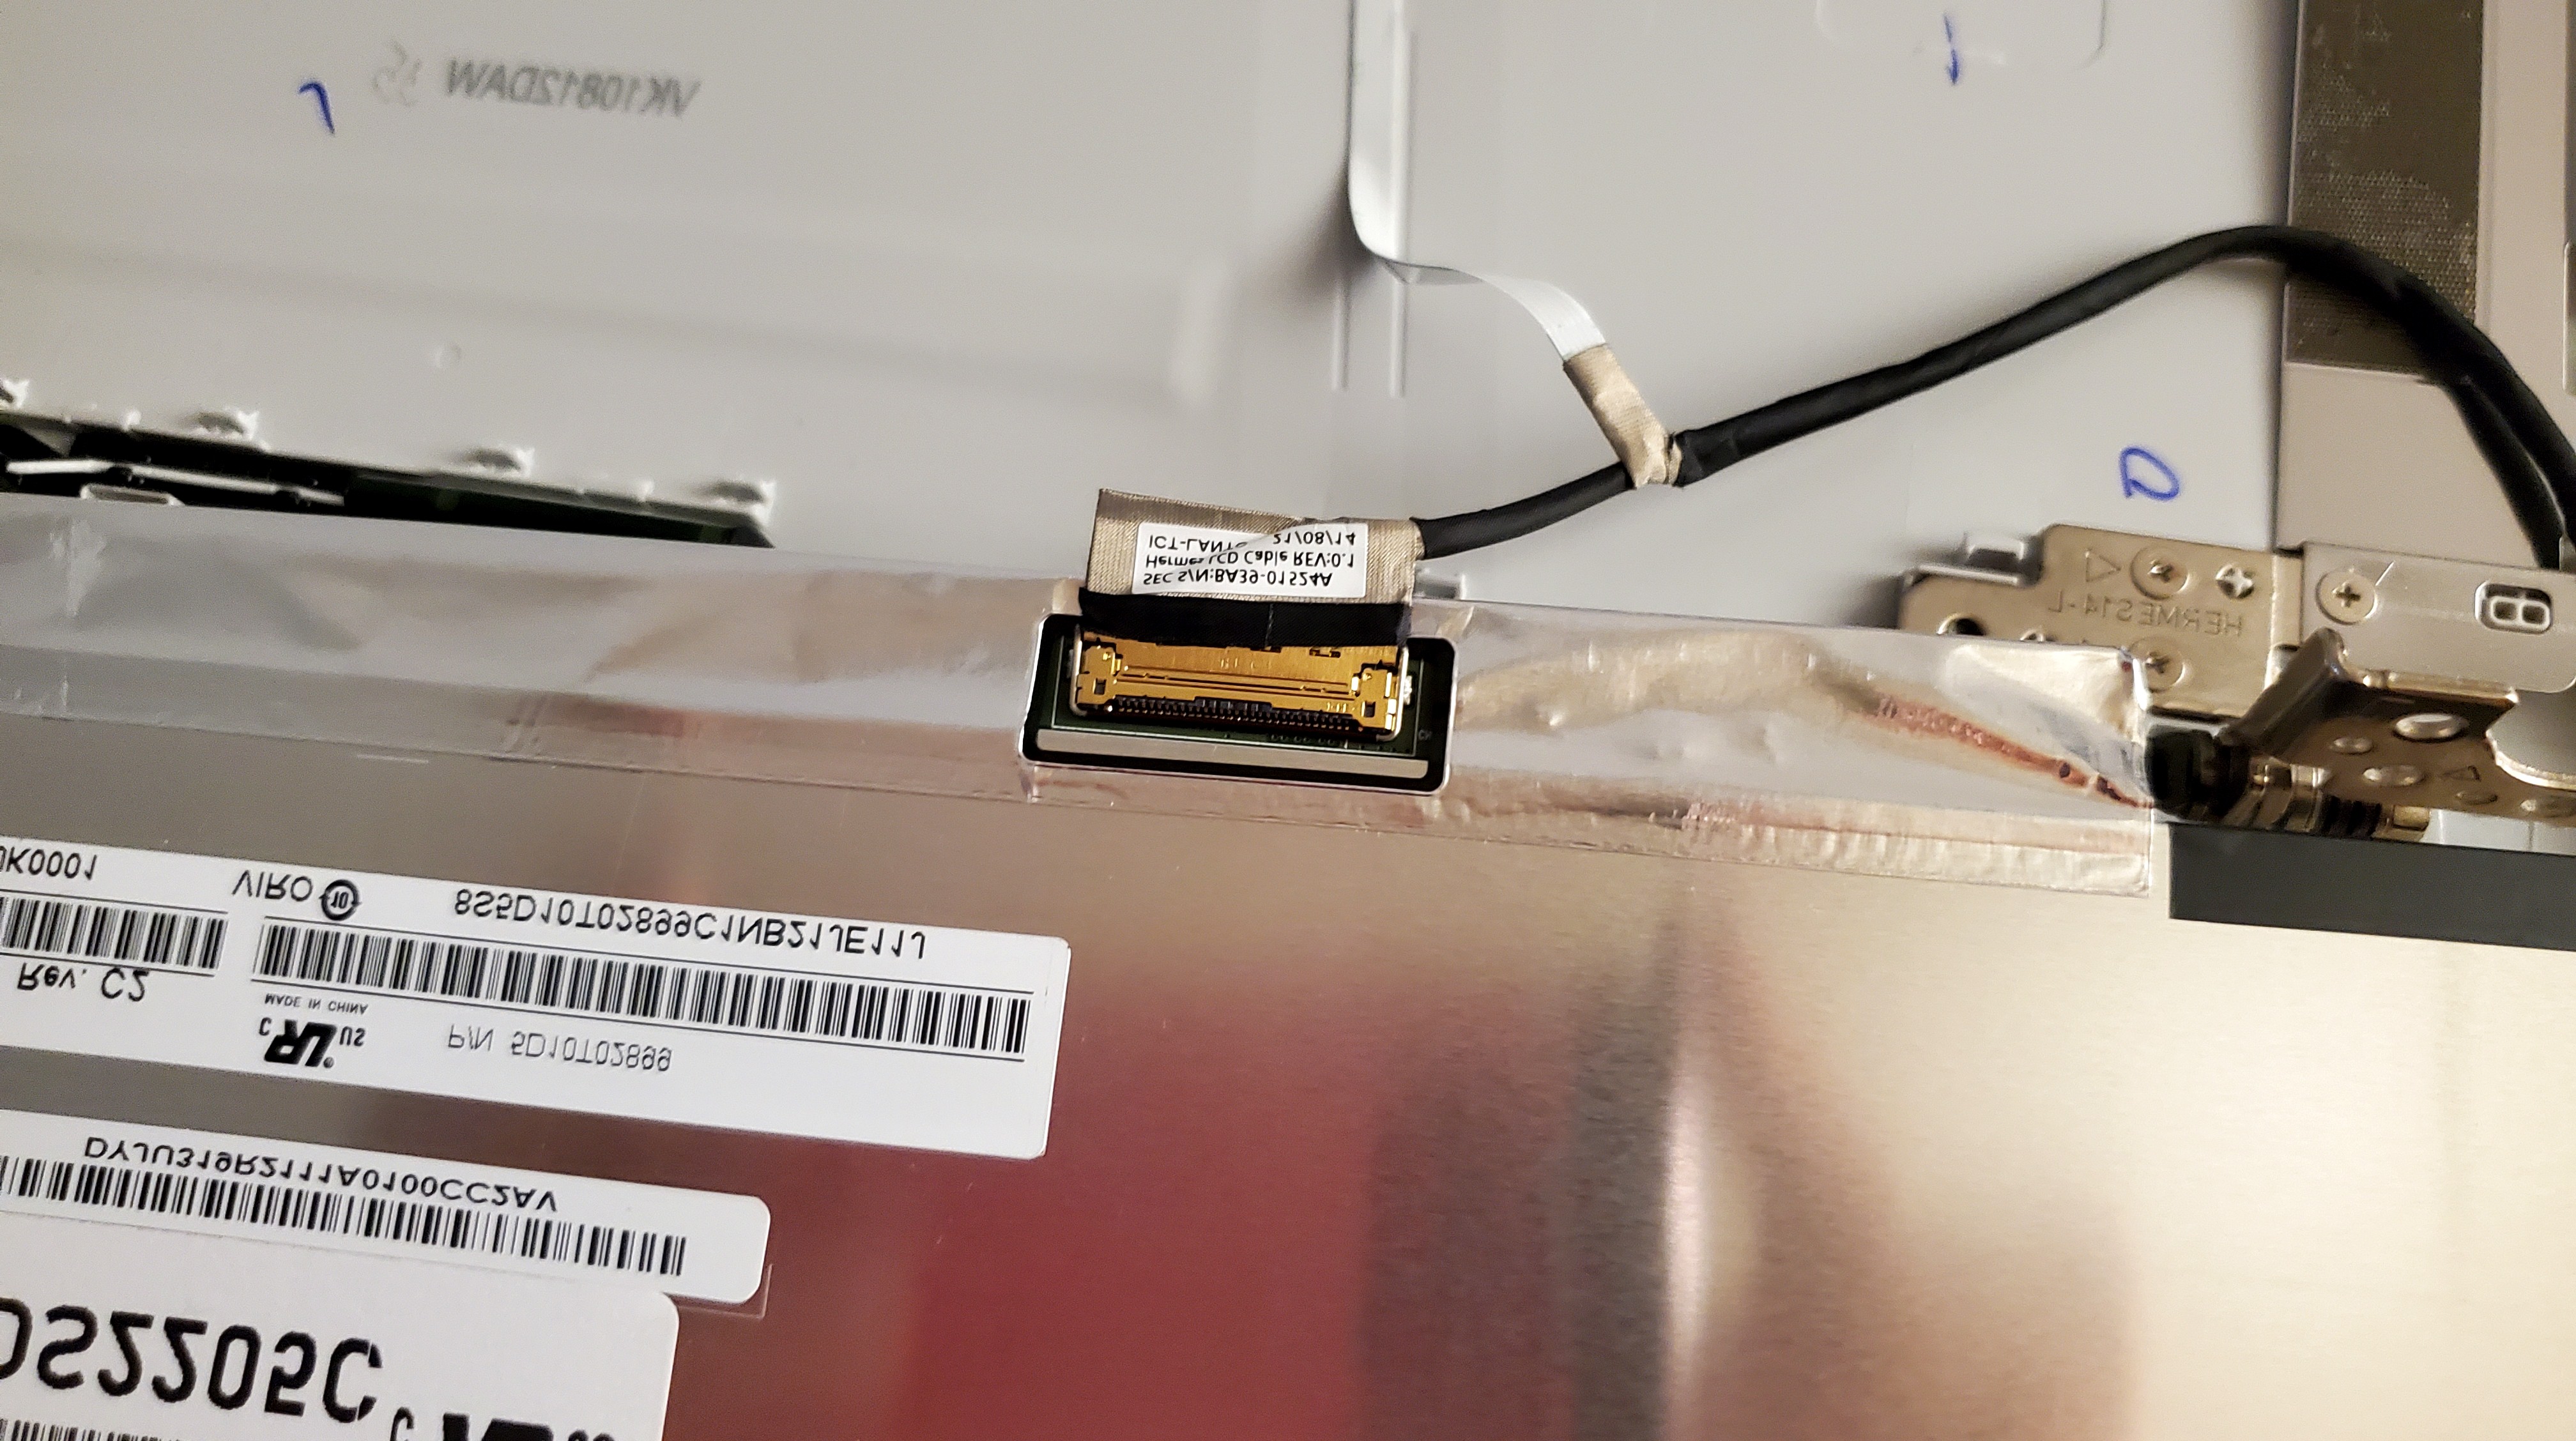
<p>After receiving the second <em>Samsung Galaxy Book Go 5G</em> I decided to replace the LCD (80€) and make some pictures this time:</p>

<table>
    <tr>
        <td><a href="/assets/images/samsung-galaxy-book-go-5g/lcd_replacement_1.jpg" target="_blank"><img src="/assets/images/samsung-galaxy-book-go-5g/lcd_replacement_1_small.jpg" /></a></td>
        <td><a href="/assets/images/samsung-galaxy-book-go-5g/lcd_replacement_2.jpg" target="_blank"><img src="/assets/images/samsung-galaxy-book-go-5g/lcd_replacement_2_small.jpg" /></a></td>
        <td><a href="/assets/images/samsung-galaxy-book-go-5g/lcd_replacement_3.jpg" target="_blank"><img src="/assets/images/samsung-galaxy-book-go-5g/lcd_replacement_3_small.jpg" /></a></td>
    </tr>
    <tr>
        <td><a href="/assets/images/samsung-galaxy-book-go-5g/lcd_replacement_4.jpg" target="_blank"><img src="/assets/images/samsung-galaxy-book-go-5g/lcd_replacement_4_small.jpg" /></a></td>
        <td><a href="/assets/images/samsung-galaxy-book-go-5g/lcd_replacement_5.jpg" target="_blank"><img src="/assets/images/samsung-galaxy-book-go-5g/lcd_replacement_5_small.jpg" /></a></td>
        <td><a href="/assets/images/samsung-galaxy-book-go-5g/lcd_replacement_6.jpg" target="_blank"><img src="/assets/images/samsung-galaxy-book-go-5g/lcd_replacement_6_small.jpg" /></a></td>
    </tr>
    <tr>
        <td><a href="/assets/images/samsung-galaxy-book-go-5g/lcd_replacement_7.jpg" target="_blank"><img src="/assets/images/samsung-galaxy-book-go-5g/lcd_replacement_7_small.jpg" /></a></td>
        <td><a href="/assets/images/samsung-galaxy-book-go-5g/lcd_replacement_8.jpg" target="_blank"><img src="/assets/images/samsung-galaxy-book-go-5g/lcd_replacement_8_small.jpg" /></a></td>
        <td><a href="/assets/images/samsung-galaxy-book-go-5g/lcd_replacement_9.jpg" target="_blank"><img src="/assets/images/samsung-galaxy-book-go-5g/lcd_replacement_9_small.jpg" /></a></td>
    </tr>
</table>

<p>Now I was also able to find out which LCD Samsung used for the <em>Galaxy Book Go 5G</em>, namely a <a href="https://www.panelook.com/B140HTN02.0_AUO_14.0_LCM_parameter_45284.html">B140HTN02.0</a>. Below you
have the comparison to the LCD I picked:</p>

<p><img src="/assets/images/samsung-galaxy-book-go-5g/lcd-vs-original-lcd.png" /></p>

<h1 id="some-more-benchmarks">Some more benchmarks</h1>

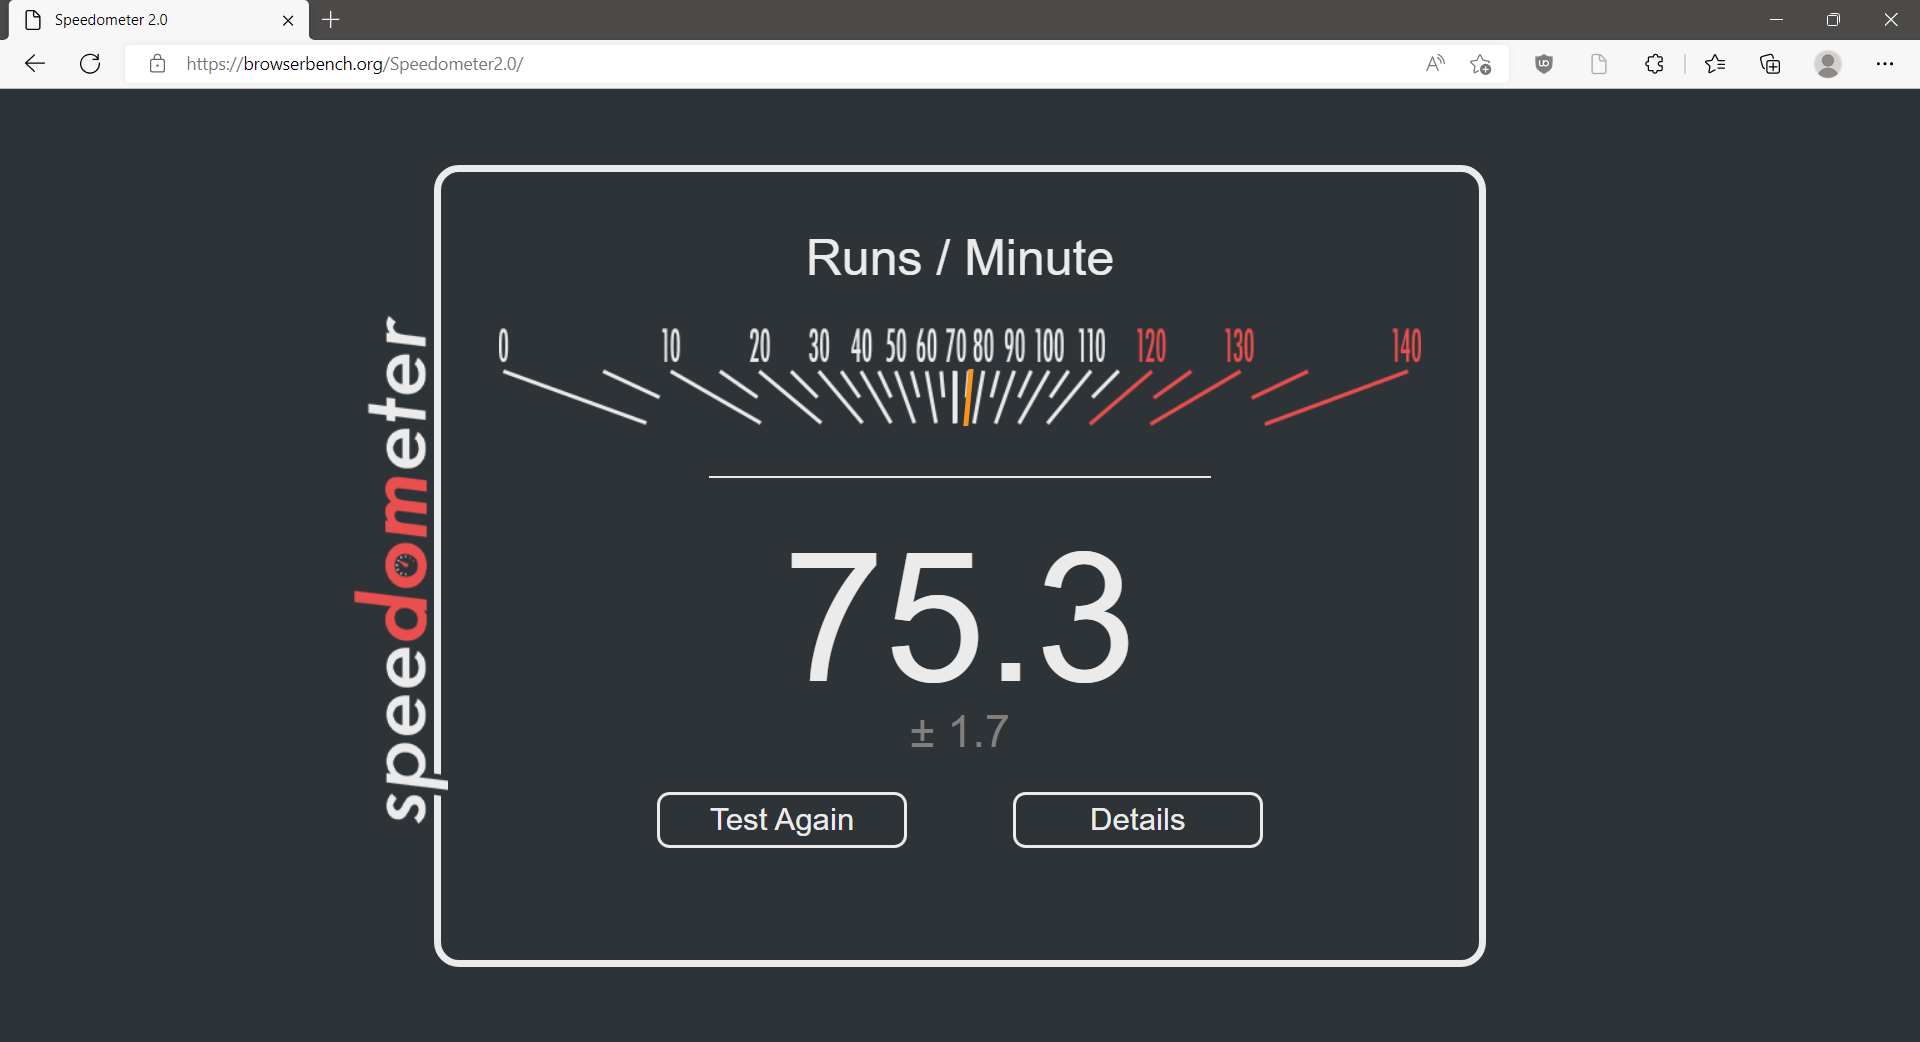
<p>Edge running as a native Arm64 application with <a href="https://browserbench.org/Speedometer2.0/">Speedometer2.0</a>:</p>

<p><img src="/assets/images/samsung-galaxy-book-go-5g/edge-speedometer-5g.png" /></p>

<p>CrystalDiskMark 8.0.4:</p>

<p><img src="/assets/images/samsung-galaxy-book-go-5g/crystaldiskmark.png" /></p>

<h1 id="real-life-usage">Real life usage</h1>

<p>I have been using the <em>Samsung Galaxy Book Go 5G</em> as a main laptop at home for a few months now. Mainly browsing, and RDP-ing into a Ryzen 9 machine.</p>

<p>But I have also built Qt Creator 9 and its dependencies: Qt 6.4 and LLVM 15.0 with it. It’s not that fast, and not having all the tools as native Arm64 doesn’t help with performance.
Microsoft did release <a href="https://devblogs.microsoft.com/visualstudio/arm64-visual-studio-is-officially-here/">Arm64 Visual Studio</a> recently though.</p>

<p>It has a plastic feel to it, not very solid, seems more like a toy. The keyboard is not that great, but it has proper left Ctrl and Fn keys and no Print Screen key close to the right Alt key.
I had to reduce the keyboard repeat rate so that I would have lleess double kkeys.</p>

<p>I had to disable all touchpad gestures, because it would emit fake taps. But I got used to clicking on the low part of the touchpad.</p>

<p>I do like the screen and the fact that it’s a 14” device. The sad part is that you can’t upgrade anything on the device, and the CPU is not on par with what Apple has to offer.</p>

<p>All in all I’ve spent 1281€, for which I could have bought a <a href="https://geizhals.de/apple-macbook-air-midnight-mly33d-a-2022-a2747646.html">Apple MacBook Air Midnight, M2 - 8 Core CPU / 8 Core GPU, 8GB RAM, 256GB SSD</a> priced at 1274€, but I wouldn’t have had so much fun <span class="emoji">😅</span></p>]]></content><author><name></name></author><category term="Windows" /><category term="Arm64" /><summary type="html"><![CDATA[We all know the Arm CPU architecture from smartphones, which have a long battery life and passive cooling. Apple has shown with the M1/2 laptops that you can have a laptop that kicks ass with an Arm CPU. In November 2021 I had a look to see if there was something like that for Windows. I found a handful of models. Microsoft Surface Pro X, Lenovo Flex 5G, Acer Spin 7 at prices between 1000 - 1500$, and lastly Samsung Galaxy Book Go 5G at 800$ (400$ on eBay). Samsung Galaxy Book Go In Germany I could only buy the Samsung Galaxy Book Go “European” LTE version. Which came with a Qualcomm Snapdragon (TM) 7c Gen 2 CPU, 4GB of RAM and 128GB SSD. I bought a refurbished model for 300€. I took 7zip and run 7z -b to benchmark for arm64, x86_64 and x86. The results are here, below you have the arm64 results: C:\Program Files (Arm)\7-Zip&gt;7z b 7-Zip 21.04 beta (arm64) : Copyright (c) 1999-2021 Igor Pavlov : 2021-11-02 Windows 10.0 22000 ARM64 0 805.D0E cpus:8 128T f:804EB8C1004 LE 1T CPU Freq (MHz): 1931 2549 2550 2493 2488 2549 2545 4T CPU Freq (MHz): 346% 1903 354% 1952 RAM size: 3659 MB, # CPU hardware threads: 8 RAM usage: 1779 MB, # Benchmark threads: 8 Compressing | Decompressing Dict Speed Usage R/U Rating | Speed Usage R/U Rating KiB/s % MIPS MIPS | KiB/s % MIPS MIPS 22: 12741 678 1828 12395 | 194291 705 2349 16568 23: 12388 722 1749 12622 | 185160 687 2333 16017 24: 11760 729 1735 12645 | 187951 720 2290 16491 25: 11119 753 1686 12696 | 185261 739 2232 16484 ---------------------------------- | ------------------------------ Avr: 12002 720 1750 12590 | 188166 713 2301 16390 Tot: 716 2025 14490 The numbers by themselves do not mean much, but let’s compare them with the Apple M1 results from 7-cpu.com: CPU Compressing MIPS Decompressing MIPS Qualcomm 7c Gen 2 12590 16390 Apple M1 48841 45484 That’s not that good, isn’t it? Also 4GB of RAM, and 128GB SSD with no means to upgrade, made the offering a bit uncool. Another thing that I’ve noticed was the screen quality. It wasn’t at the same level as my previous Lenovo laptops. The colors would change depending how I moved my head. Notebookcheck.net has an article named Samsung Galaxy Book Go in review: Silent office notebook (archive.org copy), and their conclusion: A better display could have made the Samsung Galaxy Book Go a good and inexpensive notebook.]]></summary></entry><entry><title type="html">Speeding up C++ GitHub Actions using ccache</title><link href="https://cristianadam.eu/20200113/speeding-up-c-plus-plus-github-actions-using-ccache/" rel="alternate" type="text/html" title="Speeding up C++ GitHub Actions using ccache" /><published>2020-01-13T22:35:38+01:00</published><updated>2020-01-13T22:35:38+01:00</updated><id>https://cristianadam.eu/20200113/speeding-up-c-plus-plus-github-actions-using-ccache</id><content type="html" xml:base="https://cristianadam.eu/20200113/speeding-up-c-plus-plus-github-actions-using-ccache/"><![CDATA[<p>In my previous post <a href="/20191222/using-github-actions-with-c-plus-plus-and-cmake">Using GitHub Actions with C++ and CMake</a> I have provided
a GitHub Actions yaml configuration file for C++ projects using CMake.</p>

<p>Building a project on GitHub Actions means always a build from scratch, for any given change, big or small. This takes time and wastes resources unnecessarily.</p>

<p>GitHub provides a way of <a href="https://help.github.com/en/actions/automating-your-workflow-with-github-actions/caching-dependencies-to-speed-up-workflows">caching dependencies to speed up workflows</a>. The total size of cached files per repository is 2 GiB.</p>

<p>By having a look at the examples of various <a href="https://github.com/actions/cache/blob/master/examples.md">programming languages</a> we can see that
this is meant to cache package manager dependencies e.g. pip for python, npn for node, or gradle for java.</p>

<p>But, as it turns out, the caching mechanism can be used to cache compilation artifacts.</p>

<!--more-->

<h1 id="ccache">ccache</h1>

<blockquote>
  <p><a href="https://ccache.dev/">ccache</a> (or “Ccache”) is a compiler cache. It speeds up recompilation by caching previous compilations and detecting when the same compilation is being done again. Supported languages are C, C++, Objective-C and Objective-C++.</p>
</blockquote>

<p>The following yaml file excerpt will enable ccache support for GitHub Actions:</p>

<div class="language-yaml highlighter-rouge"><div class="highlight"><pre class="highlight"><code><span class="pi">-</span> <span class="na">name</span><span class="pi">:</span> <span class="s">Prepare ccache timestamp</span>
    <span class="s">id</span><span class="err">:</span> <span class="s">ccache_cache_timestamp</span>
    <span class="s">shell</span><span class="err">:</span> <span class="s">cmake -P {0}</span>
    <span class="s">run</span><span class="err">:</span> <span class="pi">|</span>
    <span class="s">string(TIMESTAMP current_date "%Y-%m-%d-%H;%M;%S" UTC)</span>
    <span class="s">message("::set-output name=timestamp::${current_date}")</span>

<span class="pi">-</span> <span class="na">name</span><span class="pi">:</span> <span class="s">ccache cache files</span>
    <span class="s">uses</span><span class="err">:</span> <span class="s">actions/cache@v1.1.0</span>
    <span class="s">with</span><span class="err">:</span>
    <span class="na">path</span><span class="pi">:</span> <span class="s">.ccache</span>
    <span class="na">key</span><span class="pi">:</span> <span class="s">${ { matrix.config.name } }-ccache-${ { steps.ccache_cache_timestamp.outputs.timestamp } }</span>
    <span class="na">restore-keys</span><span class="pi">:</span> <span class="pi">|</span>
        <span class="s">${ { matrix.config.name } }-ccache-</span>
</code></pre></div></div>

<p>This makes sure that for every build the GitHub Actions cache key is unique. It will restore
the latest tar file containing the <code class="language-plaintext highlighter-rouge">.ccache</code> folder for the current configuration, and and the end of
the job it will store the updated <code class="language-plaintext highlighter-rouge">.ccache</code> folder in a new tar file.</p>

<h1 id="using-ccache-with-cmake">Using ccache with CMake</h1>

<p>In the configure step one only needs to pass:</p>

<div class="language-plaintext highlighter-rouge"><div class="highlight"><pre class="highlight"><code>-D CMAKE_C_COMPILER_LAUNCHER=ccache
-D CMAKE_CXX_COMPILER_LAUNCHER=ccache
</code></pre></div></div>

<p>Before building the project I am configuring ccache via environment variables like this:</p>

<div class="language-cmake highlighter-rouge"><div class="highlight"><pre class="highlight"><code><span class="nb">file</span><span class="p">(</span>TO_CMAKE_PATH <span class="s2">"$ENV{GITHUB_WORKSPACE}"</span> ccache_basedir<span class="p">)</span>
<span class="nb">set</span><span class="p">(</span>ENV{CCACHE_BASEDIR} <span class="s2">"</span><span class="si">${</span><span class="nv">ccache_basedir</span><span class="si">}</span><span class="s2">"</span><span class="p">)</span>
<span class="nb">set</span><span class="p">(</span>ENV{CCACHE_DIR} <span class="s2">"</span><span class="si">${</span><span class="nv">ccache_basedir</span><span class="si">}</span><span class="s2">/.ccache"</span><span class="p">)</span>
<span class="nb">set</span><span class="p">(</span>ENV{CCACHE_COMPRESS} <span class="s2">"true"</span><span class="p">)</span>
<span class="nb">set</span><span class="p">(</span>ENV{CCACHE_COMPRESSLEVEL} <span class="s2">"6"</span><span class="p">)</span>
<span class="nb">set</span><span class="p">(</span>ENV{CCACHE_MAXSIZE} <span class="s2">"400M"</span><span class="p">)</span>
<span class="nb">if</span> <span class="p">(</span><span class="s2">"</span><span class="si">${</span><span class="nv"> { matrix.config.cxx </span><span class="si">}</span><span class="s2"> }"</span> STREQUAL <span class="s2">"cl"</span><span class="p">)</span>
    <span class="nb">set</span><span class="p">(</span>ENV{CCACHE_MAXSIZE} <span class="s2">"600M"</span><span class="p">)</span>
<span class="nb">endif</span><span class="p">()</span>
</code></pre></div></div>

<p>This will ensure that the maximum size of the cache will be 400 MiB, will use compression, and the paths
will always be relative to the build directory.</p>

<p>ccache statistics are zeroed before starting the build (<code class="language-plaintext highlighter-rouge">ccache -z</code>), and displayed after the build (<code class="language-plaintext highlighter-rouge">ccache -s</code>).</p>

<h1 id="getting-ccache">Getting ccache</h1>

<p>ccache project doesn’t have any binary releases on their <a href="https://github.com/ccache/ccache">github page</a>, like CMake or ninja.</p>

<p>One could use <code class="language-plaintext highlighter-rouge">brew</code> to install <code class="language-plaintext highlighter-rouge">ccache</code> on macOS, <code class="language-plaintext highlighter-rouge">apt get</code> to install <code class="language-plaintext highlighter-rouge">ccache</code> on Ubuntu, but what about Windows?</p>

<p>I have my own <a href="https://github.com/cristianadam/ccache">ccache fork</a>, which has three commits over the official ccache:</p>

<ol>
  <li>CMake build system - to build on Windows</li>
  <li>GitHub Actions yaml file - for providing binary releases</li>
  <li>Visual C++ (alpha) support - for having a cross platform caching solution</li>
</ol>

<p>Getting ccache from my fork’s binary releases is as easy as:</p>

<div class="language-yaml highlighter-rouge"><div class="highlight"><pre class="highlight"><code><span class="pi">-</span> <span class="na">name</span><span class="pi">:</span> <span class="s">Download ccache</span>
    <span class="s">id</span><span class="err">:</span> <span class="s">ccache</span>
    <span class="s">shell</span><span class="err">:</span> <span class="s">cmake -P {0}</span>
    <span class="s">run</span><span class="err">:</span> <span class="pi">|</span>
      <span class="s">set(ccache_url "https://github.com/cristianadam/ccache/releases/download/v$ENV{CCACHE_VERSION}/${ { runner.os } }.tar.xz")</span>
      <span class="s">file(DOWNLOAD "${ccache_url}" ./ccache.tar.xz SHOW_PROGRESS)</span>
      <span class="s">execute_process(COMMAND ${CMAKE_COMMAND} -E tar xvf ./ccache.tar.xz)</span>
</code></pre></div></div>

<h1 id="visual-c-support">Visual C++ support</h1>

<p>I used Jean-Dominique Gascuel’s work from <a href="https://github.com/ccache/ccache/pull/162">ccache’s PR 162</a>.
He tried to build ccache with Visual C++, add support for it in ccache. His pull request had
161 commits, and in the end got closed <span class="emoji">😔</span></p>

<p>I just needed the last part, having support for Visual C++. I am fine with a MinGW build of ccache.</p>

<p>At the moment I have only tested CMake with Ninja generator in Release mode, which is exactly
what I need for GitHub actions.</p>

<p>Debug mode is not supported since ccache should cache also the pdb files.
Precompiled headers are not supported since ccache should know about them and store the pch files.</p>

<h1 id="helloworld-project">HelloWorld project</h1>

<p>I have updated my C++ <a href="https://github.com/cristianadam/HelloWorld">HelloWorld</a> GitHub Actions enabled project to use ccache.
The yaml file can be also downloaded from <a href="/assets/github-actions-ccache/build_cmake.yml" class="download">here</a>.</p>]]></content><author><name></name></author><category term="ccache" /><category term="CMake" /><category term="C++" /><summary type="html"><![CDATA[In my previous post Using GitHub Actions with C++ and CMake I have provided a GitHub Actions yaml configuration file for C++ projects using CMake. Building a project on GitHub Actions means always a build from scratch, for any given change, big or small. This takes time and wastes resources unnecessarily. GitHub provides a way of caching dependencies to speed up workflows. The total size of cached files per repository is 2 GiB. By having a look at the examples of various programming languages we can see that this is meant to cache package manager dependencies e.g. pip for python, npn for node, or gradle for java. But, as it turns out, the caching mechanism can be used to cache compilation artifacts.]]></summary></entry><entry><title type="html">Using GitHub Actions with C++ and CMake</title><link href="https://cristianadam.eu/20191222/using-github-actions-with-c-plus-plus-and-cmake/" rel="alternate" type="text/html" title="Using GitHub Actions with C++ and CMake" /><published>2019-12-22T12:42:33+01:00</published><updated>2019-12-22T12:42:33+01:00</updated><id>https://cristianadam.eu/20191222/using-github-actions-with-c-plus-plus-and-cmake</id><content type="html" xml:base="https://cristianadam.eu/20191222/using-github-actions-with-c-plus-plus-and-cmake/"><![CDATA[<p>In this post I am going to provide a GitHub Actions configuration yaml file for C++ projects using CMake.</p>

<p><a href="https://github.com/features/actions">GitHub Actions</a> is a CI/CD infrastructure provided by GitHub. GitHub Actions
currently offers the following <a href="https://help.github.com/en/actions/automating-your-workflow-with-github-actions/virtual-environments-for-github-hosted-runners#supported-runners-and-hardware-resources">virtual machines (runners)</a>:</p>

<table>
  <thead>
    <tr>
      <th><strong>Virtual environment</strong></th>
      <th><strong>YAML workflow label</strong></th>
    </tr>
  </thead>
  <tbody>
    <tr>
      <td>Windows Server 2019</td>
      <td>windows-latest</td>
    </tr>
    <tr>
      <td>Ubuntu 18.04</td>
      <td>ubuntu-latest or ubuntu-18.04</td>
    </tr>
    <tr>
      <td>Ubuntu 16.04</td>
      <td>ubuntu-16.04</td>
    </tr>
    <tr>
      <td>macOS Catalina 10.15</td>
      <td>macos-latest</td>
    </tr>
  </tbody>
</table>

<p>Each virtual machine has the same hardware resources available:</p>

<ul>
  <li>2-core CPU</li>
  <li>7 GB of RAM memory</li>
  <li>14 GB of SSD disk space</li>
</ul>

<p>Each job in a workflow can run for up to <a href="https://help.github.com/en/actions/automating-your-workflow-with-github-actions/workflow-syntax-for-github-actions#usage-limits">6 hours</a> of execution time.</p>

<p>Unfortunately when I enabled GitHub Actions on a C++ project I was presented with this workflow:</p>

<div class="language-plaintext highlighter-rouge"><div class="highlight"><pre class="highlight"><code>./configure
make
make check
make distcheck
</code></pre></div></div>

<p>This is not something you can use with CMake though <span class="emoji">😄</span></p>

<h1 id="hello-world">Hello World</h1>

<p>I am going to build the following C++ hello world program:</p>

<div class="language-cpp highlighter-rouge"><div class="highlight"><pre class="highlight"><code><span class="cp">#include</span> <span class="cpf">&lt;iostream&gt;</span><span class="cp">
</span>
<span class="kt">int</span> <span class="nf">main</span><span class="p">()</span>
<span class="p">{</span>
  <span class="n">std</span><span class="o">::</span><span class="n">cout</span> <span class="o">&lt;&lt;</span> <span class="s">"Hello world</span><span class="se">\n</span><span class="s">"</span><span class="p">;</span>
<span class="p">}</span>
</code></pre></div></div>

<p>With the following CMake project:</p>

<div class="language-cmake highlighter-rouge"><div class="highlight"><pre class="highlight"><code><span class="nb">cmake_minimum_required</span><span class="p">(</span>VERSION 3.16<span class="p">)</span>

<span class="nb">project</span><span class="p">(</span>main<span class="p">)</span>

<span class="nb">add_executable</span><span class="p">(</span>main main.cpp<span class="p">)</span>

<span class="nb">install</span><span class="p">(</span>TARGETS main<span class="p">)</span>

<span class="nb">enable_testing</span><span class="p">()</span>
<span class="nb">add_test</span><span class="p">(</span>NAME main COMMAND main<span class="p">)</span>
</code></pre></div></div>

<p><strong>TL;DR</strong> see the project on <a href="https://github.com/cristianadam/HelloWorld/">GitHub</a>.</p>

<!--more-->

<h1 id="build-matrix">Build Matrix</h1>

<p>I have started with the following build matrix:</p>

<div class="language-yaml highlighter-rouge"><div class="highlight"><pre class="highlight"><code><span class="na">name</span><span class="pi">:</span> <span class="s">CMake Build Matrix</span>

<span class="na">on</span><span class="pi">:</span> <span class="pi">[</span><span class="nv">push</span><span class="pi">]</span>

<span class="na">jobs</span><span class="pi">:</span>
  <span class="na">build</span><span class="pi">:</span>
    <span class="na">name</span><span class="pi">:</span> <span class="s">${ { matrix.config.name } }</span>
    <span class="na">runs-on</span><span class="pi">:</span> <span class="s">${ { matrix.config.os } }</span>
    <span class="na">strategy</span><span class="pi">:</span>
      <span class="na">fail-fast</span><span class="pi">:</span> <span class="kc">false</span>
      <span class="na">matrix</span><span class="pi">:</span>
        <span class="na">config</span><span class="pi">:</span>
        <span class="pi">-</span> <span class="pi">{</span>
            <span class="nv">name</span><span class="pi">:</span> <span class="s2">"</span><span class="s">Windows</span><span class="nv"> </span><span class="s">Latest</span><span class="nv"> </span><span class="s">MSVC"</span><span class="pi">,</span> <span class="nv">artifact</span><span class="pi">:</span> <span class="s2">"</span><span class="s">Windows-MSVC.tar.xz"</span><span class="pi">,</span>
            <span class="nv">os</span><span class="pi">:</span> <span class="nv">windows-latest</span><span class="pi">,</span>
            <span class="nv">build_type</span><span class="pi">:</span> <span class="s2">"</span><span class="s">Release"</span><span class="pi">,</span> <span class="nv">cc</span><span class="pi">:</span> <span class="s2">"</span><span class="s">cl"</span><span class="pi">,</span> <span class="nv">cxx</span><span class="pi">:</span> <span class="s2">"</span><span class="s">cl"</span><span class="pi">,</span>
            <span class="nv">environment_script</span><span class="pi">:</span> <span class="s2">"</span><span class="s">C:/Program</span><span class="nv"> </span><span class="s">Files</span><span class="nv"> </span><span class="s">(x86)/Microsoft</span><span class="nv"> </span><span class="s">Visual</span><span class="nv"> </span><span class="s">Studio/2019/Enterprise/VC/Auxiliary/Build/vcvars64.bat"</span>
          <span class="pi">}</span>
        <span class="pi">-</span> <span class="pi">{</span>
            <span class="nv">name</span><span class="pi">:</span> <span class="s2">"</span><span class="s">Windows</span><span class="nv"> </span><span class="s">Latest</span><span class="nv"> </span><span class="s">MinGW"</span><span class="pi">,</span> <span class="nv">artifact</span><span class="pi">:</span> <span class="s2">"</span><span class="s">Windows-MinGW.tar.xz"</span><span class="pi">,</span>
            <span class="nv">os</span><span class="pi">:</span> <span class="nv">windows-latest</span><span class="pi">,</span>
            <span class="nv">build_type</span><span class="pi">:</span> <span class="s2">"</span><span class="s">Release"</span><span class="pi">,</span> <span class="nv">cc</span><span class="pi">:</span> <span class="s2">"</span><span class="s">gcc"</span><span class="pi">,</span> <span class="nv">cxx</span><span class="pi">:</span> <span class="s2">"</span><span class="s">g++"</span>
          <span class="pi">}</span>
        <span class="pi">-</span> <span class="pi">{</span>
            <span class="nv">name</span><span class="pi">:</span> <span class="s2">"</span><span class="s">Ubuntu</span><span class="nv"> </span><span class="s">Latest</span><span class="nv"> </span><span class="s">GCC"</span><span class="pi">,</span> <span class="nv">artifact</span><span class="pi">:</span> <span class="s2">"</span><span class="s">Linux.tar.xz"</span><span class="pi">,</span>
            <span class="nv">os</span><span class="pi">:</span> <span class="nv">ubuntu-latest</span><span class="pi">,</span>
            <span class="nv">build_type</span><span class="pi">:</span> <span class="s2">"</span><span class="s">Release"</span><span class="pi">,</span> <span class="nv">cc</span><span class="pi">:</span> <span class="s2">"</span><span class="s">gcc"</span><span class="pi">,</span> <span class="nv">cxx</span><span class="pi">:</span> <span class="s2">"</span><span class="s">g++"</span>
          <span class="pi">}</span>
        <span class="pi">-</span> <span class="pi">{</span>
            <span class="nv">name</span><span class="pi">:</span> <span class="s2">"</span><span class="s">macOS</span><span class="nv"> </span><span class="s">Latest</span><span class="nv"> </span><span class="s">Clang"</span><span class="pi">,</span> <span class="nv">artifact</span><span class="pi">:</span> <span class="s2">"</span><span class="s">macOS.tar.xz"</span><span class="pi">,</span>
            <span class="nv">os</span><span class="pi">:</span> <span class="nv">macos-latest</span><span class="pi">,</span>
            <span class="nv">build_type</span><span class="pi">:</span> <span class="s2">"</span><span class="s">Release"</span><span class="pi">,</span> <span class="nv">cc</span><span class="pi">:</span> <span class="s2">"</span><span class="s">clang"</span><span class="pi">,</span> <span class="nv">cxx</span><span class="pi">:</span> <span class="s2">"</span><span class="s">clang++"</span>
          <span class="pi">}</span>
</code></pre></div></div>

<h1 id="latest-cmake-and-ninja">Latest CMake and Ninja</h1>

<p>In the <a href="https://help.github.com/en/actions/automating-your-workflow-with-github-actions/software-installed-on-github-hosted-runners">software installed</a> on the runners page we
can see that CMake is installed on all runners, but with different versions:</p>

<table>
  <thead>
    <tr>
      <th><strong>Virtual environment</strong></th>
      <th><strong>CMake Version</strong></th>
    </tr>
  </thead>
  <tbody>
    <tr>
      <td>Windows Server 2019</td>
      <td>3.16.0</td>
    </tr>
    <tr>
      <td>Ubuntu 18.04</td>
      <td>3.12.4</td>
    </tr>
    <tr>
      <td>macOS Catalina 10.15</td>
      <td>3.15.5</td>
    </tr>
  </tbody>
</table>

<p>This would mean that one would have to limit the minimum CMake version to 3.12, or upgrade CMake.</p>

<p>CMake 3.16 comes with support for <a href="https://cmake.org/cmake/help/latest/command/target_precompile_headers.html">Precompile Headers</a>
and <a href="https://cmake.org/cmake/help/latest/prop_tgt/UNITY_BUILD.html">Unity Builds</a>, which help reducing build times.</p>

<p>Since CMake and Ninja have GitHub Releases, I decided to download those GitHub releases. <span class="emoji">😄</span></p>

<p>I used CMake as a scripting language, since the default scripting language for runners is <a href="https://help.github.com/en/actions/automating-your-workflow-with-github-actions/workflow-syntax-for-github-actions#using-a-specific-shell">different</a> (bash, and powershell).
CMake can execute processes, download files, extract archives.</p>

<div class="language-yaml highlighter-rouge"><div class="highlight"><pre class="highlight"><code><span class="pi">-</span> <span class="na">name</span><span class="pi">:</span> <span class="s">Download Ninja and CMake</span>
  <span class="na">id</span><span class="pi">:</span> <span class="s">cmake_and_ninja</span>
  <span class="na">shell</span><span class="pi">:</span> <span class="s">cmake -P {0}</span>
  <span class="na">run</span><span class="pi">:</span> <span class="pi">|</span>
    <span class="s">set(ninja_version "1.9.0")</span>
    <span class="s">set(cmake_version "3.16.2")</span>

    <span class="s">message(STATUS "Using host CMake version: ${CMAKE_VERSION}")</span>

    <span class="s">if ("${ { runner.os } }" STREQUAL "Windows")</span>
      <span class="s">set(ninja_suffix "win.zip")</span>
      <span class="s">set(cmake_suffix "win64-x64.zip")</span>
      <span class="s">set(cmake_dir "cmake-${cmake_version}-win64-x64/bin")</span>
    <span class="s">elseif ("${ { runner.os } }" STREQUAL "Linux")</span>
      <span class="s">set(ninja_suffix "linux.zip")</span>
      <span class="s">set(cmake_suffix "Linux-x86_64.tar.gz")</span>
      <span class="s">set(cmake_dir "cmake-${cmake_version}-Linux-x86_64/bin")</span>
    <span class="s">elseif ("${ { runner.os } }" STREQUAL "macOS")</span>
      <span class="s">set(ninja_suffix "mac.zip")</span>
      <span class="s">set(cmake_suffix "Darwin-x86_64.tar.gz")</span>
      <span class="s">set(cmake_dir "cmake-${cmake_version}-Darwin-x86_64/CMake.app/Contents/bin")</span>
    <span class="s">endif()</span>

    <span class="s">set(ninja_url "https://github.com/ninja-build/ninja/releases/download/v${ninja_version}/ninja-${ninja_suffix}")</span>
    <span class="s">file(DOWNLOAD "${ninja_url}" ./ninja.zip SHOW_PROGRESS)</span>
    <span class="s">execute_process(COMMAND ${CMAKE_COMMAND} -E tar xvf ./ninja.zip)</span>

    <span class="s">set(cmake_url "https://github.com/Kitware/CMake/releases/download/v${cmake_version}/cmake-${cmake_version}-${cmake_suffix}")</span>
    <span class="s">file(DOWNLOAD "${cmake_url}" ./cmake.zip SHOW_PROGRESS)</span>
    <span class="s">execute_process(COMMAND ${CMAKE_COMMAND} -E tar xvf ./cmake.zip)</span>

    <span class="s"># Save the path for other steps</span>
    <span class="s">file(TO_CMAKE_PATH "$ENV{GITHUB_WORKSPACE}/${cmake_dir}" cmake_dir)</span>
    <span class="s">message("::set-output name=cmake_dir::${cmake_dir}")</span>

    <span class="s">if (NOT "${ { runner.os } }" STREQUAL "Windows")</span>
      <span class="s">execute_process(</span>
        <span class="s">COMMAND chmod +x ninja</span>
        <span class="s">COMMAND chmod +x ${cmake_dir}/cmake</span>
      <span class="s">)</span>
    <span class="s">endif()</span>
</code></pre></div></div>

<h1 id="configure-step">Configure step</h1>

<p>Now that I have CMake and Ninja, all I have to do is configure the project like this:</p>

<div class="language-yaml highlighter-rouge"><div class="highlight"><pre class="highlight"><code><span class="pi">-</span> <span class="na">name</span><span class="pi">:</span> <span class="s">Configure</span>
  <span class="na">shell</span><span class="pi">:</span> <span class="s">cmake -P {0}</span>
  <span class="na">run</span><span class="pi">:</span> <span class="pi">|</span>
    <span class="s">set(ENV{CC} ${ { matrix.config.cc } })</span>
    <span class="s">set(ENV{CXX} ${ { matrix.config.cxx } })</span>

    <span class="s">if ("${ { runner.os } }" STREQUAL "Windows" AND NOT "x${ { matrix.config.environment_script } }" STREQUAL "x")</span>
      <span class="s">execute_process(</span>
        <span class="s">COMMAND "${ { matrix.config.environment_script } }" &amp;&amp; set</span>
        <span class="s">OUTPUT_FILE environment_script_output.txt</span>
      <span class="s">)</span>
      <span class="s">file(STRINGS environment_script_output.txt output_lines)</span>
      <span class="s">foreach(line IN LISTS output_lines)</span>
        <span class="s">if (line MATCHES "^([a-zA-Z0-9_-]+)=(.*)$")</span>
          <span class="s">set(ENV{${CMAKE_MATCH_1} } "${CMAKE_MATCH_2}")</span>
        <span class="s">endif()</span>
      <span class="s">endforeach()</span>
    <span class="s">endif()</span>

    <span class="s">file(TO_CMAKE_PATH "$ENV{GITHUB_WORKSPACE}/ninja" ninja_program)</span>

    <span class="s">execute_process(</span>
      <span class="s">COMMAND ${ { steps.cmake_and_ninja.outputs.cmake_dir } }/cmake</span>
        <span class="s">-S .</span>
        <span class="s">-B build</span>
        <span class="s">-D CMAKE_BUILD_TYPE=${ { matrix.config.build_type } }</span>
        <span class="s">-G Ninja</span>
        <span class="s">-D CMAKE_MAKE_PROGRAM=${ninja_program}</span>
      <span class="s">RESULT_VARIABLE result</span>
    <span class="s">)</span>
    <span class="s">if (NOT result EQUAL 0)</span>
      <span class="s">message(FATAL_ERROR "Bad exit status")</span>
    <span class="s">endif()</span>
</code></pre></div></div>

<p>I have set the <code class="language-plaintext highlighter-rouge">CC</code> and <code class="language-plaintext highlighter-rouge">CXX</code> environment variables, and for MSVC, I had to run the <code class="language-plaintext highlighter-rouge">vcvars64.bat</code> script,
get all the environment variables, and set them for the CMake running script.</p>

<h1 id="build-step">Build step</h1>

<p>The build step involves running the CMake with <code class="language-plaintext highlighter-rouge">--build </code> parameter:</p>

<div class="language-yaml highlighter-rouge"><div class="highlight"><pre class="highlight"><code><span class="pi">-</span> <span class="na">name</span><span class="pi">:</span> <span class="s">Build</span>
  <span class="na">shell</span><span class="pi">:</span> <span class="s">cmake -P {0}</span>
  <span class="na">run</span><span class="pi">:</span> <span class="pi">|</span>
    <span class="s">set(ENV{NINJA_STATUS} "[%f/%t %o/sec] ")</span>

    <span class="s">if ("${ { runner.os } }" STREQUAL "Windows" AND NOT "x${ { matrix.config.environment_script } }" STREQUAL "x")</span>
      <span class="s">file(STRINGS environment_script_output.txt output_lines)</span>
      <span class="s">foreach(line IN LISTS output_lines)</span>
        <span class="s">if (line MATCHES "^([a-zA-Z0-9_-]+)=(.*)$")</span>
          <span class="s">set(ENV{${CMAKE_MATCH_1} } "${CMAKE_MATCH_2}")</span>
        <span class="s">endif()</span>
      <span class="s">endforeach()</span>
    <span class="s">endif()</span>

    <span class="s">execute_process(</span>
      <span class="s">COMMAND ${ { steps.cmake_and_ninja.outputs.cmake_dir } }/cmake --build build</span>
      <span class="s">RESULT_VARIABLE result</span>
    <span class="s">)</span>
    <span class="s">if (NOT result EQUAL 0)</span>
      <span class="s">message(FATAL_ERROR "Bad exit status")</span>
    <span class="s">endif()</span>
</code></pre></div></div>

<p>I set the <code class="language-plaintext highlighter-rouge">NINJA_STATUS</code> variable, to see how fast the compilation is in the respective runners.</p>

<p>For MSVC I reused the <code class="language-plaintext highlighter-rouge">environment_script_output.txt</code> script from the Configure step.</p>

<h1 id="run-tests-step">Run tests step</h1>

<p>This step calls <code class="language-plaintext highlighter-rouge">ctest</code> with number of cores passed as <code class="language-plaintext highlighter-rouge">-j</code> argument:</p>

<div class="language-yaml highlighter-rouge"><div class="highlight"><pre class="highlight"><code><span class="pi">-</span> <span class="na">name</span><span class="pi">:</span> <span class="s">Run tests</span>
  <span class="na">shell</span><span class="pi">:</span> <span class="s">cmake -P {0}</span>
  <span class="na">run</span><span class="pi">:</span> <span class="pi">|</span>
    <span class="s">include(ProcessorCount)</span>
    <span class="s">ProcessorCount(N)</span>

    <span class="s">execute_process(</span>
      <span class="s">COMMAND ${ { steps.cmake_and_ninja.outputs.cmake_dir } }/ctest -j ${N}</span>
      <span class="s">WORKING_DIRECTORY build</span>
      <span class="s">RESULT_VARIABLE result</span>
    <span class="s">)</span>
    <span class="s">if (NOT result EQUAL 0)</span>
      <span class="s">message(FATAL_ERROR "Running tests failed!")</span>
    <span class="s">endif()</span>
</code></pre></div></div>

<h1 id="install-pack-upload-steps">Install, pack, upload steps</h1>

<p>This steps involve running CMake with <code class="language-plaintext highlighter-rouge">--install</code>, then creating a <code class="language-plaintext highlighter-rouge">tar.xz</code> archive with CMake, and
uploading it as a build artifact.</p>

<div class="language-yaml highlighter-rouge"><div class="highlight"><pre class="highlight"><code><span class="pi">-</span> <span class="na">name</span><span class="pi">:</span> <span class="s">Install Strip</span>
  <span class="na">run</span><span class="pi">:</span> <span class="s">${ { steps.cmake_and_ninja.outputs.cmake_dir } }/cmake --install build --prefix instdir --strip</span>

<span class="pi">-</span> <span class="na">name</span><span class="pi">:</span> <span class="s">Pack</span>
  <span class="na">working-directory</span><span class="pi">:</span> <span class="s">instdir</span>
  <span class="na">run</span><span class="pi">:</span> <span class="s">${ { steps.cmake_and_ninja.outputs.cmake_dir } }/cmake -E tar cJfv ../${ { matrix.config.artifact } } .</span>

<span class="pi">-</span> <span class="na">name</span><span class="pi">:</span> <span class="s">Upload</span>
  <span class="na">uses</span><span class="pi">:</span> <span class="s">actions/upload-artifact@v1</span>
  <span class="na">with</span><span class="pi">:</span>
    <span class="na">path</span><span class="pi">:</span> <span class="s">./${ { matrix.config.artifact } }</span>
    <span class="na">name</span><span class="pi">:</span> <span class="s">${ { matrix.config.artifact } }</span>
</code></pre></div></div>

<p>I didn’t use CMake as scripting language, since this just involves calling CMake with parameters, and the
default shells can handle this <span class="emoji">😄</span></p>

<h1 id="handling-releases">Handling Releases</h1>

<p>When you tag a release in git, you would also want the build artifacts promoted as releases:</p>

<div class="language-plaintext highlighter-rouge"><div class="highlight"><pre class="highlight"><code>git tag -a v1.0.0 -m "Release v1.0.0"
git push origin v1.0.0
</code></pre></div></div>

<p>The code to do this is below, gets triggered if the git refpath contains <code class="language-plaintext highlighter-rouge">tags/v</code>:</p>

<div class="language-yaml highlighter-rouge"><div class="highlight"><pre class="highlight"><code><span class="na">release</span><span class="pi">:</span>
  <span class="na">if</span><span class="pi">:</span> <span class="s">contains(github.ref, 'tags/v')</span>
  <span class="na">runs-on</span><span class="pi">:</span> <span class="s">ubuntu-latest</span>
  <span class="na">needs</span><span class="pi">:</span> <span class="s">build</span>

  <span class="na">steps</span><span class="pi">:</span>
  <span class="pi">-</span> <span class="na">name</span><span class="pi">:</span> <span class="s">Create Release</span>
    <span class="na">id</span><span class="pi">:</span> <span class="s">create_release</span>
    <span class="na">uses</span><span class="pi">:</span> <span class="s">actions/create-release@v1.0.0</span>
    <span class="na">env</span><span class="pi">:</span>
      <span class="na">GITHUB_TOKEN</span><span class="pi">:</span> <span class="s">${ { secrets.GITHUB_TOKEN } }</span>
    <span class="na">with</span><span class="pi">:</span>
      <span class="na">tag_name</span><span class="pi">:</span> <span class="s">${ { github.ref } }</span>
      <span class="na">release_name</span><span class="pi">:</span> <span class="s">Release ${ { github.ref } }</span>
      <span class="na">draft</span><span class="pi">:</span> <span class="kc">false</span>
      <span class="na">prerelease</span><span class="pi">:</span> <span class="kc">false</span>

  <span class="pi">-</span> <span class="na">name</span><span class="pi">:</span> <span class="s">Store Release url</span>
    <span class="na">run</span><span class="pi">:</span> <span class="pi">|</span>
      <span class="s">echo "${ { steps.create_release.outputs.upload_url } }" &gt; ./upload_url</span>

  <span class="pi">-</span> <span class="na">uses</span><span class="pi">:</span> <span class="s">actions/upload-artifact@v1</span>
    <span class="na">with</span><span class="pi">:</span>
      <span class="na">path</span><span class="pi">:</span> <span class="s">./upload_url</span>
      <span class="na">name</span><span class="pi">:</span> <span class="s">upload_url</span>

<span class="na">publish</span><span class="pi">:</span>
  <span class="na">if</span><span class="pi">:</span> <span class="s">contains(github.ref, 'tags/v')</span>
  <span class="na">name</span><span class="pi">:</span> <span class="s">${ { matrix.config.name } }</span>
  <span class="na">runs-on</span><span class="pi">:</span> <span class="s">${ { matrix.config.os } }</span>
  <span class="na">strategy</span><span class="pi">:</span>
    <span class="na">fail-fast</span><span class="pi">:</span> <span class="kc">false</span>
    <span class="na">matrix</span><span class="pi">:</span>
      <span class="na">config</span><span class="pi">:</span>
      <span class="pi">-</span> <span class="pi">{</span>
          <span class="nv">name</span><span class="pi">:</span> <span class="s2">"</span><span class="s">Windows</span><span class="nv"> </span><span class="s">Latest</span><span class="nv"> </span><span class="s">MSVC"</span><span class="pi">,</span> <span class="nv">artifact</span><span class="pi">:</span> <span class="s2">"</span><span class="s">Windows-MSVC.tar.xz"</span><span class="pi">,</span>
          <span class="nv">os</span><span class="pi">:</span> <span class="nv">ubuntu-latest</span>
        <span class="pi">}</span>
      <span class="pi">-</span> <span class="pi">{</span>
          <span class="nv">name</span><span class="pi">:</span> <span class="s2">"</span><span class="s">Windows</span><span class="nv"> </span><span class="s">Latest</span><span class="nv"> </span><span class="s">MinGW"</span><span class="pi">,</span> <span class="nv">artifact</span><span class="pi">:</span> <span class="s2">"</span><span class="s">Windows-MinGW.tar.xz"</span><span class="pi">,</span>
          <span class="nv">os</span><span class="pi">:</span> <span class="nv">ubuntu-latest</span>
        <span class="pi">}</span>
      <span class="pi">-</span> <span class="pi">{</span>
          <span class="nv">name</span><span class="pi">:</span> <span class="s2">"</span><span class="s">Ubuntu</span><span class="nv"> </span><span class="s">Latest</span><span class="nv"> </span><span class="s">GCC"</span><span class="pi">,</span> <span class="nv">artifact</span><span class="pi">:</span> <span class="s2">"</span><span class="s">Linux.tar.xz"</span><span class="pi">,</span>
          <span class="nv">os</span><span class="pi">:</span> <span class="nv">ubuntu-latest</span>
        <span class="pi">}</span>
      <span class="pi">-</span> <span class="pi">{</span>
          <span class="nv">name</span><span class="pi">:</span> <span class="s2">"</span><span class="s">macOS</span><span class="nv"> </span><span class="s">Latest</span><span class="nv"> </span><span class="s">Clang"</span><span class="pi">,</span> <span class="nv">artifact</span><span class="pi">:</span> <span class="s2">"</span><span class="s">macOS.tar.xz"</span><span class="pi">,</span>
          <span class="nv">os</span><span class="pi">:</span> <span class="nv">ubuntu-latest</span>
        <span class="pi">}</span>
  <span class="na">needs</span><span class="pi">:</span> <span class="s">release</span>

  <span class="na">steps</span><span class="pi">:</span>
  <span class="pi">-</span> <span class="na">name</span><span class="pi">:</span> <span class="s">Download artifact</span>
    <span class="na">uses</span><span class="pi">:</span> <span class="s">actions/download-artifact@v1</span>
    <span class="na">with</span><span class="pi">:</span>
      <span class="na">name</span><span class="pi">:</span> <span class="s">${ { matrix.config.artifact } }</span>
      <span class="na">path</span><span class="pi">:</span> <span class="s">./</span>

  <span class="pi">-</span> <span class="na">name</span><span class="pi">:</span> <span class="s">Download URL</span>
    <span class="na">uses</span><span class="pi">:</span> <span class="s">actions/download-artifact@v1</span>
    <span class="na">with</span><span class="pi">:</span>
      <span class="na">name</span><span class="pi">:</span> <span class="s">upload_url</span>
      <span class="na">path</span><span class="pi">:</span> <span class="s">./</span>
  <span class="pi">-</span> <span class="na">id</span><span class="pi">:</span> <span class="s">set_upload_url</span>
    <span class="na">run</span><span class="pi">:</span> <span class="pi">|</span>
      <span class="s">upload_url=`cat ./upload_url`</span>
      <span class="s">echo ::set-output name=upload_url::$upload_url</span>

  <span class="pi">-</span> <span class="na">name</span><span class="pi">:</span> <span class="s">Upload to Release</span>
    <span class="na">id</span><span class="pi">:</span> <span class="s">upload_to_release</span>
    <span class="na">uses</span><span class="pi">:</span> <span class="s">actions/upload-release-asset@v1.0.1</span>
    <span class="na">env</span><span class="pi">:</span>
      <span class="na">GITHUB_TOKEN</span><span class="pi">:</span> <span class="s">${ { secrets.GITHUB_TOKEN } }</span>
    <span class="na">with</span><span class="pi">:</span>
      <span class="na">upload_url</span><span class="pi">:</span> <span class="s">${ { steps.set_upload_url.outputs.upload_url } }</span>
      <span class="na">asset_path</span><span class="pi">:</span> <span class="s">./${ { matrix.config.artifact } }</span>
      <span class="na">asset_name</span><span class="pi">:</span> <span class="s">${ { matrix.config.artifact } }</span>
      <span class="na">asset_content_type</span><span class="pi">:</span> <span class="s">application/x-gtar</span>
</code></pre></div></div>

<p>This looks complicated, but it’s needed since <code class="language-plaintext highlighter-rouge">actions/create-release</code> needs to be called only once, otherwise it will
fail. See <a href="https://github.com/actions/create-release/issues/14">issue #14</a>, <a href="https://github.com/actions/create-release/issues/27">issue #27</a> for
more information.</p>

<p>Even though you can use a workflow for 6 hours, the <code class="language-plaintext highlighter-rouge">secrets.GITHUB_TOKEN</code> expires in <a href="https://help.github.com/en/actions/automating-your-workflow-with-github-actions/authenticating-with-the-github_token#about-the-github_token-secret">one hour</a>. You can either create a personal token, or
upload the artifacts manually to the release. See <a href="https://github.community/t5/GitHub-Actions/error-Bad-credentials/td-p/33500">this</a> GitHub community
thread for more information.</p>

<h1 id="closing">Closing</h1>

<p>Enabling GitHub Actions on your CMake project is as easy at creating a <code class="language-plaintext highlighter-rouge">.github/workflows/build_cmake.yml</code> file with the content from
<a href="/assets/github-actions/build_cmake.yml" class="download">build_cmake.yml</a>.</p>

<p>You can see the GitHub Actions at my <a href="https://github.com/cristianadam/HelloWorld/">Hello World</a> GitHub project.</p>]]></content><author><name></name></author><category term="C++" /><category term="CMake" /><summary type="html"><![CDATA[In this post I am going to provide a GitHub Actions configuration yaml file for C++ projects using CMake. GitHub Actions is a CI/CD infrastructure provided by GitHub. GitHub Actions currently offers the following virtual machines (runners): Virtual environment YAML workflow label Windows Server 2019 windows-latest Ubuntu 18.04 ubuntu-latest or ubuntu-18.04 Ubuntu 16.04 ubuntu-16.04 macOS Catalina 10.15 macos-latest Each virtual machine has the same hardware resources available: 2-core CPU 7 GB of RAM memory 14 GB of SSD disk space Each job in a workflow can run for up to 6 hours of execution time. Unfortunately when I enabled GitHub Actions on a C++ project I was presented with this workflow: ./configure make make check make distcheck This is not something you can use with CMake though 😄 Hello World I am going to build the following C++ hello world program: #include &lt;iostream&gt; int main() { std::cout &lt;&lt; "Hello world\n"; } With the following CMake project: cmake_minimum_required(VERSION 3.16) project(main) add_executable(main main.cpp) install(TARGETS main) enable_testing() add_test(NAME main COMMAND main) TL;DR see the project on GitHub.]]></summary></entry><entry><title type="html">Building multiple configurations with CMake in one go!</title><link href="https://cristianadam.eu/20191012/building-multiple-configurations-with-cmake-in-one-go/" rel="alternate" type="text/html" title="Building multiple configurations with CMake in one go!" /><published>2019-10-12T23:20:41+02:00</published><updated>2019-10-12T23:20:41+02:00</updated><id>https://cristianadam.eu/20191012/building-multiple-configurations-with-cmake-in-one-go</id><content type="html" xml:base="https://cristianadam.eu/20191012/building-multiple-configurations-with-cmake-in-one-go/"><![CDATA[<p><img src="/assets/images/cmake-multiconfig/cmake-graph.png" class="noborder" /></p>

<p>Coming from other build systems to CMake one will quickly learn that
CMake can build only one configuration at a time. In practice
you need to set up multiple build directories and configure/build
with CMake for each and every one.</p>

<p>Autotools can do static and shared builds of libraries. For CMake
most of the project would do a static build, then a shared build
by setting the CMake variable <code class="language-plaintext highlighter-rouge">BUILD_SHARED_LIBS</code> to <code class="language-plaintext highlighter-rouge">ON</code>.</p>

<p>QMake can do debug and release builds at the same time, and as
we can read at <a href="https://www.kdab.com/qt-for-android-better-than-ever-before/">Qt for Android better than ever before</a>,
it can configure multiple Android architecture configurations
at the same time.</p>

<p>What can we do to get the same level of convenience with CMake?</p>

<!--more-->

<h2 id="shared-and-static">Shared and static</h2>

<p>CMake needs to have unique target names, so if we would have to
build a shared and static build we would need to have different
target names.</p>

<p>Since we need to build the same library twice, but with only
one <code class="language-plaintext highlighter-rouge">cmake --build</code> invocation, it would mean that CMake needs
to call itself.</p>

<p>That’s it what I’m going to do. Build the same source directory
in two different build directories. The <a href="https://cmake.org/cmake/help/latest/command/add_subdirectory.html">add_subdirectory</a> CMake
command allows a second parameter for a build directory.</p>

<p>Here is what’s needed to have a library build itself shared
and static:</p>

<div class="language-cmake highlighter-rouge"><div class="highlight"><pre class="highlight"><code><span class="nb">cmake_minimum_required</span><span class="p">(</span>VERSION 3.9<span class="p">)</span>

<span class="nb">project</span><span class="p">(</span>lib LANGUAGES CXX<span class="p">)</span>

<span class="nb">if</span> <span class="p">(</span>NOT <span class="si">${</span><span class="nv">PROJECT_NAME</span><span class="si">}</span>-MultiBuild<span class="p">)</span>
  <span class="nb">set</span><span class="p">(</span><span class="si">${</span><span class="nv">PROJECT_NAME</span><span class="si">}</span>-MultiBuild ON<span class="p">)</span>

  <span class="nb">macro</span> <span class="p">(</span>setup_library library_name build_type<span class="p">)</span>
    <span class="nb">set</span><span class="p">(</span>LIBNAME <span class="si">${</span><span class="nv">library_name</span><span class="si">}</span><span class="p">)</span>
    <span class="nb">set</span><span class="p">(</span>LIBTYPE <span class="si">${</span><span class="nv">build_type</span><span class="si">}</span><span class="p">)</span>

    <span class="nb">add_subdirectory</span><span class="p">(</span>
      <span class="si">${</span><span class="nv">CMAKE_CURRENT_SOURCE_DIR</span><span class="si">}</span>
      build-<span class="si">${</span><span class="nv">build_type</span><span class="si">}</span>
    <span class="p">)</span>
  <span class="nb">endmacro</span><span class="p">()</span>

  <span class="nf">setup_library</span><span class="p">(</span><span class="si">${</span><span class="nv">PROJECT_NAME</span><span class="si">}</span>_s STATIC<span class="p">)</span>
  <span class="nf">setup_library</span><span class="p">(</span><span class="si">${</span><span class="nv">PROJECT_NAME</span><span class="si">}</span> SHARED<span class="p">)</span>

  <span class="nb">return</span><span class="p">()</span>
<span class="nb">endif</span><span class="p">()</span>

<span class="c1"># The normal CMake library code goes here</span>

<span class="nb">add_library</span><span class="p">(</span><span class="si">${</span><span class="nv">LIBNAME</span><span class="si">}</span> <span class="si">${</span><span class="nv">LIBTYPE</span><span class="si">}</span> lib.cpp<span class="p">)</span>
</code></pre></div></div>

<h2 id="debug-and-release">Debug and release</h2>

<p>If we apply the same idea to a debug and release build, we have:</p>

<div class="language-cmake highlighter-rouge"><div class="highlight"><pre class="highlight"><code><span class="nb">cmake_minimum_required</span><span class="p">(</span>VERSION 3.9<span class="p">)</span>

<span class="nb">project</span><span class="p">(</span>lib LANGUAGES CXX<span class="p">)</span>

<span class="nb">if</span> <span class="p">(</span>NOT <span class="si">${</span><span class="nv">PROJECT_NAME</span><span class="si">}</span>-MultiBuild<span class="p">)</span>
  <span class="nb">set</span><span class="p">(</span><span class="si">${</span><span class="nv">PROJECT_NAME</span><span class="si">}</span>-MultiBuild ON<span class="p">)</span>

  <span class="nb">macro</span> <span class="p">(</span>setup_library library_name build_type<span class="p">)</span>
    <span class="nb">set</span><span class="p">(</span>LIBNAME <span class="si">${</span><span class="nv">library_name</span><span class="si">}</span><span class="p">)</span>
    <span class="nb">set</span><span class="p">(</span>CMAKE_BUILD_TYPE <span class="si">${</span><span class="nv">build_type</span><span class="si">}</span><span class="p">)</span>

    <span class="nb">add_subdirectory</span><span class="p">(</span>
      <span class="si">${</span><span class="nv">CMAKE_CURRENT_SOURCE_DIR</span><span class="si">}</span>
      build-<span class="si">${</span><span class="nv">build_type</span><span class="si">}</span>
    <span class="p">)</span>
  <span class="nb">endmacro</span><span class="p">()</span>

  <span class="nf">setup_library</span><span class="p">(</span><span class="si">${</span><span class="nv">PROJECT_NAME</span><span class="si">}</span>_d Debug<span class="p">)</span>
  <span class="nf">setup_library</span><span class="p">(</span><span class="si">${</span><span class="nv">PROJECT_NAME</span><span class="si">}</span> Release<span class="p">)</span>

  <span class="nb">return</span><span class="p">()</span>
<span class="nb">endif</span><span class="p">()</span>

<span class="c1"># The normal CMake library code goes here</span>

<span class="nb">add_library</span><span class="p">(</span><span class="si">${</span><span class="nv">LIBNAME</span><span class="si">}</span> lib.cpp<span class="p">)</span>
</code></pre></div></div>

<p>This will work with command line generators like Ninja or Makefiles,
but it won’t work with multi-config generators like Visual Studio.</p>

<h2 id="debug-and-release-for-visual-studio">Debug and release for Visual Studio</h2>

<p>In order to get Visual Studio to produce a debug and release mode,
we need to be able to invoke CMake with separate <code class="language-plaintext highlighter-rouge">--config &lt;CONFIG&gt;</code>
values for Debug and Release.</p>

<p>Even if we fiddle with <a href="https://cmake.org/cmake/help/latest/variable/CMAKE_CONFIGURATION_TYPES.html">CMAKE_CONFIGURATION_TYPES</a>
the above method is not enough. msbuild will fail to build.</p>

<p>We need to get independent CMake runs on the same source code. Luckily CMake
provides us with <a href="https://cmake.org/cmake/help/latest/module/ExternalProject.html">ExternalProject</a> module.</p>

<p><code class="language-plaintext highlighter-rouge">ExternalProject</code> is meant for software downloaded from the internet, but
it also works fine with existing source code <span class="emoji">😄</span></p>

<p>The code looks like this:</p>

<div class="language-cmake highlighter-rouge"><div class="highlight"><pre class="highlight"><code><span class="nb">cmake_minimum_required</span><span class="p">(</span>VERSION 3.9<span class="p">)</span>

<span class="nb">project</span><span class="p">(</span>lib LANGUAGES CXX<span class="p">)</span>

<span class="nb">if</span> <span class="p">(</span>NOT <span class="si">${</span><span class="nv">PROJECT_NAME</span><span class="si">}</span>-MultiBuild<span class="p">)</span>
  <span class="nb">include</span><span class="p">(</span>ExternalProject<span class="p">)</span>

  <span class="nb">macro</span> <span class="p">(</span>setup_library library_name build_type<span class="p">)</span>
    <span class="nf">ExternalProject_Add</span><span class="p">(</span><span class="si">${</span><span class="nv">library_name</span><span class="si">}</span>-builder
      SOURCE_DIR <span class="s2">"</span><span class="si">${</span><span class="nv">CMAKE_CURRENT_SOURCE_DIR</span><span class="si">}</span><span class="s2">"</span>
      CMAKE_ARGS
        -DLIBNAME=<span class="si">${</span><span class="nv">library_name</span><span class="si">}</span>
        -DCMAKE_BUILD_TYPE=<span class="si">${</span><span class="nv">build_type</span><span class="si">}</span>
        -DCMAKE_CONFIGURATION_TYPES=<span class="si">${</span><span class="nv">build_type</span><span class="si">}</span>
        -DCMAKE_INSTALL_PREFIX=<span class="si">${</span><span class="nv">CMAKE_BINARY_DIR</span><span class="si">}</span>
        -D<span class="si">${</span><span class="nv">PROJECT_NAME</span><span class="si">}</span>-MultiBuild=ON
      BUILD_COMMAND
        <span class="si">${</span><span class="nv">CMAKE_COMMAND</span><span class="si">}</span> --build . --config <span class="si">${</span><span class="nv">build_type</span><span class="si">}</span>
      INSTALL_COMMAND
        <span class="si">${</span><span class="nv">CMAKE_COMMAND</span><span class="si">}</span> -P cmake_install.cmake
    <span class="p">)</span>
  <span class="nb">endmacro</span><span class="p">()</span>

  <span class="nf">setup_library</span><span class="p">(</span><span class="si">${</span><span class="nv">PROJECT_NAME</span><span class="si">}</span>_d Debug<span class="p">)</span>
  <span class="nf">setup_library</span><span class="p">(</span><span class="si">${</span><span class="nv">PROJECT_NAME</span><span class="si">}</span> Release<span class="p">)</span>

  <span class="nb">return</span><span class="p">()</span>
<span class="nb">endif</span><span class="p">()</span>

<span class="c1"># The normal CMake library code goes here</span>

<span class="nb">add_library</span><span class="p">(</span><span class="si">${</span><span class="nv">LIBNAME</span><span class="si">}</span> lib.cpp<span class="p">)</span>
<span class="nb">install</span><span class="p">(</span>TARGETS <span class="si">${</span><span class="nv">LIBNAME</span><span class="si">}</span><span class="p">)</span>
</code></pre></div></div>

<p>I needed to restrict the <code class="language-plaintext highlighter-rouge">CMAKE_CONFIGURATION_TYPES</code> only for the needed configuration,
and to have a custom <code class="language-plaintext highlighter-rouge">BUILD_COMMAND</code>, <code class="language-plaintext highlighter-rouge">INSTALL_COMMAND</code>, and to install the library.
At the end in the build directory I’ve got a <code class="language-plaintext highlighter-rouge">lib</code> directory containing the two libraries.</p>

<p>If you have multiple libraries depending on each other, you will have to have proper
<a href="https://cmake.org/cmake/help/latest/manual/cmake-packages.7.html">CMake packages</a> for
the libraries, and set the appropriate <a href="https://cmake.org/cmake/help/latest/variable/CMAKE_PREFIX_PATH.html">CMAKE_PREFIX_PATH</a> values.</p>

<h2 id="android-multi-architecture">Android multi architecture</h2>

<p>In order to test the same setup for Android, I am assuming you have the <a href="https://developer.android.com/ndk/downloads/">Android NDK</a>
somewhere in your system.</p>

<p>I configured and build the project from a Windows command prompt window like this:</p>

<div class="language-bash highlighter-rouge"><div class="highlight"><pre class="highlight"><code><span class="nv">$ </span>cmake <span class="nt">-GNinja</span> <span class="nt">-DCMAKE_TOOLCHAIN_FILE</span><span class="o">=</span>c:<span class="se">\T</span>ools<span class="se">\a</span>ndroid-ndk-r20<span class="se">\b</span>uild<span class="se">\c</span>make<span class="se">\a</span>ndroid.toolchain.cmake ..
<span class="nv">$ </span>cmake <span class="nt">--build</span> <span class="nb">.</span>
</code></pre></div></div>

<p>The CMake code which builds for <code class="language-plaintext highlighter-rouge">armeabi-v7a</code>, <code class="language-plaintext highlighter-rouge">arm64-v8a</code>, <code class="language-plaintext highlighter-rouge">x86</code>, <code class="language-plaintext highlighter-rouge">x86_64</code> is below:</p>

<div class="language-cmake highlighter-rouge"><div class="highlight"><pre class="highlight"><code><span class="nb">cmake_minimum_required</span><span class="p">(</span>VERSION 3.9<span class="p">)</span>

<span class="nb">project</span><span class="p">(</span>lib<span class="p">)</span>

<span class="nb">if</span> <span class="p">(</span>NOT <span class="si">${</span><span class="nv">PROJECT_NAME</span><span class="si">}</span>-MultiBuild<span class="p">)</span>
  <span class="nb">include</span><span class="p">(</span>ExternalProject<span class="p">)</span>

  <span class="nb">file</span><span class="p">(</span>TO_CMAKE_PATH <span class="s2">"</span><span class="si">${</span><span class="nv">CMAKE_TOOLCHAIN_FILE</span><span class="si">}</span><span class="s2">"</span> toolchain_file<span class="p">)</span>

  <span class="nb">macro</span> <span class="p">(</span>setup_library library_name android_abi<span class="p">)</span>
    <span class="nf">ExternalProject_Add</span><span class="p">(</span><span class="si">${</span><span class="nv">library_name</span><span class="si">}</span>-builder
      SOURCE_DIR <span class="s2">"</span><span class="si">${</span><span class="nv">CMAKE_CURRENT_SOURCE_DIR</span><span class="si">}</span><span class="s2">"</span>
      CMAKE_ARGS
        -DLIBNAME=<span class="si">${</span><span class="nv">library_name</span><span class="si">}</span>
        -DANDROID_ABI=<span class="si">${</span><span class="nv">android_abi</span><span class="si">}</span>
        -DCMAKE_INSTALL_PREFIX=<span class="si">${</span><span class="nv">CMAKE_BINARY_DIR</span><span class="si">}</span>
        -DCMAKE_TOOLCHAIN_FILE=<span class="si">${</span><span class="nv">toolchain_file</span><span class="si">}</span>
        -D<span class="si">${</span><span class="nv">PROJECT_NAME</span><span class="si">}</span>-MultiBuild=ON
    <span class="p">)</span>
  <span class="nb">endmacro</span><span class="p">()</span>

  <span class="nf">setup_library</span><span class="p">(</span><span class="si">${</span><span class="nv">PROJECT_NAME</span><span class="si">}</span>-v7a armeabi-v7a<span class="p">)</span>
  <span class="nf">setup_library</span><span class="p">(</span><span class="si">${</span><span class="nv">PROJECT_NAME</span><span class="si">}</span>-v8a arm64-v8a<span class="p">)</span>
  <span class="nf">setup_library</span><span class="p">(</span><span class="si">${</span><span class="nv">PROJECT_NAME</span><span class="si">}</span>-x86 x86<span class="p">)</span>
  <span class="nf">setup_library</span><span class="p">(</span><span class="si">${</span><span class="nv">PROJECT_NAME</span><span class="si">}</span>-x86_64 x86_64<span class="p">)</span>

  <span class="nb">return</span><span class="p">()</span>
<span class="nb">endif</span><span class="p">()</span>

<span class="c1"># The normal CMake library code</span>

<span class="nb">add_library</span><span class="p">(</span><span class="si">${</span><span class="nv">LIBNAME</span><span class="si">}</span> lib.cpp<span class="p">)</span>
<span class="nb">install</span><span class="p">(</span>TARGETS <span class="si">${</span><span class="nv">LIBNAME</span><span class="si">}</span><span class="p">)</span>
</code></pre></div></div>

<p>I only needed to pass the <code class="language-plaintext highlighter-rouge">ANDROID_ABI</code>, and <code class="language-plaintext highlighter-rouge">CMAKE_TOOLCHAIN_FILE</code> variables.</p>

<h2 id="conclusion">Conclusion</h2>

<p>With the technique presented here CMake can easily do multiple configuration
builds in one go! <span class="emoji">🤘</span></p>]]></content><author><name></name></author><category term="CMake" /><category term="C++" /><summary type="html"><![CDATA[Coming from other build systems to CMake one will quickly learn that CMake can build only one configuration at a time. In practice you need to set up multiple build directories and configure/build with CMake for each and every one. Autotools can do static and shared builds of libraries. For CMake most of the project would do a static build, then a shared build by setting the CMake variable BUILD_SHARED_LIBS to ON. QMake can do debug and release builds at the same time, and as we can read at Qt for Android better than ever before, it can configure multiple Android architecture configurations at the same time. What can we do to get the same level of convenience with CMake?]]></summary></entry><entry><title type="html">Bundling together static libraries with CMake</title><link href="https://cristianadam.eu/20190501/bundling-together-static-libraries-with-cmake/" rel="alternate" type="text/html" title="Bundling together static libraries with CMake" /><published>2019-05-01T15:31:53+02:00</published><updated>2019-05-01T15:31:53+02:00</updated><id>https://cristianadam.eu/20190501/bundling-together-static-libraries-with-cmake</id><content type="html" xml:base="https://cristianadam.eu/20190501/bundling-together-static-libraries-with-cmake/"><![CDATA[<p>In this article I’m going to talk about building a C++ library with CMake, but it won’t be a CMake tutorial.</p>

<p>Let’s say you have a C++ library which depends upon a few open source libraries, which have a CMake project structure, 
but not necessarily done by the book (which means that they get only get built, and not deployed / installed)</p>

<p>Your library will include tests (unit-tests / integration tests), and the deployment can be just packing the headers and the binaries together in a tar.gz file.</p>

<p>This is not necessarily by the book, but it will do the job, and it could fit into any build system that the client has.</p>

<p>A book that one can use to do CMake right is <a href="https://crascit.com/professional-cmake/">Profesional CMake</a>.
<a href="https://github.com/onqtam/awesome-cmake">Awesome CMake</a> also has a great list of resources regarding CMake.</p>

<p>Coming back to the C++ library, which decisions do we take to build it? Shared library, static library, both?</p>

<!--more-->

<h2 id="shared-library">Shared library</h2>

<p>The most common decision is to build as a shared library (<code class="language-plaintext highlighter-rouge">BUILD_SHARED_LIBS</code> set to <code class="language-plaintext highlighter-rouge">TRUE</code> in the CMake script).</p>

<p>The open source dependencies could be also shared libraries, or static libraries. If they are shared libraries you need to take care of deployment. 
Sometimes you might be forced to compile them as shared libraries, due to licensing for example.</p>

<p>It’s all good, until you have to deal with operating systems like QNX, which has a problem with shared libraries that have lots of <code class="language-plaintext highlighter-rouge">symbols</code>. 
The problem is that it takes longer to load them.</p>

<p>The default GCC and Clang compilers will compile all symbols (functions, classes, global variables) with default visibility. The Visual C++ compiler does the opposite,
it hides all the symbols.</p>

<p>You might be familiar with macros like <code class="language-plaintext highlighter-rouge">MY_LIB_API</code> which might look like this:</p>

<div class="language-cpp highlighter-rouge"><div class="highlight"><pre class="highlight"><code><span class="cp">#if defined(_WIN32) || defined(__CYGWIN__)
</span>  <span class="cp">#if defined(BUILD_SHARED_LIBS)
</span>    <span class="cp">#if defined(MY_LIB_EXPORTS)
</span>      <span class="cp">#define MY_LIB_API __declspec(dllexport)
</span>    <span class="cp">#else
</span>      <span class="cp">#define MY_LIB_API __declspec(dllimport)
</span>    <span class="cp">#endif
</span>  <span class="cp">#endif
#elif defined(MY_LIB_EXPORTS)
</span>  <span class="cp">#define MY_LIB_API __attribute__((visibility("default")))
#endif
</span>
<span class="cp">#if !defined(MY_LIB_API)
</span>  <span class="cp">#define MY_LIB_API
#endif
</span></code></pre></div></div>

<p>And then in your CMake script code you have:</p>

<div class="language-cmake highlighter-rouge"><div class="highlight"><pre class="highlight"><code><span class="nb">set</span><span class="p">(</span>CMAKE_CXX_VISIBILITY_PRESET hidden<span class="p">)</span>
<span class="nb">set</span><span class="p">(</span>CMAKE_VISIBILITY_INLINES_HIDDEN 1<span class="p">)</span>
</code></pre></div></div>

<p>This will ensure that your shared library will contain only the <code class="language-plaintext highlighter-rouge">MY_LIB_API</code> symbols. This also means that you won’t have any problems with visible 
symbols from any open source libraries that you linked statically. Hopefully you can control how that open source libraries decide how to export their symbols.</p>

<p>The generated shared object will also be smaller in size. It depends upon the number of symbols though.</p>

<p>CMake has the <a href="https://cmake.org/cmake/help/latest/module/GenerateExportHeader.html">GenerateExportHeader</a> which can help with this matter.</p>

<p>But now you will notice that your tests will fail to build, since the symbols they require are not there anymore. So what now?</p>

<h2 id="shared-and-static-library">Shared and static library</h2>

<p>We need to have a shared library with only the <code class="language-plaintext highlighter-rouge">MY_LIB_API</code> symbols exported, but also have tests working.</p>

<p>The problem with visibility flags is that it will affect the compiler command line, <code class="language-plaintext highlighter-rouge">CMAKE_CXX_VISIBILITY_PRESET</code>, 
and <code class="language-plaintext highlighter-rouge">CMAKE_VISIBILITY_INLINES_HIDDEN</code> will result in having <code class="language-plaintext highlighter-rouge">-fvisibility=hidden</code> and <code class="language-plaintext highlighter-rouge">-fvisibility-inlines-hidden</code> 
added to the compiler command line.</p>

<p>So we compile a shared library with all symbols, and one with only the <code class="language-plaintext highlighter-rouge">MY_LIB_API</code> symbols. But this means compiling 
twice, which is a bit wasteful.</p>

<p>We could compile a static library with hidden symbols, then create a shared library based on this static library, 
and link the tests to the static library. The tests will link because the symbols are there in the static library, 
marked hidden, but still accessible to the linker.</p>

<p>You will have to take care of the <a href="https://cmake.org/cmake/help/latest/prop_tgt/POSITION_INDEPENDENT_CODE.html">POSITION_INDEPENDENT_CODE</a> 
CMake property, which is not set for static libraries.</p>

<p>This solves it. Everything works. But what if you want to make the QNX case even faster? (by removing the shared library all together!)</p>

<h2 id="static-library">Static library</h2>

<p>We could just build only the static library, with hidden visibility and ship that. But this also means everything (including client code) 
needs to be compiled with the same compiler / toolchain.</p>

<p>The problem lies with the open source library dependencies. They also need to be shipped along side with your library, 
and then the client code needs to link them too.</p>

<p>If you export your CMake targets, you can have the dependencies “linked” to your target, and the client code will only 
have to specify one target. But this requires proper CMake exports! <span class="emoji">😄</span></p>

<h2 id="bundled-static-library">Bundled static library</h2>

<p>What if you could bundle the open source dependencies in the static library?</p>

<p>Stackoverflow has this article: <a href="https://stackoverflow.com/questions/50022318/using-cmake-to-build-a-static-library-of-static-libraries">Using cmake to build a static library of static libraries</a>, 
which boils down to:</p>

<div class="language-bash highlighter-rouge"><div class="highlight"><pre class="highlight"><code>ar <span class="nt">-M</span> <span class="o">&lt;&lt;</span><span class="no">EOM</span><span class="sh">
    CREATE libALL.a
    ADDLIB libA.a
    ADDLIB libB.a
    SAVE
    END
</span><span class="no">EOM
</span></code></pre></div></div>

<p>You need to run a script which does this, but wouldn’t it be nice if we had a CMake function which enumerates the 
dependencies and bundles them into one library?</p>

<p>Here it is:</p>
<div class="language-cmake highlighter-rouge"><div class="highlight"><pre class="highlight"><code><span class="nb">function</span><span class="p">(</span>bundle_static_library tgt_name bundled_tgt_name<span class="p">)</span>
  <span class="nb">list</span><span class="p">(</span>APPEND static_libs <span class="si">${</span><span class="nv">tgt_name</span><span class="si">}</span><span class="p">)</span>

  <span class="nb">function</span><span class="p">(</span>_recursively_collect_dependencies input_target<span class="p">)</span>
    <span class="nb">set</span><span class="p">(</span>_input_link_libraries LINK_LIBRARIES<span class="p">)</span>
    <span class="nb">get_target_property</span><span class="p">(</span>_input_type <span class="si">${</span><span class="nv">input_target</span><span class="si">}</span> TYPE<span class="p">)</span>
    <span class="nb">if</span> <span class="p">(</span><span class="si">${</span><span class="nv">_input_type</span><span class="si">}</span> STREQUAL <span class="s2">"INTERFACE_LIBRARY"</span><span class="p">)</span>
      <span class="nb">set</span><span class="p">(</span>_input_link_libraries INTERFACE_LINK_LIBRARIES<span class="p">)</span>
    <span class="nb">endif</span><span class="p">()</span>
    <span class="nb">get_target_property</span><span class="p">(</span>public_dependencies <span class="si">${</span><span class="nv">input_target</span><span class="si">}</span> <span class="si">${</span><span class="nv">_input_link_libraries</span><span class="si">}</span><span class="p">)</span>
    <span class="nb">foreach</span><span class="p">(</span>dependency IN LISTS public_dependencies<span class="p">)</span>
      <span class="nb">if</span><span class="p">(</span>TARGET <span class="si">${</span><span class="nv">dependency</span><span class="si">}</span><span class="p">)</span>
        <span class="nb">get_target_property</span><span class="p">(</span>alias <span class="si">${</span><span class="nv">dependency</span><span class="si">}</span> ALIASED_TARGET<span class="p">)</span>
        <span class="nb">if</span> <span class="p">(</span>TARGET <span class="si">${</span><span class="nv">alias</span><span class="si">}</span><span class="p">)</span>
          <span class="nb">set</span><span class="p">(</span>dependency <span class="si">${</span><span class="nv">alias</span><span class="si">}</span><span class="p">)</span>
        <span class="nb">endif</span><span class="p">()</span>
        <span class="nb">get_target_property</span><span class="p">(</span>_type <span class="si">${</span><span class="nv">dependency</span><span class="si">}</span> TYPE<span class="p">)</span>
        <span class="nb">if</span> <span class="p">(</span><span class="si">${</span><span class="nv">_type</span><span class="si">}</span> STREQUAL <span class="s2">"STATIC_LIBRARY"</span><span class="p">)</span>
          <span class="nb">list</span><span class="p">(</span>APPEND static_libs <span class="si">${</span><span class="nv">dependency</span><span class="si">}</span><span class="p">)</span>
        <span class="nb">endif</span><span class="p">()</span>

        <span class="nb">get_property</span><span class="p">(</span>library_already_added
          GLOBAL PROPERTY _<span class="si">${</span><span class="nv">tgt_name</span><span class="si">}</span>_static_bundle_<span class="si">${</span><span class="nv">dependency</span><span class="si">}</span><span class="p">)</span>
        <span class="nb">if</span> <span class="p">(</span>NOT library_already_added<span class="p">)</span>
          <span class="nb">set_property</span><span class="p">(</span>GLOBAL PROPERTY _<span class="si">${</span><span class="nv">tgt_name</span><span class="si">}</span>_static_bundle_<span class="si">${</span><span class="nv">dependency</span><span class="si">}</span> ON<span class="p">)</span>
          <span class="nf">_recursively_collect_dependencies</span><span class="p">(</span><span class="si">${</span><span class="nv">dependency</span><span class="si">}</span><span class="p">)</span>
        <span class="nb">endif</span><span class="p">()</span>
      <span class="nb">endif</span><span class="p">()</span>
    <span class="nb">endforeach</span><span class="p">()</span>
    <span class="nb">set</span><span class="p">(</span>static_libs <span class="si">${</span><span class="nv">static_libs</span><span class="si">}</span> PARENT_SCOPE<span class="p">)</span>
  <span class="nb">endfunction</span><span class="p">()</span>

  <span class="nf">_recursively_collect_dependencies</span><span class="p">(</span><span class="si">${</span><span class="nv">tgt_name</span><span class="si">}</span><span class="p">)</span>

  <span class="nb">list</span><span class="p">(</span>REMOVE_DUPLICATES static_libs<span class="p">)</span>

  <span class="nb">set</span><span class="p">(</span>bundled_tgt_full_name 
    <span class="si">${</span><span class="nv">CMAKE_BINARY_DIR</span><span class="si">}</span>/<span class="si">${</span><span class="nv">CMAKE_STATIC_LIBRARY_PREFIX</span><span class="si">}${</span><span class="nv">bundled_tgt_name</span><span class="si">}${</span><span class="nv">CMAKE_STATIC_LIBRARY_SUFFIX</span><span class="si">}</span><span class="p">)</span>

  <span class="nb">if</span> <span class="p">(</span>CMAKE_CXX_COMPILER_ID MATCHES <span class="s2">"^(Clang|GNU)$"</span><span class="p">)</span>
    <span class="nb">file</span><span class="p">(</span>WRITE <span class="si">${</span><span class="nv">CMAKE_BINARY_DIR</span><span class="si">}</span>/<span class="si">${</span><span class="nv">bundled_tgt_name</span><span class="si">}</span>.ar.in
      <span class="s2">"CREATE </span><span class="si">${</span><span class="nv">bundled_tgt_full_name</span><span class="si">}</span><span class="se">\n</span><span class="s2">"</span> <span class="p">)</span>
        
    <span class="nb">foreach</span><span class="p">(</span>tgt IN LISTS static_libs<span class="p">)</span>
      <span class="nb">file</span><span class="p">(</span>APPEND <span class="si">${</span><span class="nv">CMAKE_BINARY_DIR</span><span class="si">}</span>/<span class="si">${</span><span class="nv">bundled_tgt_name</span><span class="si">}</span>.ar.in
        <span class="s2">"ADDLIB $&lt;TARGET_FILE:</span><span class="si">${</span><span class="nv">tgt</span><span class="si">}</span><span class="s2">&gt;</span><span class="se">\n</span><span class="s2">"</span><span class="p">)</span>
    <span class="nb">endforeach</span><span class="p">()</span>
    
    <span class="nb">file</span><span class="p">(</span>APPEND <span class="si">${</span><span class="nv">CMAKE_BINARY_DIR</span><span class="si">}</span>/<span class="si">${</span><span class="nv">bundled_tgt_name</span><span class="si">}</span>.ar.in <span class="s2">"SAVE</span><span class="se">\n</span><span class="s2">"</span><span class="p">)</span>
    <span class="nb">file</span><span class="p">(</span>APPEND <span class="si">${</span><span class="nv">CMAKE_BINARY_DIR</span><span class="si">}</span>/<span class="si">${</span><span class="nv">bundled_tgt_name</span><span class="si">}</span>.ar.in <span class="s2">"END</span><span class="se">\n</span><span class="s2">"</span><span class="p">)</span>

    <span class="nb">file</span><span class="p">(</span>GENERATE
      OUTPUT <span class="si">${</span><span class="nv">CMAKE_BINARY_DIR</span><span class="si">}</span>/<span class="si">${</span><span class="nv">bundled_tgt_name</span><span class="si">}</span>.ar
      INPUT <span class="si">${</span><span class="nv">CMAKE_BINARY_DIR</span><span class="si">}</span>/<span class="si">${</span><span class="nv">bundled_tgt_name</span><span class="si">}</span>.ar.in<span class="p">)</span>

    <span class="nb">set</span><span class="p">(</span>ar_tool <span class="si">${</span><span class="nv">CMAKE_AR</span><span class="si">}</span><span class="p">)</span>
    <span class="nb">if</span> <span class="p">(</span>CMAKE_INTERPROCEDURAL_OPTIMIZATION<span class="p">)</span>
      <span class="nb">set</span><span class="p">(</span>ar_tool <span class="si">${</span><span class="nv">CMAKE_CXX_COMPILER_AR</span><span class="si">}</span><span class="p">)</span>
    <span class="nb">endif</span><span class="p">()</span>

    <span class="nb">add_custom_command</span><span class="p">(</span>
      COMMAND <span class="si">${</span><span class="nv">ar_tool</span><span class="si">}</span> -M &lt; <span class="si">${</span><span class="nv">CMAKE_BINARY_DIR</span><span class="si">}</span>/<span class="si">${</span><span class="nv">bundled_tgt_name</span><span class="si">}</span>.ar
      OUTPUT <span class="si">${</span><span class="nv">bundled_tgt_full_name</span><span class="si">}</span>
      COMMENT <span class="s2">"Bundling </span><span class="si">${</span><span class="nv">bundled_tgt_name</span><span class="si">}</span><span class="s2">"</span>
      VERBATIM<span class="p">)</span>
  <span class="nb">elseif</span><span class="p">(</span>MSVC<span class="p">)</span>
    <span class="nb">find_program</span><span class="p">(</span>lib_tool lib<span class="p">)</span>

    <span class="nb">foreach</span><span class="p">(</span>tgt IN LISTS static_libs<span class="p">)</span>
      <span class="nb">list</span><span class="p">(</span>APPEND static_libs_full_names $&lt;TARGET_FILE:<span class="si">${</span><span class="nv">tgt</span><span class="si">}</span>&gt;<span class="p">)</span>
    <span class="nb">endforeach</span><span class="p">()</span>

    <span class="nb">add_custom_command</span><span class="p">(</span>
      COMMAND <span class="si">${</span><span class="nv">lib_tool</span><span class="si">}</span> /NOLOGO /OUT:<span class="si">${</span><span class="nv">bundled_tgt_full_name</span><span class="si">}</span> <span class="si">${</span><span class="nv">static_libs_full_names</span><span class="si">}</span>
      OUTPUT <span class="si">${</span><span class="nv">bundled_tgt_full_name</span><span class="si">}</span>
      COMMENT <span class="s2">"Bundling </span><span class="si">${</span><span class="nv">bundled_tgt_name</span><span class="si">}</span><span class="s2">"</span>
      VERBATIM<span class="p">)</span>
  <span class="nb">else</span><span class="p">()</span>
    <span class="nb">message</span><span class="p">(</span>FATAL_ERROR <span class="s2">"Unknown bundle scenario!"</span><span class="p">)</span>
  <span class="nb">endif</span><span class="p">()</span>

  <span class="nb">add_custom_target</span><span class="p">(</span>bundling_target ALL DEPENDS <span class="si">${</span><span class="nv">bundled_tgt_full_name</span><span class="si">}</span><span class="p">)</span>
  <span class="nb">add_dependencies</span><span class="p">(</span>bundling_target <span class="si">${</span><span class="nv">tgt_name</span><span class="si">}</span><span class="p">)</span>

  <span class="nb">add_library</span><span class="p">(</span><span class="si">${</span><span class="nv">bundled_tgt_name</span><span class="si">}</span> STATIC IMPORTED<span class="p">)</span>
  <span class="nb">set_target_properties</span><span class="p">(</span><span class="si">${</span><span class="nv">bundled_tgt_name</span><span class="si">}</span> 
    PROPERTIES 
      IMPORTED_LOCATION <span class="si">${</span><span class="nv">bundled_tgt_full_name</span><span class="si">}</span>
      INTERFACE_INCLUDE_DIRECTORIES $&lt;TARGET_PROPERTY:<span class="si">${</span><span class="nv">tgt_name</span><span class="si">}</span>,INTERFACE_INCLUDE_DIRECTORIES&gt;<span class="p">)</span>
  <span class="nb">add_dependencies</span><span class="p">(</span><span class="si">${</span><span class="nv">bundled_tgt_name</span><span class="si">}</span> bundling_target<span class="p">)</span>

<span class="nb">endfunction</span><span class="p">()</span>
</code></pre></div></div>

<p>The usage of this function is as simple as:</p>

<div class="language-cmake highlighter-rouge"><div class="highlight"><pre class="highlight"><code><span class="nb">add_library</span><span class="p">(</span>awesome_lib STATIC ...<span class="p">)</span>;
  
<span class="nf">bundle_static_library</span><span class="p">(</span>awesome_lib awesome_lib_bundled<span class="p">)</span>
</code></pre></div></div>

<p>Another benefit of a static library is that you could provide a build with Interprocedural Optimization / Link Time Optimization (IPO/LTO) 
enabled, and then the client code will generate smaller, faster binaries.</p>

<p>CMake has support for IPO/LTO, see <a href="https://cmake.org/cmake/help/latest/module/CheckIPOSupported.html">CheckIPOSupported</a>, 
and <a href="https://cmake.org/cmake/help/latest/policy/CMP0069.html">CMP0069</a>.</p>]]></content><author><name></name></author><category term="CMake" /><category term="C++" /><summary type="html"><![CDATA[In this article I’m going to talk about building a C++ library with CMake, but it won’t be a CMake tutorial. Let’s say you have a C++ library which depends upon a few open source libraries, which have a CMake project structure, but not necessarily done by the book (which means that they get only get built, and not deployed / installed) Your library will include tests (unit-tests / integration tests), and the deployment can be just packing the headers and the binaries together in a tar.gz file. This is not necessarily by the book, but it will do the job, and it could fit into any build system that the client has. A book that one can use to do CMake right is Profesional CMake. Awesome CMake also has a great list of resources regarding CMake. Coming back to the C++ library, which decisions do we take to build it? Shared library, static library, both?]]></summary></entry><entry><title type="html">Speeding up libclang on Windows</title><link href="https://cristianadam.eu/20190318/speeding-up-libclang-on-windows/" rel="alternate" type="text/html" title="Speeding up libclang on Windows" /><published>2019-03-18T21:39:30+01:00</published><updated>2019-03-18T21:39:30+01:00</updated><id>https://cristianadam.eu/20190318/speeding-up-libclang-on-windows</id><content type="html" xml:base="https://cristianadam.eu/20190318/speeding-up-libclang-on-windows/"><![CDATA[<p><img src="/assets/images/speeding-up-libclang-2019/clang_speedup.png" class="noborder" /></p>

<p>In this article I am revisting an article from three years ago: <a href="https://cristianadam.eu/20160104/speeding-up-libclang-on-windows/">“Speeding up libclang on Windows”</a>,
in which I was having a look at how the experimental Clang Code Model was handling a particular source code file.</p>

<p>With the help of Profile Guided Optimization I was able to go down from <strong>10 seconds</strong> to <strong>6 seconds</strong>.</p>

<p>In the meantime the Clang Code Model has been <a href="https://blog.qt.io/blog/2018/06/05/qt-creators-clang-code-model/">enabled by default</a> in Qt Creator 4.7.</p>

<p>Three years ago I tested Qt Creator 3.6.0, Qt 5.5.1, LLVM/Clang 3.6.2, MinGW GCC 5.3.0, Visual C++ 2013/5.
I tested on a Lenovo W510 Thinkpad with an “Intel(R) Core (TM) i7 CPU M 620 @ 2.67 GHz” CPU.</p>

<p>Now I am going to test Qt Creator 4.8.2, Qt 5.12.2, LLVM/Clang 7.0.1, MinGW GCC 7.3.0, and Visual C++ 2017.
I upgraded my laptop to a Lenovo A485 Thinkpad with an “AMD Ryzen 7 Pro 2700U w/ Radeon Vega Mobile Gfx 2.20 GHz” CPU.</p>

<p>How many seconds would it take libclang to parse the file? TL;DR? <strong>3 seconds!</strong></p>

<!--more-->

<h2 id="setting-up-the-development-environment">Setting up the development environment</h2>

<p>Since my A485 Thinkpad was brand new I had to set up my development environment.</p>

<p>I installed <a href="https://visualstudio.microsoft.com/vs/community/">Visual Studio 2017 Community Edition</a>, for the Visual C++ 2017 compilers.</p>

<p>Then I went to get the Qt 5.12.2 builds, and to my surprise, instead of various compiler builds of Qt, there was <strong>only one</strong>: <a href="https://download.qt.io/official_releases/qt/5.12/5.12.2/qt-opensource-windows-x86-5.12.2.exe">qt-opensource-windows-x86-5.12.2.exe 3.7GiB</a>.</p>

<p>The above package has the Qt 5.12.2 Visual C++ 2017 32 and 64bit, MinGW GCC 7.3.0 32 and 64bit Qt and compiler / debuggers.</p>

<p>This is not something new, the <a href="https://download.qt.io/official_releases/qt/">download.qt.io/official_releases/qt</a> has this one executable bundle since Qt 5.9.0.</p>

<p>It was nice not to hunt for MinGW GCC builds. This package comes with <strong>everything</strong>. Well, almost everything. One needs to get the <code class="language-plaintext highlighter-rouge">cdb.exe</code> debuggers to be able to debug 
Visual C++ projects in Qt Creator.</p>

<p>Because I had installed Visual Studio 2017 community, I only had to go to Control Panel to “Programs and Features” and “Change” the 
“Windows Software Development Kit - Windows 10.0.17763.132” and select the “Debugging Tools for Windows”.</p>

<p><img src="/assets/images/speeding-up-libclang-2019/debugging-tools-for-windows.png" class="noborder" /></p>

<p>It is very nice to have Qt with batteries included (MinGW GCC compiler, GDB Debugger, and Qt libraries)!</p>

<h2 id="building-libclang">Building libclang</h2>

<p>Now to see how the Ryzen CPU performs at compiling a project like LLVM/Clang.</p>

<p>I downloaded LLVM and clang source packages, unpacked them like this (using Git Bash):</p>

<div class="language-plaintext highlighter-rouge"><div class="highlight"><pre class="highlight"><code>$ tar xf llvm-7.0.1.src.tar.xz
$ tar xf cfe-7.0.1.src.tar.xz
$ mv cfe-7.0.1.src llvm-7.0.1.src/tools/clang
</code></pre></div></div>

<p>And run the following CMake cmd script (from the appropriate cmd shell):</p>

<div class="language-plaintext highlighter-rouge"><div class="highlight"><pre class="highlight"><code>cmake ^
  -B llvm-7.0.1.build ^
  -S llvm-7.0.1.src ^
  -G "Ninja" ^
  -DCMAKE_BUILD_TYPE=Release ^
  -DCMAKE_INSTALL_PREFIX=c:\llvm ^
  -DLLVM_TARGETS_TO_BUILD=X86

cmake -E time ^
  cmake --build llvm-7.0.1.build --target libclang

cmake -E time ^
  cmake --build llvm-7.0.1.build --target install 
</code></pre></div></div>

<p>To my surprise it took:</p>

<ul>
  <li>Visual C++ 2017 64 bit: <strong>43m:36s</strong> for the libclang target, and <strong>22m:27s</strong> for install</li>
  <li>MinGW 7.3.0 64 bit: <strong>52m:43s</strong> for the libclang target, and <strong>22m:02s</strong> for install</li>
</ul>

<p>Three years ago on my old laptop it took like <strong>20m</strong> to build the libclang target.</p>

<p>I guess the Clang code base got bigger, and the C++ compilers got complexer. But then again I have more, and faster CPU cores on this laptop than the old one. Hmmm.</p>

<h2 id="libclang-compilation-with-gcc">libclang compilation with GCC</h2>

<p>While compiling I noticed in “Task Manager” that the CPU speed was fluctuating, even though I selected “High Performance Mode” in Lenovo’s tools.</p>

<p>I though I should visit the BIOS settings, where I disabled the “AMD PowerNow!” feature in Bios.</p>

<p>Now the MinGW 7.3.0 64bit results are:  <strong>51m:13s</strong> for the libclang target, and <strong>20m:00s</strong> for the install target.
The results are only a bit better. I also had the Real-time Windows Defender protection, and the search indexing for the C: drive disabled.</p>

<p>Since I have a dual boot system (two encrypted SSDs), I tried the same setup on my KDE Neon (Ubuntu 18.04 LTS based) Linux.</p>

<p>The GCC 7.3.0 build results were: <strong>27m:22s</strong> for the libclang target, and <strong>10m:33s</strong>.</p>

<p>I knew that GCC is optimized on Linux, but almost twice as fast?!</p>

<h2 id="amd-power-slider">AMD Power Slider</h2>

<p>While compiling on Windows I noticed that the “Task Manager” was showing the CPU usage not as 100%. On Linux there the “Task Manager” was showing 100%.</p>

<p>So I had closer look at Windows power options in Control Panel, and found the “AMD Power Slider”, which I set for “Best performance” while plugged in.</p>

<p><img src="/assets/images/speeding-up-libclang-2019/amd-power-slider.png" class="noborder" /></p>

<p>How does the “Best performance” look like?</p>

<ul>
  <li>Visual C++ 2017 64 bit: <strong>34m:30s</strong> for the libclang target, and <strong>14m:02s</strong> for install</li>
  <li>MinGW 7.3.0 64 bit: <strong>34m:03s</strong> for the libclang target, and <strong>13m:52s</strong> for install</li>
</ul>

<p>The result are waaaaaay better. Both compilers seem to have similar performance, but less than what I got on Linux.</p>

<h2 id="ram-drive">RAM Drive</h2>

<p>I had (crazy) idea, how about a RAM Drive? I took the <a href="https://sourceforge.net/projects/imdisk-toolkit/">ImDisk Toolkit</a>, created a 512MB drive, then run a benchmark:</p>

<p><img src="/assets/images/speeding-up-libclang-2019/ramdrive.png" class="noborder" /></p>

<p>The RAM Drive is a few times faster than my SSD Drive!</p>

<p>I copied the whole mingw730_64 (450MiB) folder to R: and ran the compilation. The results were: <strong>32m:42s</strong> for libclang target, and <strong>12m:35s</strong> for the install target.</p>

<p>The results are not what one would expect, which shows that Windows is caching the read files. Well, duh!</p>

<h2 id="setting-up-lyx">Setting up Lyx</h2>

<p>I took Lyx from git, and I had to download the <a href="http://ftp.lyx.de/LyXWinInstaller/lyx-windows-deps-msvc2015.zip">lyx-windows-deps-msvc2015.zip</a> manually,
since the Lyx’s CMake machinery doesn’t work out of the box. I also had to comment the <code class="language-plaintext highlighter-rouge">include("${TOP_CMAKE_PATH}/LyxPackaging.cmake")</code> line, which assumed different things on MinGW.</p>

<p>I used this script to configure the project and then import it in Qt Creator.</p>

<div class="language-plaintext highlighter-rouge"><div class="highlight"><pre class="highlight"><code>::set kit=mingw73_64
set kit=msvc2017_64

cmake ^
  -B build-%kit% ^
  -S lyx ^
  -GNinja ^
  -DCMAKE_BUILD_TYPE=Debug ^
  -DGNUWIN32_DIR=lyx-windows-deps-msvc2015 ^
  -DCMAKE_PREFIX_PATH=c:\Qt\Qt5.12.2\5.12.2\%kit%\lib\cmake	
</code></pre></div></div>

<p>I configured two builds, one with Visual C++ and one with MinGW “kits”, then imported the builds in Qt Creator.</p>

<h2 id="clang-parsing-of-text3cpp">Clang parsing of Text3.cpp</h2>

<p>Then I went to set the <code class="language-plaintext highlighter-rouge">QT_LOGGING_RULES=qtc.clangbackend.timers=true</code> environment variable, which should make Qt Creator to display logging 
information in the <a href="https://docs.microsoft.com/en-us/sysinternals/downloads/debugview">DebugView</a> tool.</p>

<p>Nothing was displayed in DebugView. It took me a while to find out why <span class="emoji">😄</span></p>

<p>Qt Logging stops sending messages to the platform’s preferred logging mechanism if you have message handler installed.</p>

<p>This patch fixed it:</p>

<div class="language-diff highlighter-rouge"><div class="highlight"><pre class="highlight"><code><span class="gh">diff --git a/src/tools/clangbackend/clangbackendmain.cpp b/src/tools/clangbackend/clangbackendmain.cpp
index 5cbac3ce60..2e6badeac7 100644
</span><span class="gd">--- a/src/tools/clangbackend/clangbackendmain.cpp
</span><span class="gi">+++ b/src/tools/clangbackend/clangbackendmain.cpp
</span><span class="p">@@ -57,8 +57,11 @@</span> QString processArguments(QCoreApplication &amp;application)
 }
<span class="err">
</span> #ifdef Q_OS_WIN
<span class="gi">+#include &lt;Windows.h&gt;
</span> static void messageOutput(QtMsgType type, const QMessageLogContext &amp;, const QString &amp;msg)
 {
<span class="gi">+    OutputDebugStringW(msg.toStdWString().c_str());
+
</span>     std::wcout &lt;&lt; msg.toStdWString() &lt;&lt; std::endl;
     if (type == QtFatalMsg)
         abort();
</code></pre></div></div>

<p>Now I was able to see these lines in DebugView.</p>

<div class="language-plaintext highlighter-rouge"><div class="highlight"><pre class="highlight"><code>[10504] UpdateAnnotationsJobRunner needed 3732 ms
[10504] UpdateExtraAnnotationsJobRunner needed 519 ms
</code></pre></div></div>

<h2 id="profile-guided-optimization">Profile Guided Optimization</h2>

<p>In order to do a profile guided optimzation one has to change the compiler flags.</p>

<p>For the instrumentation part I used a toolchain file, and added it to the CMake call:</p>

<div class="language-plaintext highlighter-rouge"><div class="highlight"><pre class="highlight"><code>-DCMAKE_TOOLCHAIN_FILE=%cd%\toolchains\msvc.pgo.instrument.cmake
</code></pre></div></div>

<p>For Visual C++ the toolchain looks like this:</p>

<div class="language-cmake highlighter-rouge"><div class="highlight"><pre class="highlight"><code><span class="nb">set</span><span class="p">(</span>CMAKE_CXX_FLAGS_RELEASE_INIT <span class="s2">"/GL"</span><span class="p">)</span>
<span class="nb">set</span><span class="p">(</span>CMAKE_SHARED_LINKER_FLAGS_INIT <span class="s2">"/LTCG:PGINSTRUMENT"</span><span class="p">)</span>
</code></pre></div></div>

<p>For MinGW the toolchain looks very similar:</p>

<div class="language-cmake highlighter-rouge"><div class="highlight"><pre class="highlight"><code><span class="nb">set</span><span class="p">(</span>CMAKE_CXX_FLAGS_RELEASE_INIT <span class="s2">"-fprofile-generate"</span><span class="p">)</span>
<span class="nb">set</span><span class="p">(</span>CMAKE_SHARED_LINKER_FLAGS_INIT <span class="s2">"-fprofile-generate"</span><span class="p">)</span>
</code></pre></div></div>

<p>For the optimization part, I failed to come up with a toolchain file, due to the fact that I 
need to reuse an already configured CMake project, and my attempts to have a clean solution failed.</p>

<p>Then I manually replaced in <code class="language-plaintext highlighter-rouge">build.ninja</code>:</p>

<ul>
  <li>For Visual C++: <code class="language-plaintext highlighter-rouge">/LTCG:PGINSTRUMENT</code> with <code class="language-plaintext highlighter-rouge">/LTCG:PGOPTIMIZE</code></li>
  <li>For MinGW: <code class="language-plaintext highlighter-rouge">-fprofile-generate</code> with <code class="language-plaintext highlighter-rouge">-fprofile-use -Wno-error=coverage-mismatch</code></li>
</ul>

<p>Visual C++ 2017 PGO instrumentation resulted in a whooping build directory size of <strong>27.8GiB</strong>, 
from <strong>1.58GiB</strong> which was the size of the regular build.</p>

<p>Also the instrumented binary is like an order of magnitude slower (~60seconds), while the MinGW counterpart was not that bad (~9seconds).
I’m approximating because I haven’t saved the instrumentation DebugView results.</p>

<h2 id="clang-build-of-libclang">Clang build of libclang</h2>

<p>I also gave Clang 7.0.1 64 bit build a try. My build script changed a bit:</p>

<div class="language-plaintext highlighter-rouge"><div class="highlight"><pre class="highlight"><code>set PATH=c:\Program Files\LLVM\bin\;%PATH%
set INCLUDE=c:\Program Files\LLVM\lib\clang\7.0.1\include;%INCLUDE%
set CC=clang-cl
set CXX=clang-cl

cmake ^
  -B llvm-7.0.1.build ^
  -S llvm-7.0.1.src ^
  -G "Ninja" ^
  -DCMAKE_BUILD_TYPE=Release ^
  -DCMAKE_INSTALL_PREFIX=c:\llvm ^
  -DLLVM_TARGETS_TO_BUILD=X86

cmake -E time ^
  cmake --build llvm-7.0.1.build --target libclang

cmake -E time ^
  cmake --build llvm-7.0.1.build --target install 
</code></pre></div></div>

<p>The build times were: <strong>44m:04s</strong> for libclang target, and <strong>16m:36s</strong> for the install target.</p>

<p>“AMD Power Slider” was still at best performance, but I enabled back “AMD PowerNow!”. Hmm.</p>

<p>Clang also has PGO support. The CMake instrumentation toolchain looked like this:</p>

<div class="language-cmake highlighter-rouge"><div class="highlight"><pre class="highlight"><code><span class="nb">set</span><span class="p">(</span>CMAKE_CXX_FLAGS_RELEASE_INIT <span class="s2">"-fprofile-instr-generate=c:/llvm/clang.pgo"</span><span class="p">)</span>
<span class="nb">set</span><span class="p">(</span>CMAKE_SHARED_LINKER_FLAGS_INIT <span class="s2">"-fprofile-instr-generate=c:/llvm/clang.pgo"</span><span class="p">)</span>
</code></pre></div></div>

<p>Unfortunately the instrumentation build failed, with lots of errors like:</p>

<div class="language-plaintext highlighter-rouge"><div class="highlight"><pre class="highlight"><code>AsmWriterInst.cpp.obj : error LNK2001: unresolved external symbol __llvm_profile_register_names_function
Attributes.cpp.obj : error LNK2001: unresolved external symbol __llvm_profile_register_names_function
</code></pre></div></div>

<p>As it turns out, CMake cannot use <code class="language-plaintext highlighter-rouge">clang.exe</code> and <code class="language-plaintext highlighter-rouge">clang++.exe</code> from the official LLVM/Clang windows distribution
with a MinGW compiler, as explained in the <a href="https://gitlab.kitware.com/cmake/cmake/issues/18880">#18880 CMake issue</a>:</p>

<p><img src="/assets/images/speeding-up-libclang-2019/clang-windows.png" class="noborder" /></p>

<p>I also tried my MinGW 64 Clang build as a Clang C++ compiler. Unfortunately CMake didn’t like it either. Different error.</p>

<p>Clang produced slightly bigger binaries than Visual C++, slightly faster than a normal Visual C++ build, but slower than
a Visual C++ PGO build. Will the Clang PGO build beat the Visual C++ PGO build? I will give it a go some day, but not today <span class="emoji">😄</span></p>

<h2 id="results-results-results">Results, Results, Results</h2>

<p>The results from below are the median values of ten <code class="language-plaintext highlighter-rouge">Text3.cpp</code> file open, then wait for parsing.</p>

<p>I included also a run of my MinGW64 PGO build with the <code class="language-plaintext highlighter-rouge">%temp%</code> folders in the RAM Drive.</p>

<table>
  <thead>
    <tr>
      <th><strong>Compiler</strong></th>
      <th><strong>Time to compile</strong></th>
      <th><strong>Binary size</strong></th>
      <th><strong>Visual C++ kit</strong></th>
      <th><strong>MinGW kit</strong></th>
    </tr>
  </thead>
  <tbody>
    <tr>
      <td>Qt Creator <br />clang official 64</td>
      <td>-</td>
      <td>89.2 MiB</td>
      <td><strong>4227.7 ms</strong></td>
      <td>3358.8 ms</td>
    </tr>
    <tr>
      <td>Visual C++ 2017 64</td>
      <td>34m:30s</td>
      <td>27.1 MiB</td>
      <td>5417.7 ms</td>
      <td>4373.5 ms</td>
    </tr>
    <tr>
      <td>Visual C++ 2017 64 PGO</td>
      <td>47m:15s+</td>
      <td><strong>21.6 MiB</strong></td>
      <td>4573.4 ms</td>
      <td>3816.7 ms</td>
    </tr>
    <tr>
      <td>Clang 7.1.0 64</td>
      <td>44m:04s</td>
      <td>31.3 MiB</td>
      <td>5181.1 ms</td>
      <td>4213.4 ms</td>
    </tr>
    <tr>
      <td>MinGW 7.3.0 64</td>
      <td><strong>32m:42s</strong></td>
      <td>53.4 MiB</td>
      <td>4652.3 ms</td>
      <td>4191.8 ms</td>
    </tr>
    <tr>
      <td>MinGW 7.3.0 64 PGO</td>
      <td>1h:48m:46s+</td>
      <td>46.9 MiB</td>
      <td>4317.5 ms</td>
      <td>3467.9 ms</td>
    </tr>
    <tr>
      <td>MinGW 7.3.0 64<br /> PGO RAM Drive</td>
      <td>1h:48m:46s+</td>
      <td>46.9 MiB</td>
      <td>4252.1 ms</td>
      <td><strong>3123.0</strong> ms</td>
    </tr>
  </tbody>
</table>

<p>Compared with the results from three years ago, the compile times have increased, the binary files have increased, 
but running times have decreased! I assume mostly due to faster hardware.</p>

<p>Did I mention that Qt Creator is shipping a PGO optimized version of libclang.dll on Windows? <span class="emoji">🤘</span></p>

<h2 id="hardware">Hardware</h2>

<p>I bought my Lenovo A485 at the end of 2018, got a nice price offer. I tried the Lenovo A485 configurator again, this time with 32GB of RAM.</p>

<p>I have 16GB (2x8GB), thus I can’t actually use a bigger RAM Drive and  put the 
whole Visual C++ and Microsoft Windows SDKs there. ImDisk Toolkit lets you to preload a disk image!</p>

<p>The following Lenovo A485 Thinkpad:</p>

<ul>
  <li>CPU: AMD Ryzen 7 PRO 2700U (2MB Cache, up to 3.8 GHz)</li>
  <li>OS: Windows 10 Pro 64</li>
  <li>Screen: 35.6cm (14.0”) FHD (1920x1080), IPS, without Touch</li>
  <li>Internal Battery: 3 cells Lithium-Ion 24Wh</li>
  <li>Back battery: 6 cells Lithium-Ion 72Wh</li>
  <li>Power supply: 65 Watt</li>
  <li>Wifi: Realtek RTL8822BE 802.11ac WLAN with Bluetooth</li>
  <li>RAM: 32 GB(2x 16GB) DDR4 2.400 MHz SODIM</li>
  <li>Graphics: AMD Radeon Vega</li>
  <li>Camera: 720p-HD with ThinkShutter</li>
  <li>HDD: 512 GB SSD, M.2 2280, PCIe, OPLAL 2.0</li>
</ul>

<p>Costs (in Germany) <strong>2010,06€</strong>, but with a price deduction of <strong>361,81€</strong> ends up to cost <strong>1648,25€</strong>.</p>

<p>I bought a second 512GB SSD for 130€ (which <a href="https://geizhals.de/western-digital-pc-sn520-nvme-ssd-512gb-sdapmuw-512g-a1797631.html">now</a> costs 86€!), following the advice from this Reddit <a href="https://www.reddit.com/r/thinkpad/comments/a6q9my/a485_fully_upgraded_with_aftermarket_parts/">A485 fully upgraded with aftermarket parts</a> thread.</p>

<p>Am I doing this right, Lenovo? <span class="emoji">😄</span></p>]]></content><author><name></name></author><category term="QtCreator" /><category term="C++" /><category term="clang" /><category term="Windows" /><summary type="html"><![CDATA[In this article I am revisting an article from three years ago: “Speeding up libclang on Windows”, in which I was having a look at how the experimental Clang Code Model was handling a particular source code file. With the help of Profile Guided Optimization I was able to go down from 10 seconds to 6 seconds. In the meantime the Clang Code Model has been enabled by default in Qt Creator 4.7. Three years ago I tested Qt Creator 3.6.0, Qt 5.5.1, LLVM/Clang 3.6.2, MinGW GCC 5.3.0, Visual C++ 2013/5. I tested on a Lenovo W510 Thinkpad with an “Intel(R) Core (TM) i7 CPU M 620 @ 2.67 GHz” CPU. Now I am going to test Qt Creator 4.8.2, Qt 5.12.2, LLVM/Clang 7.0.1, MinGW GCC 7.3.0, and Visual C++ 2017. I upgraded my laptop to a Lenovo A485 Thinkpad with an “AMD Ryzen 7 Pro 2700U w/ Radeon Vega Mobile Gfx 2.20 GHz” CPU. How many seconds would it take libclang to parse the file? TL;DR? 3 seconds!]]></summary></entry></feed>